Sketch Sunday 62

I’m deliberately late posting this, because it really needed to come after the silk dyeing and scarf tying posts. I was inspired by the brochures to sketch my favourite way to wear a scarf – The Noose. There was also a variation of it in one of the brochures which involved twisting the scarf rather like making a skein, so I called it The Skein.

Back in the 90s

In among my silk painting supplies I found these little instruction pamphlets on how to tie scarves and wraps:

Oh, the hair! The hats!

The poses! The stylin’!

It reminded me how scarves and wraps were so trendy at the time. Not knitted scarves, however. Knitting was so 80s. I don’t remember seeing all these ways of tying scarves being popular, however. Most people I knew tied them once, loosely at the throat, then tucked the ends into the front of their jacket or coat. My favourite method is to fold the scarf in half, wrap around the neck then tuck the ends through the loop. It had the advantage that it the wind couldn’t blow it off. I don’t remember if it was called anything fancy. I call it The Noose.

What I do miss about silk scarves is that they are so light but so warm. You can stuff one into a coat pocket or a handbag and it doesn’t take up much room. Then if you needed a scarf you could whip it out, wrapping it twice if it was particularly cold. Loosely wrapped too, because the air trapped in the folds will quickly warm up from your body heat.

The 90s are supposed to be ‘back’ and hand made fabric scarves seemed as popular as knitted ones last winter. Perhaps this year I’ll bring my collection of hand painted silk scarves out of hiding.

Silk Dyeing Weekend

On Saturday my friend Margaret hosted another Quilting Day. Well, I think of them as Craft Days since I don’t quilt and a whole range of craftiness takes place at them – and sometimes a lot more conversation and laughs than crafting.

It occurred to me that this might be a good opportunity to work at one of my Projects for 2011 – using up and getting rid of all my silk painting things. So I put out an email seeing if anyone coming along would like to have a go at dyeing a silk scarf, with the lure of taking it home at the end of the day. I had plenty of takers and had lots of fun showing them my quick and dirty way of dyeing silk scarves.

(In my opinion, there are three aspects of silk painting that are too time consuming, expensive or hard to do at home. Firstly there’s the stretchers. I made my own because I couldn’t afford to buy one. Mine held two edges of the cloth in a way that didn’t let you paint them, which didn’t matter at the time because pre-hemmed scarves weren’t on the market yet, but once they were my stretcher was redundant. Secondly, the setting of the dye relied on someone nearby running a steaming service, or doing it at home. Doing it at home always resulted in water getting in, dyes running and crease marks. Thirdly, the hemming took FOREVER. You could carefully pull out threads on the edges of square scarves to make a ‘fringe’, but this took just as long because the silk is so fine, fragile and sticks to itself like spider web.

My method eliminated the first two annoyances. Forget stretchers – I scrunch up the fabric and dab it into dishes of dyes until I’m satisfied with the coverage. The colour combines in a lovely mottled way. Then I leave them to dry scrunched up, and with certain dyes this intensifies the colour on the outside folds because they dry faster. Then I steam them all scrunched up, wrapped loosely in paper towel and tied with string like little dumplings, and then protected from condensation drips within the pressure cooker within a ‘cup’ of aluminium foil, and the flaws created by water getting in and crease marks become part of the textural beauty of the dye.)

By the end of the day all of my pre-hemmed scarves and two ties were dyed, steamed and in the possession of happy crafters. That left one pre-fringed scarf and various scraps of silk. So on Sunday I got to work on my own, dyeing and experimenting all morning and then tending the pressure cooker all afternoon.

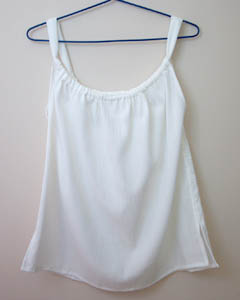
I took most of the finished fabric and some of the scarves I’d done the day before to a dinner with interstate and local friends, and found homes for three pieces. That left me with this lot to photograph today:

Experimenting produced some interesting results. The first two of these scraps were left to dry pleated in two different directions, and the third I tried dotting with gutta first to see if I’d get white spots: (I didn’t, because the gutta is water based and just dissolved.)

This one I hung by the middle as it dried, and then steamed it coiled up, which gave it a tie-dye look:

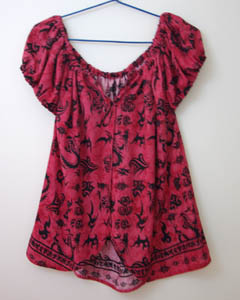
This one was the last I dyed. I tried adding silver and gold gutta to black dye. It didn’t dissolve, but fragmented enough that I got flecks of metallic paint all over the scarf, which I love:

Knowing that I’d run out of silk before I ran out of dye, I also tried dyeing silk yarn. I bought these two skeins at Morris & Sons in Sydney. They were not cheap, so I was rather dismayed to find that, outside the dimly-lit shop, what had been an intense purple was actually a bit paler than I’d thought and getting dangerously close to pink:

I dripped navy dye all over them and popped them in the pressure cooker, and to my relief the dye took:

Which made me very happy, because I have been struggling to think of what to do with this yarn for two years and the only thing stopping me from gifting it to the op shop was that it had cost me $70 for these two small skeins.

I’m also feeling pretty pleased with myself because what had filled this tub:

Now fits into this small shoe box:

Which, along with the pressure cooker, will go in with my yarn/fabric dyes. All the paint brushes, plastic lids and dishes for mixing dye, pipettes for gutta and drop sheets are now stowed with my art stuff.

Which means I can make my first tick against one of my Projects of 2011. Yippee!

Second Rag Rug

On Sunday we were going to go to Brickvention, but reports of 2 hour plus queues and crowds inside changed our minds. I’d managed to finish warping the loom for another rag rug in the morning, and found myself with a whole empty afternoon in which to weave and weave and weave.

Once again, I used jersey/knit strips this time in green, red, blue, lilac, grey and black.

I’d planned to make two small rugs, but couldn’t be bothered working out how to tell where the halfway point was in the warp, since I’d forgotten to mark it on any of the threads, so I just wove until I ran out of weft to make a long floor rug.

The fabric strips were all used up half a metre shy of the end of the warp. I considered just cutting off the rug and seeing if I could find a use for the ends another time, but decided to dig around in my rag rug fabric stash and see if anything caught my eye. I found a ball of black fabric strips from a pair of men’s pants. It was one of the first things I’d tried chopping up and I’d simply cut around and around the legs, which meant there were chunky seams every 40-50cm or so that formed clumps in the woven fabric. I learned from this to cut around seams, especially with thicker fabric.

So I used it up on the leftover warp.

It made a small, tough, not-ugly-but-not-pretty mat. I’m thinking of using it as a door mat on the inside of the garage doorway. The rough texture will be good for wiping shoes clean on, and I can chuck it in the washing machine when it gets filthy.

The Knitting Post

Still haven’t touched Summer Solstice. I blame the humidity. It puts you off handling larger projects. And wool. Instead I’ve been getting a bit more sock knitting done. One sock and one toe done. I love this yarn:

Once I worked out that I really didn’t want to be tackling big projects, I turned to my not-insubstantial queue of small ones and started this:

Which quickly became this:

The pattern is Bamboozled and the yarn is a test ball of Crystal Palace Cotton Twirl I bought a while back in the hopes it would be a good yarn for knitting Tubey. So far I’m thinking that it might be. The yarn is nice and springy and doesn’t feel at all ropey. It comes in a proper black black as well as a range of jewel hues.

Ah, Tubey. I see the pattern is dated 2005. I knew I’d been searching for a good stretchy yarn that isn’t wool for this one for a long time, but I hadn’t realised it was THAT long. Still, if I still want to knit it after all this time I must really like it.

Trying Something New

Yarn magazine mainly because it contained a tutorial for making baskets out of scraps of yarn and raffia. I reckon these baskets are made with the same method. I decided to give it a go, using loom ends and some thick acrylic yarn my Mum used to make a hooked rug out of in the 70s.

I didn’t like the method. The main pro was that I could use up loom ends, the main con was that the constant joining in of a new bit of yarn and the sewing was time consuming. I kept thinking that I could probably do this using crochet, with one continuous strand. Then yesterday I saw a book reviewed over at Craft Leftovers that looked like it might be about that sort of thing. As I always do, I ignored the link to Amazon and went looking for it on Fishpond.

It is there, though with a much less appealing cover. I spotted something called Google Preview and discovered that it shows you the first quarter of the book. Unfortunately for the publisher and author, that first quarter contains all of the technical instructions. I only wanted to confirm that the method was the sort of think I was thinking of. Now I don’t need to buy the book at all.

Hmm.

Anyway, I looked at my macrame supplies and there were two thicker kinds of rope that would work well, in natural and black. What to crochet them together with? I grabbed some linen thread from my bookbinding supplies. It was originally purchased for weaving, then turned out to be great bookbinding thread, and now it’s being used for crochet basketry:

I’m really pleased with the result. It’s faster than the sewing method and I like the look and feel of the ‘fabric’ it’s making, which is flexible enough to mould into shape and stiff enough to hold it. I’m not sure what I’ll make this into. A bowl? A matching pair of waste paper baskets for the bedroom? A trivet for the dining table? I can see potential for plenty of projects: table runners and place mats, lidded boxes, carry bags…

And there is so much potential for using other materials. I’m thinking it might look interesting to match the black rope with the leftovers from the Peri Peri Floor Rug:

I could be even more adventurous, and substitute the rope with strips of paper or card, fabric, wire, or even electrical cord. The crochet thread could be any kind of string-like thread, from yarn to thin wire to audio tape. Most of these things have been tried already, somewhere.

The book went onto my wishlist at Fishpond. Though I don’t need it, it did have some good project ideas in it. If you’re curious, follow both the link to the Fishpond page (and Google Preview) but also the Craft Leftovers review.

Summer Skirt into a Top

These last few days I’ve been transfixed by news of the flooding in Queensland. The internet is both good and bad when disasters happen, making you want to watch – feel like you should be watching as your heart goes out to people affected – but then it starts to feel a bit voyeuristic.

And suddenly posting about crafting seems trivial, but also a welcome distraction. Anyway, here’s a post I prepared earlier. It’s cheap and cheerful. (Rather than, as in a lyric I heard the other day ‘expensive and sad’.)

A couple of months ago, all inspired by refashioning, I popped into a small local op shop to see if there was anything there with potential. I came home with an oversized shirt which I turned into a sleeveless top, and this:

I really liked the fabric – a light cotton with a lovely print:

The skirt was just two rectangles sewn together down the sides with elastic at the waist. I could have simply removed the elastic and taken advantage of there already being slits down either side to make another top like this one. But I don’t like the way bra straps show under that style, so I went for another one like this and this.

That meant removing the elastic, turning the skirt upside down and chopping off some fabric for the sleeves. (The elastic has been removed in this pic, but the material was still crinkled from it.)

Then sewing the sleeves in where the slits were, closing the sleeve seam and the rest of the slit.

And then sew a hem for the elastic around the necklines, and plain hems around the sleeves and waist.

The top turned out to be a bit tight around the hips, so I shortened it. I’m pretty pleased with how it came out, though I think this style works best when there’s more volume of cloth around the body.

And now I have another summery top to wear. Trouble is, what started as a cull of clothing in order to make more space in my wardrobe has led to most of what I culled going back in as new garments. And more going in as I refashion Paul’s old shirts. And then these refashioned op shop clothes.

So I’m trying to put the brakes on the refashioning. I still have a few projects waiting in the wings that I want to do, but I’m telling myself I won’t be adding to that. If I venture into an op shop, I will be averting my eyes from the garment section. (I’m not deluded enough to think I could ever stick to an overall op-shop ban.)

Enough

Here’s my third crocheted sunhat. I like it. I’ve decided I’ll keep this one and the cream one, and give the one with the curled brim to Mum. She likes short, curled brims.

After I finished this, I decided that I’d had enough of crocheting sunhats…

… and it was time to pick up the knitting needles again:

Sketch Sunday 60

A sketch of my paint box. I’ve replaced one of the blues with cerulean blue, because I missed it and the previous light blue just didn’t make the right hue I wanted. I also miss paynes grey for shadows. I’m sure I could mix up decent shadow colours, but the point of on-the-spot sketching is it’s fast, and for that paynes grey works just fine – as well as being a good quick grey in black and white sketches.

I did this sketch to test out the colours I have, and see if there are any obvious choices to swap out. At first I thought it was a toss up between the light green or mid brown, but once I did this sketch I could see that three shades of blue is more than I need.

Trouble is, I have been trying to get a hold of paynes grey, but every time I’ve been near an art store they’ve either been out of stock or closed.