WIP Wipeout

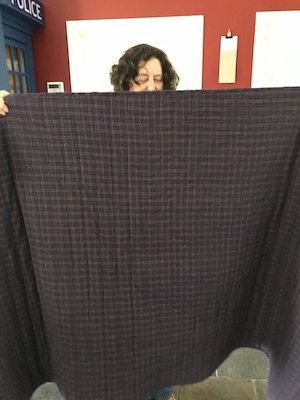
These dishcloths were on the loom for fourteen months. Fourteen.

And now they’re done.

They’re the last of the major WIPs I decided to finish a few months back. While not as old as the Pin Loom Blanket project, they had definitely fallen into a Black Hole of Mehness. They seemed like a good use of the supplemental warp beam – and they were – but I couldn’t help wondering why I was spending so many hours weaving and hemming an object that I can buy for around a dollar each and will toss in a year or so when they get too stained and threadbare.

Eventually I decided I wasn’t allowed to start any new weaving project until they were off the loom. I suspect my dive into air dry clay was partly a subconscious rebellion against that decision. My brain was desperate for excitement. So it was kind of ironic that the gloss went off air dry clay so quickly, and that on the same day I packed away the clay supplies I also finished the last dishcloth.

I was seriously considering just cutting the warp off the loom to get it over with, but decided to finish the last cloth and see how much was left. Turns out, not enough for another cloth. Which means I don’t feel like I gave up on them, or that they defeated me.

But I sure as heck won’t be weaving dishcloths again!

Feat of Clay

For the first few weeks after having Covid I didn’t feel any urge to paint. Instead I either tidied up or organised my art supplies. And then I had two of those dives into a craft I only occasionally dabble in. The first was jewellery-making, which led to ideas for making brooches, which led to me unearthing my small supply of air-dry clay.

Well, it’s been a long time. It turned out that the terracotta version I’d used to make some macrame beads years ago was now too solid and crumbly to use. After consulting the internet, I crumbled it up into a container, added water to soak in overnight, then spent an afternoon pushing it through a sieve then spreading the resulting paste out to dry on the shiny side of the glass slab I use to grind up pigments for ink.

That was going to take a few days, so I opened a pack of white clay and started to play. Even though it had to be over ten years old, it was still in good condition. The first pieces I made were simple flat shapes to paint later, so I could get a feel for how the clay worked. Then I made circles, a square and a heart with an edge, with the intention to make little mosaics.

I haven’t yet made anything from the flat shapes, but I had fun painting the ‘frames’ and filling them with tiles. They have brooch pins glued to the backs.

Having opened a pack of clay, I was worried it would dry out in the years that were likely to pass until I got the inclination again. I hadn’t used up much clay, so I tried making something bigger: a brush holder, which isn’t the most attractive thing I’ve ever knocked together but works.

Then I went even bigger and made a mug-sized candle lamp. Not something I’d normally use, but I thought I might be able to hang earrings on it. The mistake I made was to not let the side panel dry a bit before attaching it to the base. The holes reduced the integrity of the clay, too. The side slumped in on itself and the holes started closing up. Fortunately, the plastic cup I was using for water was exactly the same size as the vessel, so I wrapped it in baking paper and inserted it inside the piece, then turned everything upside down. Now gravity was in my favour, stretching it out again – though I still had to re-cut the holes. The next day the vessel was dry enough to remove the cup. When it was dry I painted it black on the outside and silver inside. The sides are too thick to get earring hooks into, so I guess it’s going to have to be a candle lamp after all.

In the meantime I’d had more brooch ideas, I made a paint tube and paint box…

… and a pair of abstract shapes with round hollows in them. I filled one with glitter and the other with scraps of wire and beads.

I also made some mushrooms and abstract flowers that were painted with some of the terracotta clay paste thinned a bit to make a slip. The stems are florist wire. No idea what I’m going to do with them.

When the terracotta paste had finally dried to the consistency of clay, I gave it a good knead. By then I didn’t have many ideas left to try, so I decided to use it up all in one project. To do this I made a a flat leaf shape and pressed that into a bowl covered in cling wrap. When it had dried enough to hold its shape I took it out of the bow. It took aaaages to dry.

This whole clay adventure took a lot longer than I had expected. Much longer than my enthusiasm lasted, unfortunately. On the day I sanded the white clay items I was really over the whole clay thing, but it got more interesting once I began painting things and glueing in mosaic tiles, glitter and jewellery scraps.

But I’m done. I’ve put the unused flat shapes in among my jewellery making supplies until I know what I want to do with them, and both clay and jewellery-making supplies have been put away. Now, with the craft table cleared, I’m free to dive into the next thing.

SketchBOX November 2023

I got my wish for a more interesting colour scheme with November’s box. In fact, there were lots of colours!

After watching the SketchBox instructional video, I felt the most intriguing part of the box was the circle-making device. But after I viewed a few YouTubers opening the box and testing its contents, my most anticipated art supply shifted to the dot pens. They looked very intriguing.

The box arrived a little earlier than usual. I did my usual swatching and testing. I drew a circle using the device as carefully as I could, then used a cup to trace an accurate circle close to the same size, and the first one was waaay out. Which is a shame, because it is a cool idea. The Faber Castell and Marabu markers bled easily on the paper, but I don’t know if that was the pens’ fault or the paper – and the paper is made by Marabu too so I can only assume their pens are meant to be used with it. I received a small pack of the Marabu markers from The Paletteful Pack I ordered early in the year and didn’t like them much for making art, and I didn’t change my mind on this second try. However, having two thicknesses of nib will make them handier than Sharpies around the house.

The theme for the box was mandalas, and the prompt was ‘intricate”. I figured I’d make lots of circles and try all the markers, similar to what’s in the SketchBox instructional video. After that, I took my favourite items from the box and drew a mandala, using my 40 year old school Math-o-Mat to draw out accurate base pencil line work.

It was fun, but overall just okay as a box. I’m not much of a marker user and the aesthetic was more ‘doodley’ than ‘arty’. But I also figure not every SketchBox is going to contain the sorts of art supplies that suit me. It’s all about trying new things, after all, and in this case the dot pens certainly fulfilled that promise.

Lucy’s Honeycomb

A little white ago a friend asked on FB if anyone wanted a ball of slubby, multicoloured yarn formerly a scarf that had unravelled. I put my hand up for it and offered to weave it into a new scarf. She accepted.

We had a couple of quick consultations, in which I showed her some examples of weaving using slubby yarn, she picked honeycomb weave with a green background as her favourite. I did a lot of math and worked out that I didn’t have enough of the green to make a shawl, but plenty for a wide scarf.

Weaving honeycomb was rather pleasant, and similar to the deflected doubleweave I’ve been weaving in that it pairs smooth wool with a textured yarn, and is fast and engaging to weave.

My calculations were way out, though, since I still had plenty of both the slubby and background yarns left when the scarf was done. I considered making another scarf. Then memories of this friend wearing a beret/tam had me digging out a device I made years ago for weaving tams, and I got to work. The body was woven from the old scarf yarn, then fulled a little. The brim was knit separately out of a natural coloured 8ply yarn then sewn on.

The pom pom was made from the thrums, making this a very frugal project. I still have a ball of the slubby yarn left, but I’m going to offer it to my friend to save in case of moth damage.

When I embarked on the band knitting, I looked up beret patterns to see how many stitches were cast on and realised that berets seem to be in fashion again. It has me eyeing the yarn stash.

SketchBOX October 2023

This box arrived mid-afternoon of the day before I woke up with Covid symptoms. I was tempted to put is aside to open the next day, but decided I didn’t want to wait.

As someone who lives on the other side of the world to the company that creates these boxes, and who doesn’t care much for Halloween, the colour scheme of this box (and the previous one to be honest) have seemed a little ‘meh’. But when I looked around me for a subject to paint that was relevant to who and where I am, my eye was caught straight away by the nasturtiums sprawling through the garden with their bright orange petals, yellow and purple hearts, and green leaves. Perfect!

The acrylic ink was lovely to paint with, and the white ink is impressively opaque. The box came with a fillable pen for mixing up your own colour, so I decided to push it as far as possible and by making a mix that included the white. It worked, and is still working fine two weeks later – I was afraid it would dry up and clog the pen. The paper didn’t buckle and is nice and smooth. The brushes are easy to work with and since I probably wouldn’t have tried a dagger brush if it hadn’t come with the box I’ve learned something I wouldn’t have without the box.

The orange brush pen was both fascinating and a bit disappointing. The filament tip works just like using a paint brush, but – my only criticism – the ink seemed to get duller as it dried.

This is the eight box I’ve received and I’m still enjoying the experience. I’m hoping November will have an interesting colour scheme because I expect December to be predictably Christmassy.

Posted in art

The Pin Loom Blanket

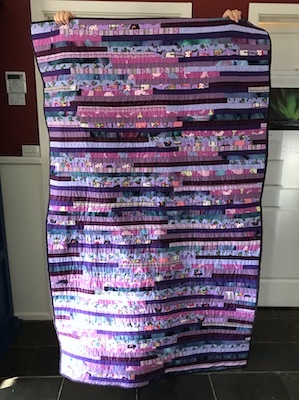
This project has taken me over half a decade. It started as a small weaving thing to do while travelling then, when I had accumulated enough squares to start thinking about what to make out of them, something bigger. Eventually I hit on the idea of a double-thickness blanket of stuffed squares. Since then, however, I decided not to stuff them because the weave isn’t dense enough for the filler not to show through.

After I did the pin loom workshop a few years ago I bought the double size square loom to get a little variety into the blanket and speed up the process, though it didn’t really speed up the process much. It didn’t help that, no matter what size square I wove, if I worked on it too much my back would complain. So progress was made in small bouts of enthusiasm and abandonment.

Early this year I decided it was time to finish it off. Using safety pins, I connected the squares together in an appealing sequence and used a board to carry it all from room to room when I needed the kitchen table for something else. Slowly I wove the remaining squares. Gradually I crocheted around the edges. Doggedly I sewed it all together, then crocheted a border. When I think about the hours I must have spent on it, I’m sure it has to have taken hundreds. I wonder if it was all worth it. If the journey is more important than the destination, then yes, it being an epic trek that I was totally over by the time it was done definitely overshadows the relief of having it done.

Not all wanderers are lost? Yeah, I’d totally lost all will to live by the end of this one. But I survived.

Left Dangling

During the first few days after we returned from Norfolk Island, I had that feeling of inevitably slipping back into the old routine but quietly railing against it. Yet also acknowledging that remaining unsettled would be quite unpleasant, so I ought to embrace the return to normality.

Then we caught Covid 19 for the first time.

Well, that wasn’t fun but we got over it and, more importantly, didn’t pass it on to anyone vulnerable. I didn’t need being stuck at home for ten days to tell me normal life, post Mum’s decline and joining an artist society, involves quite a bit more going out than it did even pre-pandemic. Though I’d had no trouble staying at home during the long lockdowns, by day seven of isolation I was going a bit stir-crazy. A big part of that was not feeling alert enough to do anything mentally challenging. There’s only so much Project Runway I can watch in one sitting, or books I can read, before I get a bit bored.

So when I did regain some energy, I culled my jewellery collection. I’d done a major clothing cull just before Covid hit, and it turns out I was still in that frame of mind a week later. It had been a loooong time since I’d looked at my jewellery, and I hadn’t worn much for a while, mainly because it’s almost all necklaces and I now have what I call ‘old lady spots’ on my neck that get irritated if something rubs against them.

Out went lots of necklaces, most of my rings, a few bracelets and most of my hair clips. Usually when this happens I take some of the old pieces and attempt to make something new. I tried to resist that, but once I’d done a bit of mending and tweaking of things I was keeping I found myself converting some necklaces to bracelets and earrings.

I have very few earrings. I haven’t worn them on a regular basis since my 20s, because my hairstyle hid them. But my new hairdresser keeps cutting my hair quite short and I kinda like it. I even bought two pairs of earrings on Norfolk Island, in a kind of holiday fling with earringness.

As for bracelets, I do rather like wearing them in warmer months when they don’t get caught up in long sleeves. Brooches used to leave me cold, but I’m starting to appreciate the fact that they don’t touch my skin therefore no itchiness. And there are so many modern, stylish pieces out there. They need to go on robust fabric, however, so maybe more suited to cooler months.

So here’s a few photos of what I made:

Bracelet and earrings from old necklace
Earring using beads from old necklaces
Bracelet from old necklace + bracelet combo
Bracelet from old necklace section

Norfolk Island

A few months back, when we were considering where to go for a week’s holiday, one place we looked into was Norfolk Island. While chose Lord Howe Island, the idea of going to Norfolk Island still appealed, but weren’t getting around to arranging a trip. Then one day I did a search for “artist holiday Norfolk Island” and the first link that came up was for a watercolour painting trip in October.

Almost everything was included in the package – I just had pay for one leg of the flights and organise insurance. It was nice not to have to do a lot of research and bookings, and assume that the artist would have vetoed the accommodation. Paul was okay with coming along on a holiday where I’d be painting a lot, since the teacher would know where all the nice views were that he could photograph, and he could take our car and go exploring if he wanted to.

The first day we went out painting, it started to rain. We retired to a function room at the accommodation to finish our paintings from photos. The subject was Bloody Bridge:

Despite the name, that isn’t gore in the creek but a water plant that had died due to lack of water, which seemed ironic considering why we had to abandon the spot.

The second location was St Barnabus’ Mission Chapel. It was a windy day, but less so there than in more open areas like the beach:

That night I did a sketch of one of the whale oil lamps in the chapel. It’s sideways here:

On the righthand page I painted a big, rusty buoy at the front of the accommodation.

The next location was Slaughter Bay. It was sunny but very windy, so we sought shelter within the penal colony walls. Rather than doing a painting on a board, which would catch the wind, I painted in my sketchbook.

However, the wind played a trick on me, flipping over a few pages without me realising before I slipped them open, which meant I was obliged to fill in three spreads before I left Norfolk Island.

We had an afternoon to spend at the agricultural show, which was fun but didn’t take up the rest of the day so I suggested to Paul that we go exploring. We found our way to Anson Bay, where I found a good, sheltered spot to work.

The water is mostly white because it was so rough it was nearly all foam.

That evening we had a BBQ at Emily Bay. I did a really quick sketch of the sun going down. It was very rushed, what with the light changing and the wind so strong it kept pushing my water cup across the park bench I was sitting on.

The next day, the location Belinda picked was… Anson bay. So to do something different, Paul and I walked down the steep track to the beach, and I painted in my sketchbook.

The following day we were back at Slaughter Bay, but this time to paint the rotting boat hulls on the shore.

I was seeing some rather peculiar colours – green shadows and lurid yellow grass anyone? As we headed home I realised I’d had my sunglasses on the whole time. Later, in our room, I over-painted with Ultramarine in the hope of alleviating the crazy green cast.

We had a tour and free afternoon the next day. I must have been sitting right over the back wheels on the bus, so ended up with a protesting back and a headache. After a bit of food and a rest, I felt better and decided I needed a walk to straighten things out. We went to do the walk at 100 Acres Reserve, and near the end stopped at a park bench so I could paint a different sort of scene to beaches and historical subjects.

That meant I’d filled the gap in my sketchbook. I could have stopped there, but I did add another spread later. Before then, we had our last painting session at Cemetery Bay:

My aim, other than having fun, was to get more familiar and confident with watercolours so I could do better sketchbook art, and I feel like those last two pieces show some success. I learned some new things about the medium and ways to apply it, like that some pigments are opaque and how that affects mixing, and that watercolour doesn’t have to be all about trying to get pigment to disperse in puddles of water in a pleasing way.

On the day we headed home we had several hours to fill, so I did these two vehicles from photos on my phone. The purple tractor was at a lavender farm, and the mini utes are everywhere on the island:

Overall it was a great trip, and so nice to hang out with a lovely group of fellow artists. Because I was painting so much, Paul and I didn’t get to see all of the island, so there’s more to experience should we ever go back.

I’m finding these week-long trips a nice length – enough for a change of scene but not being away from home very long. We both agreed that we wouldn’t do a package artist holiday together again, but Paul is fine with waiting while I do a spread in my sketchbook on a holiday we arrange and take together, and I am more confident that I could go on artist holidays on my own.

With that in mind I’ve started doing some research into the next island we want to visit. Already, I can see plenty of potential painting locations, as well as more attractions than I realised were on offer. And I’m tweaking my painting kit to take on Belinda’s advice, and a few changes that might make it lighter to carry and easier to use.

Longer Slinky Ribs

Way back over a decade ago I knit this jumper.

“Slinky Ribs” by Wendy Bernard.

Well, time changes things and not the least body shape. In this case, the length of the jumper just didn’t look or feel right any more. Too short – causing the hemline to sit right at the widest part of my belly. I was tempted to send it off to an op shop, but decided instead to see if my hands could cope with a bit of knitting again. Seems they can, but my neck complains louder so I listened to it and stuck to doing a few rows at a time, knowing I would eventually get it finished.

I didn’t have any more of the yarn, which is discontinued, and the only people on Ravelry who were selling it had colours that wouldn’t suit. Instead, I opted for adding stripes of navy and light blue yarns in my stash. I didn’t have enough of the navy, and Spotlight had sold out of it, but a friend came to the rescue with a spare ball.

The new yarns were slightly thicker, but any change of tension this created would be better hidden with ribbing than plain knitting, so I frogged back to where the ribs started changing to plain knit and started adding ribbed stripes from there.

A few months later I had this:

A ‘new’ jumper. And an itch to knit that I am trying hard to ignore.

Making Watercolours

It’s a year since I did the Ink-Making workshop. Since then I’ve made several more inks – the main session six months after when acorns were in season and I used some of the leftovers from the Print & Paint with Natural Dyes workshop. One thing I had intended to try but hadn’t got around to was making watercolour paint.

A few weeks ago I finally gave it a try. I decided to use two commercial pigments intended for making paint (titanium white and carbon black), one earth pigment I’d sourced myself (yellow ochre), leftover indigo powder from ink-making and two extracts from the printing workshop (weld and madder).

First up I made some watercolour medium based on a recipe by the Dogwood Dyer. All the medium recipes I’d found used powdered gum Arabic, but I wasn’t able to find it for the ink-making course and I still had some stock solution from that workshop so I used that instead.

Then I got to making paint. The first one I tried was titanium white, which worked perfectly. So I was pretty confident starting out with carbon black. It mixed into a thick, dry paste so I added more medium until it was the right consistency. But even then, when I painted a bit onto some card it could be brushed off once it was dry, so I dug it out of the paint pan and added even more medium.

I was a bit nervous trying the ochre, but it worked out ok. The paint is a bit transparent and slightly gritty, so a little disappointing. The indigo was also ok – so intense that it really needs watering down to appear blue.

The weld had solidified in the jar, so I abandoned it. The madder was still ok, but mixed into a dark, oily brown rather than the red I was expecting. I consulted the Dogwood Dyer’s troubleshooting tips and added more gum Arabic to it, which improved the consistency.

Later I painted some dogs to try them out.

Overall, I found it rather uninspiring. I’m not sure if I was just in a bad mood or something, but I came away thinking making watercolours wasn’t fun or worth the effort. Making dyes was more enjoyable. I may try making watercolour paint again, just to see if it was bad beginner’s luck, but for now it’s just a box to tick on my Things To Try list.