Cord on Bleu

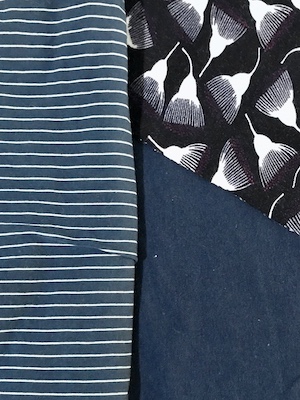
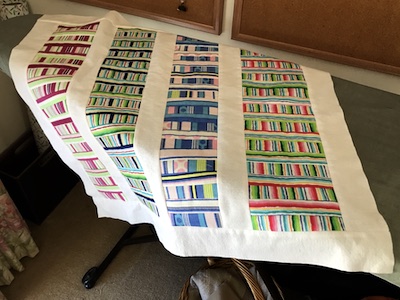
This project began with two remnants of corduroy in my stash. One a navy-based floral pin cord with light blue, white and pink in the pattern, the other a plain burgundy with a quite broad cord texture. I searched online for corduroy colour blocking and up came pics of men’s shirts.

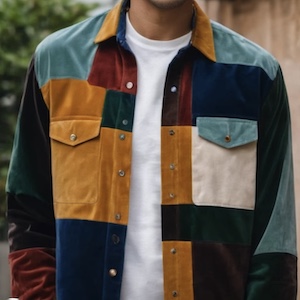
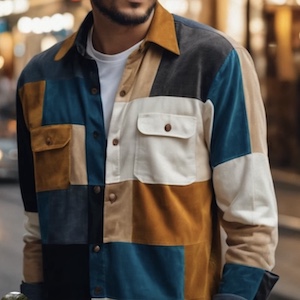
Which I like the look of. The colours and pattern I’m going to use are going to be different, of course. The pattern I’m going to use is one I traced from an old corduroy shirt, but adding pockets and leaving out the waist shaping. The colours are taken from the navy floral fabric: pink, a dusty light blue, a light burgundy, the dark burgundy leftovers from my stash and – because I wanted more than one patterned fabric – a mid-tone aqua-blue with little flowers and mushrooms.

Texture is going to be another factor. The two batches of leftover corduroy are a fine pin cord and an unusually broad cord, so I figured I’d embrace textural difference and have a variety of cord widths. The corduroy I bought to go with them are a mix of medium and fine cord.

I did some sketching…

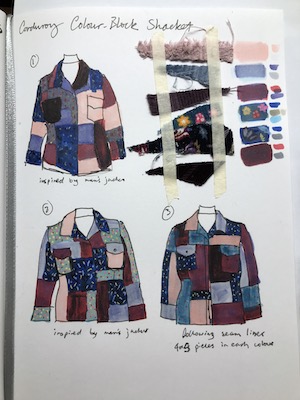
The first two versions were deliberately riffing off the men’s shirts to see what I liked and disliked about the blocking and colour placement. I really didn’t like it having one dark and one light breast pocket – that’s going to matter more on a woman than a man. I also preferred seam lines going along the arms rather than around them. The third sketch is my own choice of seam lines and colour placement, and I like it much better. The arrangement of colours seems more balanced.

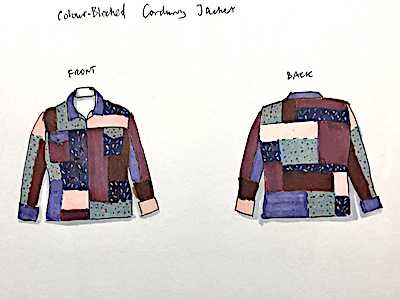
The next step was to tweak the front and work out an arrangement for the back.

Once I was satisfied with that, I spent an afternoon making a tracing of the main pieces of the pattern and creating pieces for the pockets. Then I drew design lines on the front, back, and sleeve, and traced off a pattern piece for each block, adding 1cm seam allowance. Why go to all that trouble? I just knew that if I simply cut up the front, back and sleeve, I’d forget to add seam allowance later. And I’d have had to make two more copies of the front and sleeves, since the pattern isn’t the same on each.

Then I went alway for a long weekend, so there was a bit of gap between making the pattern and making the garment. The latter will have to wait for another post.

In the Navy

It was time to change the thread on the overlocker again, and tackle the navy knit fabric leftovers. They consisted of three kinds: enough plain to make a skivvy, enough gum nut print to make two sleeves or some side panels, and a small amount of a thinner striped knit that might work with the others if I used it like the gauze in the recent t-shirts.

I drew up some options and worked out there was only one combo where I got two garments out of the fabric and didn’t need to draft a new variation on the patterns I’m using. The first was a t-shirt with the striped fabric as puffed sleeves and neckband, the second was a skivvy with the gumnut fabric for arms and collar.

However… the day I started cutting out I didn’t realise I was too tired to be sewing until I’d cut out the plain navy fronts and backs at 90 degrees to the grain. Oops. I decided to go ahead and make the t-shirt anyway.

While it looks good and is wearable, the stretch being so generous along the length of the body is a mistake I don’t want to repeat, so I decided to abandon making the gumnut skivvy.

At that point I decided I was done sewing stretch. I was starting to feel a bit over it anyway. Most of the knit fabric in my stash had been sewn up. Aside from a small amount of leftovers, I had one recently-purchased batch of fabric that might make a dress, and I wasn’t in the mood for tackling a dress.

So what next? Well, I’m still enamoured of colour blocking. I have two kinds of corduroy in the stash and an idea I want to pursue, so I’m thinking it’s time for a projects done purely for fun.

Aqua Sewrobics

I took a five day break from sewing before starting on the next stretch fabric projects, and rather than continue making tops I started with a couple of UFOs. The first was to put ribbing cuffs on my painting jacket, which I’ve been meaning to do for, um, over thirty years. The second was to put ribbing cuffs on a jacket I made from woven material some time ago. I’d already changed the collar to ribbing last year, then got distracted by quilts and other things. The old too-narrow collar looked like it was eked of a scrap of fabric – which it was – and the sleeves were too short, so these bomber jacket inspired changes improve both the look and wearability of the garment.

The next day, the Saturday of the Easter long weekend, was a craft and chat day with some friends. I felt familiar enough with the pattern and overlocker to whip up another mock turtleneck.

Then I took the leftovers of aqua and floral fabric and made this colour-blocked top.

However, I wasn’t satisfied with the second one. Something about it felt out of balance. It looked like I was wearing an ill-fitting vest. So I checked what fabric I had left in the stash and did a bit of tweaking on my phone, and eventually settled on adding vertical stripes and a scoop-neck.

Much better!

Reversed & Reused

With the Mushroom Top done, I was almost ready to change the thread on the overlocker. But there was one more idea I wanted to try.

I had noticed when making the Textured Turtleneck that the back of the fabric was nice too.

I’d also noted that the sleeves on the top that inspired the Gauze-Sleeved T-shirt were still in pretty good shape.

So I spread out the textured fabric to see if I had enough for the body of a top. Yes, I did. Then I unpicked the gauze sleeves and they came off without a hitch. The two fabrics next to each other looked pretty good, so then it was just a matter of cutting out and sewing.

Which, of course, didn’t go as straightforwardly as that. My brain kept insisting that the black hexagon side of the fabric was the wrong side, so there was a lot of unpicking. I tried removing the gauze neckband on the old top but it wasn’t coming off without a fight that would probably destroy it. Fortunately, I had a piece of the black fabric I’d used for the Mushroom Top neckband – the bit I’d trimmed off – and it was big enough to use for the neckband on this new top.

It came out even better than I expected:

At this point, I was definitely in the groove of sewing with stretch fabrics. I had two new gauze-sleeved t-shirts, one freshly made mock turtleneck and one long-sleeved top added to my wardrobe – along with the Cascade Skirt. The to-do list consisted of an aqua mock turtleneck, a long-sleeved colour-blocked top, a navy t-shirt and possibly a navy colour-blocked top, and a batch of fabric that might be big enough to make another wrap dress. So I was not quite half way through.

Quilted & Bound

The Purple Quilt is done. It’s a cosy couch quilt size.

This one makes me feel competent. The strip sequence came out nicely, and the newer way of binding went well. I like the colour combination.

The back is a brushed cotton plaid.

“Stitch in the ditch” on every second row seems to work just as nicely as every row and takes half the time and thread. If I was to make another quilt, out of those blue leftovers, I’d do another one of these strip quilts.

The Blue Quilt – Finished!

It turns out I’ve been doing binding wrong. Well, not the usual way for quilts. I’m supposed to be making a wide strip, ironing it in half, sewing the raw edges to the back of the quilt, then folding it over to to the front and sewing it down. I’ve been making a narrower strip, sewing one raw edge to the back, folding the other edge over then sewing it to the front.

I tried this new method and it is slightly easier. However, I forgot which side of the quilt I was supposed to be sewing it to first, and wound up having to hand stitch it down. Never mind. I do quite enjoy hand stitching, even if it sets my back off.

Here’s the back of the quilt:

Here’s another shot of the front:

It’s far from perfect. On the other side of the galaxy from perfect. But I actually finished it, which I doubted more times than I can count. I’m calling it the ‘learner quilt’.

The Summer of Quilts…

…is done.

When I started, all these boxes were full of flannelette strips and some uncut fabric:

And this is what I have left:

Whatever I do with the leftovers, it’s not going to be quilts. I might make fabric-wrapped rope baskets from it. I might made fabric pompoms. I might use it as stuffing. I might just send it all to fabric recycling.

What I do know, is that a bag of scrap fabric can go a loooooong way. That huge bag of flannelette pieces I bought for $100 in early 2020 became five woven floor rugs and nine quilts from knee to double bed size. And that’s after a third of pieces were culled at the beginning because they weren’t the right size and shape to become strips.

I won’t be buying random bags of fabric again!

I also won’t be making flannelette floor rugs again. There’s too much time spent ironing the strips to conceal the raw edges, and I don’t think my body (or even my loom) is up for the pounding of the beater to get a tight rug. That’s fine, because I have three big rugs in my storage chest ready for when the one I’m using wears out, which is probably a lifetime’s supply considering how good the current one looks.

I might make a flannelette quilt again. The fabric does make a cushy quilt. But it wouldn’t be a big one.

I’d like to try making a ‘normal’ cotton fabric quilt one day. But not for some time, I think. I’ve had enough of quilting. It’s time to get back to the sewing I meant to do before all this started.

But wait, I hear you say. What about the topstitching and binding of all those unfinished quilts? Well, I decided I only had to get the flannelette strips made into quilt tops by the end of summer. My plan after that is to tackle finishing one quilt a month, and hopefully have them all done by the end of the year.

The Blue Quilt – Part Four

I was a bit fed up with the numerous problems this quilt kept throwing at me, and tempted to pack it away for a while, but I knew I’d probably forget how I was fixing the rows of blocks so I had to get that part done. To preserve my will to live, and because the Sew Mini was old and I didn’t want to overheat it, I also decided to fix no more than one row of blocks at a time. I got distracted by the Purple Quilt top, but once that was done I returned to the blue quilt and finished the last three rows of blocks one hot Sunday when I just wanted easy, brainless sewing to do.

Then I did put it aside. Using a walking foot would make the topstitching much neater, and I didn’t think the one I had would fit the Juno. Instead, I made the Square Cat Quilt and Crayon Quilt.

That left me with this:

The leftovers from the Blue Quilt.

And everything else.

I didn’t want to do anything with the blue leftovers it until I’d finished the blue quilt in case I wanted to add more sashing and patchwork to the sides. The mixed leftovers batch didn’t inspire me. Not even the skull-themed fabric strips. I was almost left with nothing to work on.

But then the Juki was back and working beautifully. I launched into finishing the Blue Quilt. The quilt-as-you-go method is designed to lesson the time you spend wrestling a big, heavy quilt. But the more you add, the bigger it gets and in the final stage you do have a big, heavy quilt to deal with. During the break I’d had an idea to lesson the strain. Instead of just adding rows of blocks and it getting bigger and bigger, I could work from both sides simultaneously, creating two smaller sections that would be joined at the middle. Only when the middle section had to be top-stitched would it be a PITA to handle.

To add the middle section, I sewed it onto one already quilted part, then sewed the other side of the top onto the other already quilted part, then hand stitched the backing in place.

Then I just had to top stitch it. Yeah. What a monster. I had to unpick nearly half of it and sew from the other end to try and smooth it out, but I tell you, if there were quilt exams this one would get an F-.

But it was assembled at last.

And I hadn’t needed to put aside the blue batch of leftover strips. There wasn’t any way I was going to wrestle the monster Blue Quilt a minute longer. Well, except for the binding, but that’s another story.

Squares & Borders

When I considered what quilt to make next, I considered the leftover strips and asked myself what I would hate to toss out. My eyes went to the crayon and psychedelic fabric, and the uncut pieces of fabric with feathers and cat-in-a-garden designs.

I started playing and found myself making borders around a white square. I’d seen this method of building blocks in videos, and it looked simple and fast. I began matching solid coloured strips and chose three that matched well, and I was ready to start the construction.

I began with the squares, which I fussy cut. I wasn’t able to get one of the types of cat cut from the fabric and managed 8 squares. But when I laid them out it seemed obvious that a 3×3 grid would work best. So I cut around the cat an appliquéd it to a square cut from a plain garden part of the fabric.

Next I laid out coloured strips for borders. Then I took three of the multicoloured fabrics I liked – feathers, dots and psychedelic stripes – and added the next round of borders. Then more colour, and sashing in white.

And I got sewing.

I’m calling this the Square Cat Quilt

I really enjoyed the patchworking method, so I decided to do another quilt using it. This one used the crayon, dotty and thick stripe rainbow fabric cut across not along the stripes. I was able to make twelve blocks before I ran out of fabric.

This became the Crayon Quilt

At this point, I was also spending time cutting backing, batting and allocating fabric for binding. By the time I finished the second squares and borders quilt, I had five quilt sandwiches ready for top stitching. Add to that the Blue Quilt, which used the quilt-as-you-go method, and I had six quilts to finish.

And one or maybe two more quilt tops to make before I was done for the summer.

Bookcase Quilt

So, thanks partly to the Juki requiring a service and repair, I have a new machine.

I’d had a shop web page for it bookmarked for many months – maybe even a year – as a machine for taking to friends’ houses or lessons. When the Juki started eating needles I checked on the web page and to my delight it was on sale, reduced by 33%.

So the Sew Mini went back in the cupboard and I put the Juno to work. Oh, it was nice to have a variable speed foot pedal again!

I turned my attention to the batch of striped fabric strips. I discovered three things: firstly, I had leftovers from the Snakes & Ladders quilt already sewn together; secondly, the overall combination of stripe patterns didn’t combine that nicely; thirdly, it also contained some uncut pieces of fabrics.

Regarding the already sewn pieces, some were in pairs, some were several pairs sewn together in a short column. They were of similar widths so if all the pairs were joined I would have a longer column. Four of the fabrics – about half of them – were a combination of strips cut along and across the stripes, and could be sewn together the same way. I could do a column of each, then join them all together with a strip of white between. So I did that.

It’s a good knee rug size.