Last month I went outside to do half an hour’s gardening, and somehow that turned into several hours. Mainly because I decided it was time to dig up the madder.
Having heard that madder could get invasive, I grew it in a cut-down old oil barrel. I’d harvested and dried most of the roots a year and a half ago, but since those roots hadn’t been particularly thick I left a couple in the barrel to see if the plants would come back and grow thicker roots.
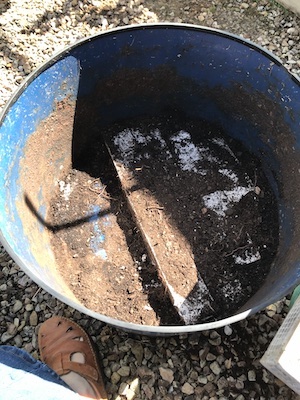
Initially I thought they hadn’t. The roots were few and not much bigger than the previous harvest’s. But then I continued emptying the barrel and discovered a whole other layer of roots at the bottom half of the barrel. They were chunkier and more numerous, and I was pleased with that because they’d yield more dye.
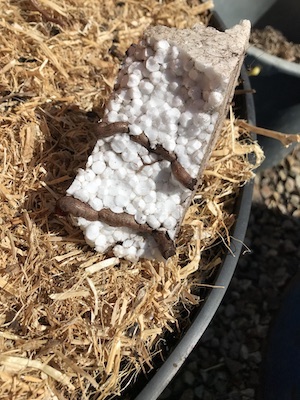
Then I reached a layer of polystyrene I’d forgotten I’d lined the bottom with as a barrier to discourage roots to escape out of the holes.
Except it turned out the madder really liked those conditions. The roots had grown really fat, making their way through the polystyrene.
Under this were more big roots. Then I tipped over the empty barrel and wasn’t so pleased any more. The ground beneath was riddled with madder root.
Fortunately, the ground there is chunky gravel on top of a thin layer of clay on top of shale, so it wasn’t too hard to dig it all out. It could have been much worse, especially as the roots have a habit of thinning out to a thread, then after an inch or so thickening up and continuing on. So I’d pull at one and it’d get thinner then break, and look like I’d got the whole root.
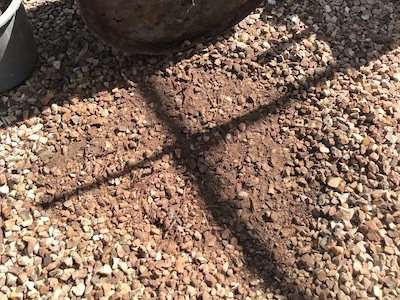
Having twigged to this growth habit, I knew that I needed to keep digging to check whether I had truly found the end. Eventually I was done, and to my surprise had a bigger harvest than the first one. I chopped it all up into tiny pieces and spread it on a screen to dry.
One of these days I’m going to get around to dyeing something with the old batch, and maybe this new one as well. But I don’t think I’ll be growing madder again. Or, if I do, I’ll use a pot with holes in the side rather than the bottom so I can see if it’s trying to escape. But I’ll also line it with polystyrene, since the roots growing in and around it were the fattest of all!
After a week on which I sewed every day, and spend a lovely Saturday afternoon at a friend’s Sewing Day & Pizza Night, I decided that on the Sunday I’d take a break from sewing and relax.
Well, I did take a break from sewing, but I didn’t manage to relax. When I considered what I could do instead of sewing I remembered something I’d been meaning to do for nearly a year now. Last year I made an attempt at starting an indigo vat with ripe bananas and failed dismally, so I ordered fructose and hydrated lime in order to try that recipe. It was time to give it a go.
This time the vat seems to have worked. It’s not particularly strong – I chose the ‘medium blue’ recipe because I only had 32 grams of indigo powder left but only got a light blue. My aim was to only shift colour with over-dying and the vat was dark enough to achieve that.
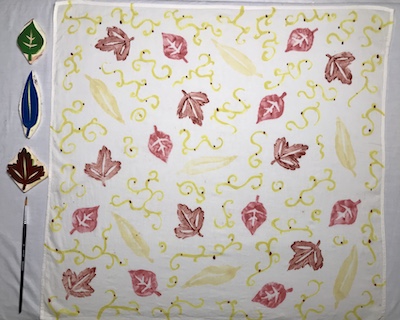
I started with some over dye test strips I made during the Maiwa class, in module 7. They got two dips. The result was interesting in that the indigo moved the red dyes toward purple but the yellow dyes didn’t change to green. I still went ahead and dyed the bigger piece later, but doing only one dip. I’m glad I did because the result is lovely! The background is a light blue and the leaves now range from yellowy green to olive.
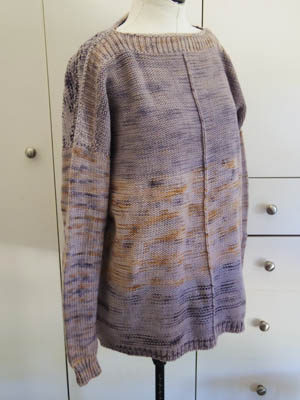
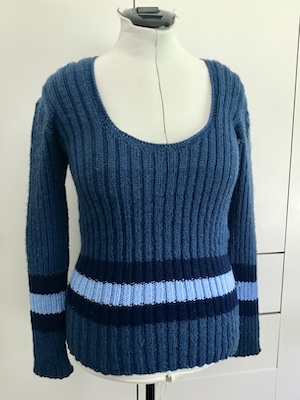
The next was Dusk, a big jumper I’d machine knit by adapting the Weekender pattern. The yarn had been through two dyeing sessions previously: first a failed eucalyptus dye, then over-dyeing with some leftover old wool dyes. It was mauve with orange bits.
I’d made a hat in the same yarn on the Addi circular knitting machine, too, and there were three more skeins of yarn. They all had two dips in the indigo, and are now a coolish grey. I also popped a skein of sock yarn in. It was an unappealing mix of browns, and turned a much nicer blue-brown.
(I have to add: the above post-dye photos aren’t the best. The light here has been terrible for project photography lately, which is usually only a problem in winter.)
The indigo dyeing took up most of the day and most of my energy. So much for a restful Sunday! But I managed a successful indigo vat, improved some pieces of clothing, yarn and fabric, and had a nice break from sewing.
This year I’ve been all over the place creatively and, well, so has life in general. I didn’t seem to get much done at times, but when I look closer that was because I tackled single projects that took up a lot of time. I did a bit of sewing, a bit of weaving, delved into some occasional crafts like jewellery-making and air-dry clay, finished some long-term WIPs and culled several kinds of hobby supplies. It feels like my mind began to jump from hobby to hobby in the latter months of the year, new shiny things taking my attention before I’d finished with whatever had last attracted me, as if Covid 19 gave me some king of creative ADHD.
January & February:
The Print & Paint With Natural Dyes workshop took up all of my creative energy at the beginning of the year, partly because so much else were going on, including having Dad and his very naughty cat staying with us.
March:
Using the knowledge I’d gained in the workshop, I painted/dyed three tops and a scarf. I also sewed a shirt out of a sarong.
April:
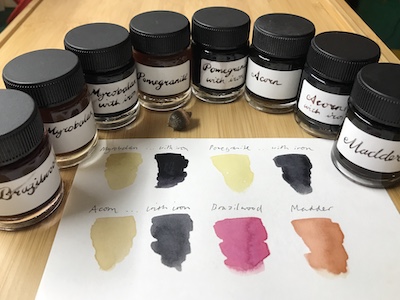
I didn’t include the Ink-Making workshop in my 2022 summary, but I think I should have. Six months after, I made some more inks as some sources dependant on season became available.
May:
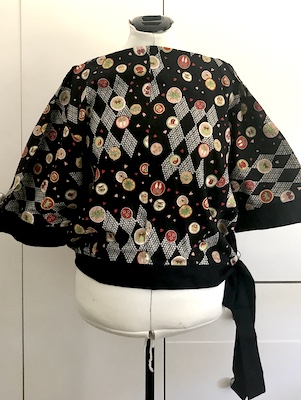
A bit more sewing happened, first when I turned Motto Skirt into a top…
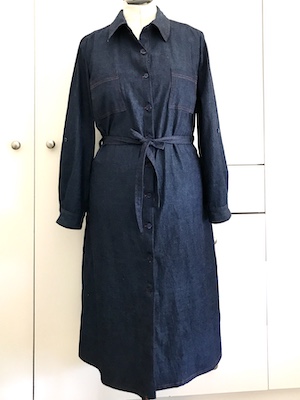
… and made a Chambray Dress.
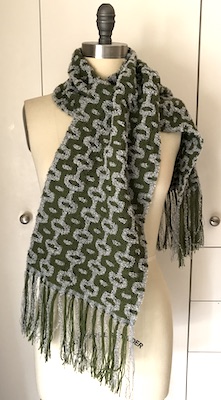
And I returned to the loom to finish the Bouclé Chains Scarf.
June:
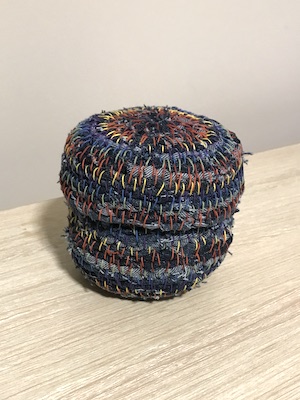
I finished a coiling fabric basket, made while visiting Mum.
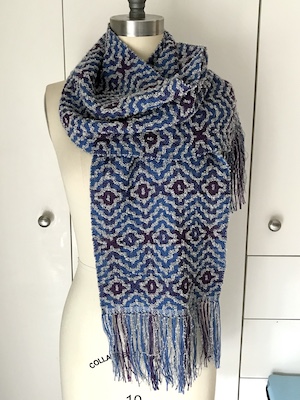
More exploration of Deflected Doubleweave with bouclé yarn happened with the Baroque Scarf.
I also culled my mosaic supplies and did an illustration commission.
July:
And another DDW project finally using a design I drafted a few years ago: the Electricity Scarf.
August:
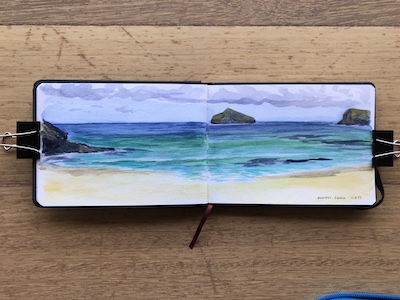
We went to Lord Howe Island, and I did some sketches.
September:
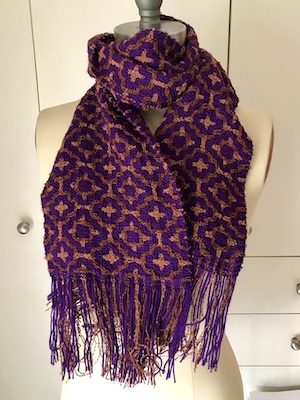
The fourth and favourite DDW bouclé scarf: Copper Roses.
I tried making watercolour paint, and felt a bit ‘meh’ about it.
October:
A bout of finishitis set in. I lengthened Slinky Ribs and made it all rib:
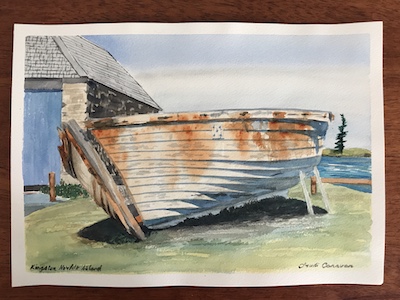
We went to Norfolk Island on an artist holiday.
A bout of Covid 19 somehow led to me culling things. First my jewellery collection, which led to jewellery-making.
November:
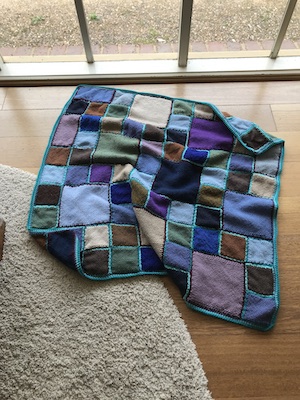
I finally, at long last, finished the Pin Loom Blanket.
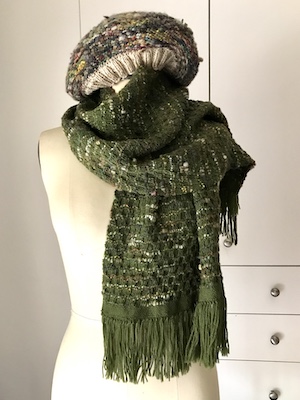
I wove a Honeycomb Scarf and Tapestry Beret.
The jewellery-making also included a dive into air dry clay.
I finally, at long last, finished the dishcloths that had been on the Jane loom for a year.
December:
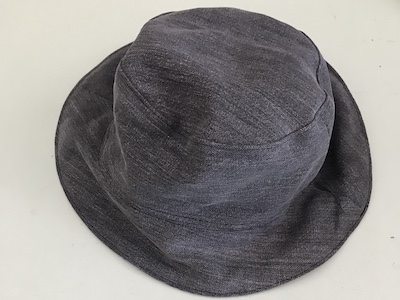
Watching Project Runway and The Great British Sewing Bee had me itching to sew. After culling my sewing materials, I made Paul a bucket hat and me some shorts.
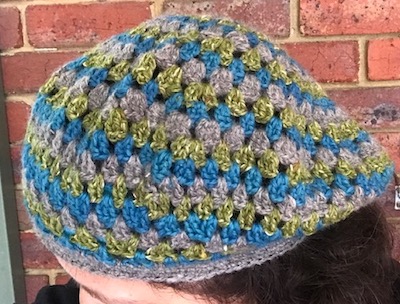
And then got the itch to crochet. This Granny Beret seemed a good warm up to something bigger.
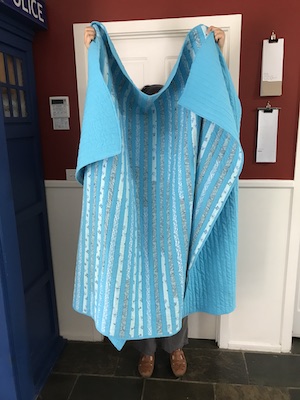
A big yarn cull moved the flannelette strips meant for rag rugs into the fabric stash intended for quilts. I sewed a single bed sized quilt.
Also:
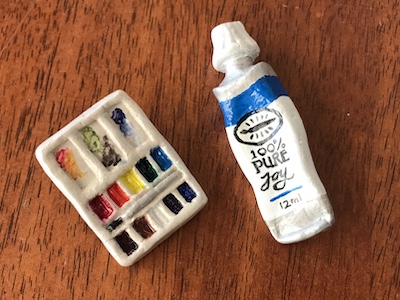
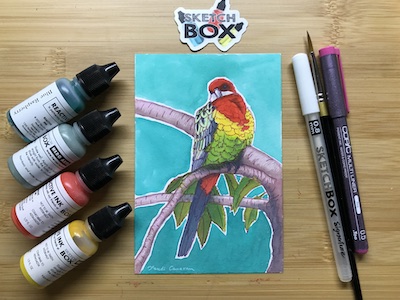
This year was also the year of the artist subscription box. I tried one Paletteful Pack but decided against signing up because the postage was too expensive, then gave SketchBox a go and stuck with it. They proved to be a very entertaining and interesting monthly treat. It allowed me to try some art supplies I’ve never encountered before. It’s likely after a year I’ll stop the subscription because there are only so many kinds of art supply so the rewards will eventually diminish, but it has been fun and I suspect I’ll miss it if I do.
I also did a lot of oil painting, mostly in the plein air group but also lots of still life both at the art society and at home. I decided to stop posting pictures of my art, however, until it was clearer how plagiarism software (AI) was going to affect everything.
The last two weeks of the Print and Paint with Natural Dyes covered more methods that played with mordants and didn’t involve steaming the pieces. The last one was my favourite.
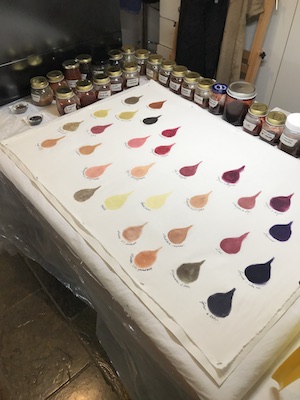
Module 7 was all about painting with mordant pastes with varying ratios of alum and iron. I was in full test everything mode, and tried eight dye baths instead of four, putting them in jars in a water bath rather than cooking them individually over 10+ hours.
I tore the samples even smaller with the intention of overdying one of each with indigo.
Unfortunately, when I tried making an indigo vat it was a complete failure. I had a memory from the Kay Faulkner workshop I organised of buying urea for our woven shibori dyeing, but I couldn’t find a recipe. Not even on her website, which should have been warning enough. I googled and found a blogger with a recipe using urea and soda ash… that did not work. Later I realised the urea was probably for using with the commercial protein fibre dyes in Kay’s workshop. After doing more research, I tried adding mashed banana juice and more soda ash to the vat, with no success. At that point I had too much else to do and put the bucket outside. I’ve bought some chemicals to try the recipes on the Maiwa site, but I suspect I’ll have to start from scratch.
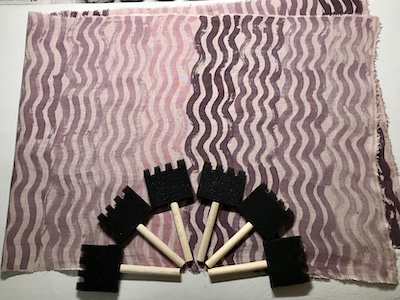
After making the sampler, I returned to an earlier idea of cutting notches in foam brushes. Since they came in set and I had to buy several packs to get three small ones, I had a lot of these large ones and was able to make one for each of the six alum/iron pastes. I painted the white linen with wavy lines, inspired by a shirt I’d glimpsed on tv, and then dyed it with logwood.
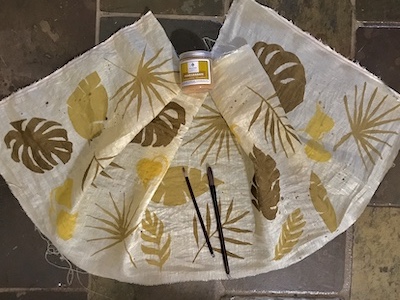
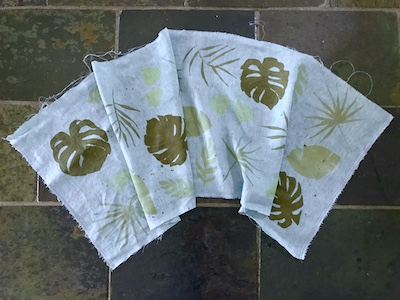
For the natural linen, I painted tropical leaves freehand with Japanese sumi brushes then dyed it with pomegranite. This one I intend to dye with indigo when I get a vat up and running.
For Module 8, we mixed up mordant discharge paste. We cut our cotton and linen pieces in half and dyed them, and two bandanas, in two batches: one dyed grey with iron, the other mordanted with alum. The discharge paste then either bleached out the grey or removed the alum mordant so when those pieces were immersion dyed later the paste areas took up little to no colour, depending on the dye.
I’d bought some refillable pens which you can use to make your own textas, and tried it with the discharge solution before the thickener went in. It worked, but the solution with beet powder in it kept clogging up the pen. I also realised on the second day that I’d made the first solution half strength. It still worked but the result was paler. I also tried screen printing but the result was too blobby.
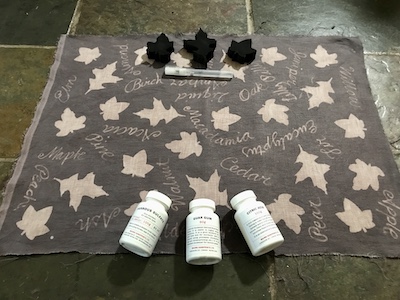
On the iron-coloured natural linen I printed leaf stamps that I’d made by tracing leaves from my front yard, and wrote the common names of trees.
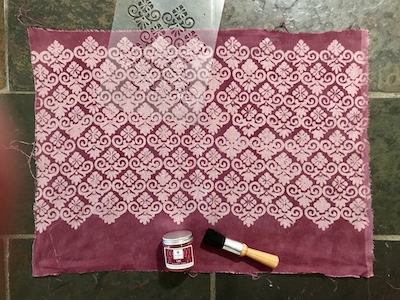
On the alum-mordanted natural linen I used a stencil from a bundle I bought at Bunnings then immersion dyed in lac.
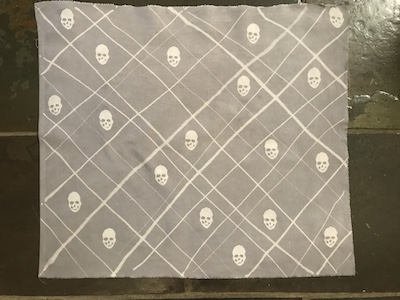
For the iron-coloured cotton I made a teeny skull stamp. I meant to draw neat diagonal lines but things went wonky and I just went with that, and used the stamp here and there in the gaps. I love this and wish I’d worked on a bigger piece of cloth.
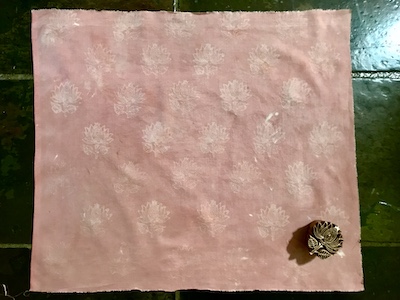
For the alum-mordanted cotton I tried an Indian wood block and did a simple diagonal grid of flowers. Then I poured a whole lot of exhaust baths into the pot to make an orangey peach colour. Unfortunately, the half-strength discharge paste and the lighter dye colour meant that the pattern was rather hard to see, but I did a wheat bran bath later and that helped to lighten the design a little.
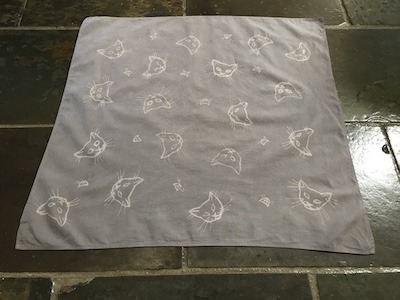
The iron-coloured bandana was entirely done with the refillable pen. I traced around the cat face stamp I’d used for Module 6 and then added details. This one is definitely a keeper.
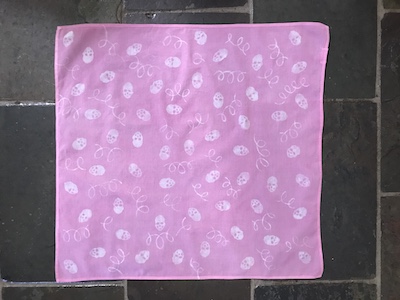
The alum-mordanted bandana became a gift for a friend who likes pink and skulls. For this one I had the rare satisfaction of planning something and it coming out as I intended.
I have a few ideas I’d like to try now the course is done. Because I’ve made small colour charts, I wound up putting aside a half metre of lightweight cotton to use if I really stuffed up a piece. Since I didn’t, I’ve torn that into two pieces to play with. For the smaller, I’ve explored dyeing with white mulberry. The rest – a square – I’d like to use up some of the leftover pastes. I also ordered two metres of silk.
As I made more and more pieces it became clear I was going to have a long list of sewing projects to do. Since we don’t use napkins I’m treating them as small squares of fabric to be transformed into something, usually something that requires more fabric. The linen nearly all begs to be made into garments, but to do that I’ll definitely need more fabric – perhaps even painted in the same way. Thankfully, the silk pieces just need to be hemmed to become wide scarves.
Overall, it has been a lot of fun and I’m glad I chose the workshop. I learned heaps and it kept me distracted rather than freezing up and stressing during a very scary few months. But I didn’t get much else done, creatively, in that time and I really, really miss art. Yet it kind of benefitted me artistic practise in that it had me working in the laundry in a different way to how I did during the ink making workshop. I have a better feel for the space and how to make it work as a mini art studio.
Which will be my next task. And then… art resumes, perhaps even daily art.
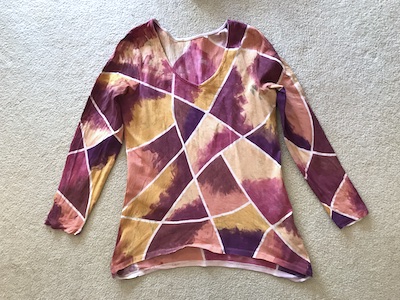
So I may have mentioned the multitude of jars the workshop required. There came a point around week 6 where I decided I needed to use up paint rather than buy more jars. I dug through my bag of clothes to dye and found two long-sleeved tops that I’d attempted to dye before but wasn’t happy with the result.
Putting my newly acquired knowledge to use, I scoured them first. That removed some but not all of the old colour. Then I mordanted them with gallnut, alum and soda.
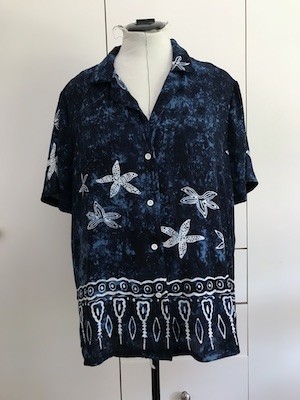
In the 6th module we’d made some iron solutions for painting, and the tutors suggested using them up by dyeing fabric. I decided to dye one of the tops, which had come printed with stripes. The white areas came out a nice, soft grey.
The second top had a few indigo leaf prints that hadn’t come out strongly enough to look like more than mistakes. So I lined the inside with paper and laid down lines of narrow masking tape, then painted it all over with the mixed colour dye pastes, figuring that I can always mix up more from the pure colours if I need to in later classes. I had to mix a little bit more of a few colours, but managed to empty six jars overall. The indigo leaf prints still show, but come across as a bit of extra patterning.
Steaming was a challenge. After the top had tried I replaced the paper inside with clean pieces, then rolled the sleeves up first, then the body from the bottom up, and continued by rolling the sleeves inside the body. It needed a few patches of paper where the odd shape made tears and I managed to curl it into a neat but open parcel.
Then I had to buy another level for the bamboo steamer and get Paul to remove the base to make a spacer level. That allowed enough room for the parcel. I dyed it for an hour rather than 40 minutes to make sure the heat penetrated.
When it was done I washed it in warm water twice, but it’s still a bit stiff from the gum. I’m going to let it cure for a few weeks then wash it in soapy water.
I’m pretty chuffed with both of these tops, and was ridiculously pleased by emptying six (SIX!) jars ready for future workshop modules. Painting a whole garment was quite time-consuming and fussy, so I wouldn’t do it except in this circumstance. Much easier to print the fabric then sew the garment.
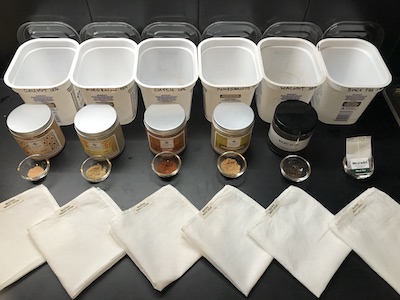
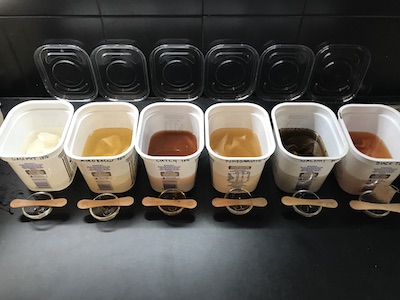
This week was the one in which life just got too stressful and busy. We were to treat six hankies with three tannins and paint on them with iron in various forms. I had little brain power left for creativity, so I decided to do one design on all six, but compensate by trying six tannins instead of three: gallnut, myrobalan, cutch, pomegranite, walnut and black tea.
Thank goodness I was saving yoghurt containers!
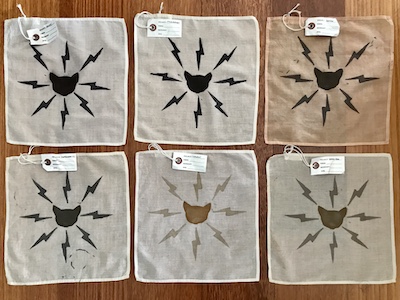
The design might have been inspired by Dad’s cat, who had gone from meek to cute to curious to full on tortoiseshell monster from hell.
The cat faces originally had eyes, but the method I used to paint in the pupils didn’t work and looked so terrible that I painted over it.
The gallnut is the most dramatic, but I’m intrigued by brown of the walnut and how well the tea worked – especially considering how easy it would be to do with just rust water made from old nails and a teabag.
This week felt like we had reached the peak of process development while also having passed the busiest part of the workshop. We didn’t need to make any more colours but use what we had to make a paste that was both paint and mordant. Instead of painting a big sampler of the colours to be steamed and chalked, I made a small chart like the one I’d made at the start. Which I stuffed up, so had to redo it later.
There were no set exercises to do so I tried a few ideas. Firstly, a plaid. I painted lines in one direction, steamed and chalked them, then painted the lines in the other direction and repeated the finishing. In the class the tutors had warned that the gum in the paste could act as a resist preventing top layers from reaching the cloth, so this seemed like a good solution. The interaction of paint between the layers was interesting: the second layer of colour seemed to activate and push through the first layer to the paper beneath, and where colours crossed they mixed.
Screen printing didn’t work. I’d done it successfully on a scrap of fabric the previous week, so I can only assume the mordant-dye paste, being the only change, was the problem. I wound up having to treat the paper doilies I used as stencils.
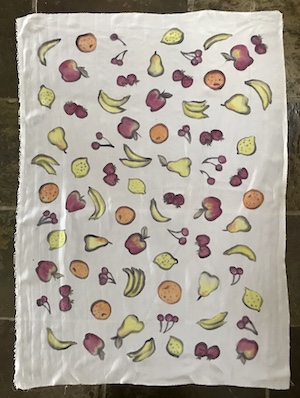
For the silk, I used one of the subjects I’d listed where the colours were in the yellow-orange-red-purple-green range available. Knowing that underneath layers of paste could be a resist to additional ones, I started with an iron grey outline of fruit, then coloured them in. After steaming and chalking it was clear the orange I’d made was too weak, so I did another layer that brightened them up. I was pretty chuffed with this piece, which I like and will definitely wear as a scarf.
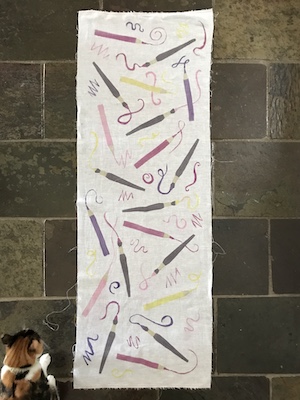
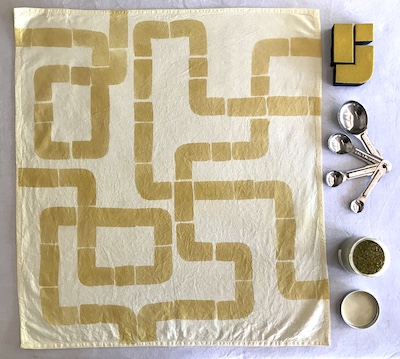
Last in the module was a length of linen. I made block stamps that worked together to create brushes and pencils, and filled the gaps with ‘scribble and flourishes’. This turned out more 80s than I anticipated, but I like it.
This week was the most productively creative rather than experimentally creative. I made something worthwhile despite all the stress and distractions around me. It was also the week of peak jar. I’d started with a dozen or so from my store of jars to reuse, had to buy a 24 pack of small jars, and needed to go back to the shop for more, then added implausibly large ones for the mordant-dye pastes. I did pick up some 70ml ones after this just to get the latter into something less airy, but from this point I started planning to use up paint and free up jars for future modules.
We started out mordanting about a third of the fabric in the kit. Only two pieces required simmering in a pot, so it was easier than the scouring, which needs to be watched.
Then we made six dye pastes, some using extracts and some requiring an extraction to be made from a source material. I made a chart showing the colours before and after steaming.
The pastes were mixed together in various ratios, painted on cloth and steamed to see the result.
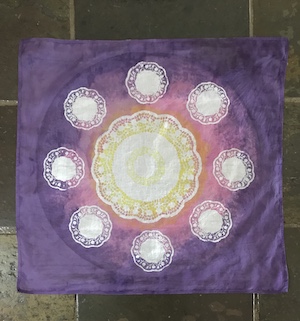
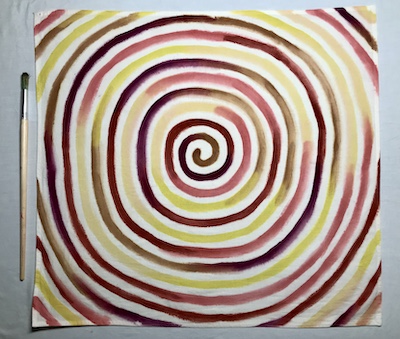
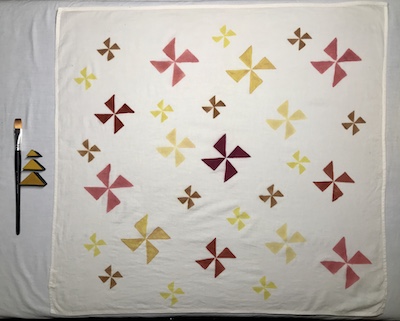
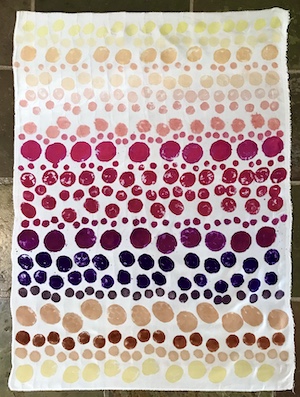
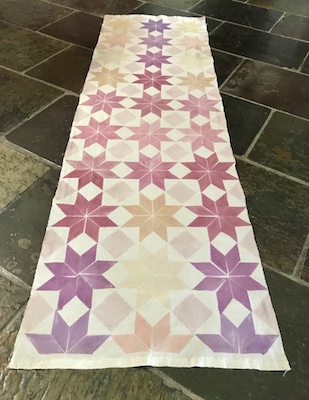
This had me scrambling for jars, and for a box to keep them in that could be stored in the fridge. I thought the above was a lot of jars, but it was just the beginning. We worked on two napkins, two bandanas and a length of natural cotton. The first napkin was a graduating spiral, for the next I used an old plastic lace table cloth as a stencil, the first bandana was printed with triangles to make pinwheels and the second I dug out some old foam stamps I made for printing wrapping paper. For the natural cotton I replicated a weaving pattern, with a graduating background.
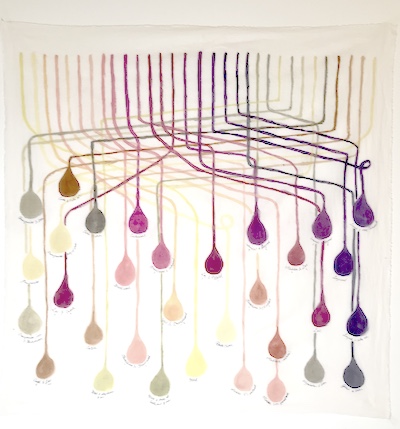
The following week we made even more colours, this time in larger batches so they could be divided up and altered with iron and soda ash. The tutors had us do test circles on a big cloth, then a row of lines in a gradient. I did drips and then linked them.
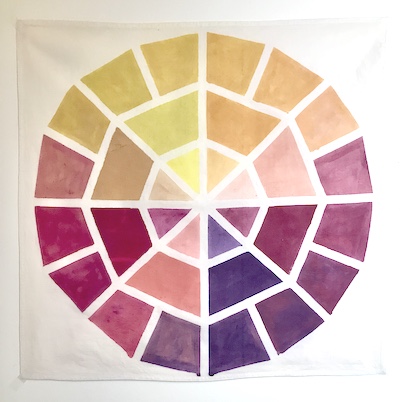
The we painted two more napkins, a length of silk and a length of natural cotton. The first napkin was to be a colour wheel. I simplified this by using all but one pure (unmixed colour) because I had plans for the other napkin that would be far more time-consuming. It became a paint chart style grid of 144 squares, showing all the combinations of the colours in ratios of either 1:2 or 2:1.
I did blobby circles on the silk and made starts out of a diamond-shaped velour stamp for the natural cotton after making ‘pastel’ version of several colours.
These were by far the most colourful weeks, though I found I really missed blue, which I believe is done with different processes. I got more useful pieces out of it: the silk just needs hemming to become a scarf, the two natural cotton pieces will be sewn into something. The paint charts are practical as they are. I kept tweaking the bandanas each week and they’ll have a post of their own. I like the stencilled napkin and later tweaked the spiral one.
The first week of the workshop was entirely taken up by scouring. This is one of those necessary steps that isn’t particularly entertaining or difficult, but since I’ve never scoured before there was definitely value in the doing of it.
The second week’s process involved making a mordant paste, applying it and then immersion dyeing. That was rather fun and a good introduction to the various methods of application. I’d already decided that I wanted to do all the processes as demonstrated, but rather than copy everything exactly I’d try to come up with a different design and find additional ways to apply the dye pastes.
One of the methods in the class was to stick adhesive-backed velour onto foam blocks. I thought I only had a few scraps of velour Contact from the 70s, but it turns out it’s fashionable again for lining drawers so I had a roll of black as well. It turned out to have just the right amount of dye-holding capacity and gave good crisp edges.
I had picked up some men-shaped makeup sponges from Daiso a few years back thinking they’d make great stamps. And they were.
They used Indian hand-carved wood stamps in the class. I had a couple of those and gave it a try. Not my favourite method, but effective.
They used multiple sponge brushes in the classes. I couldn’t find them sold singly, so for every one in a useful size I got two to three extra large ones. So I cut nicks out of one to make one that made parallel lines.
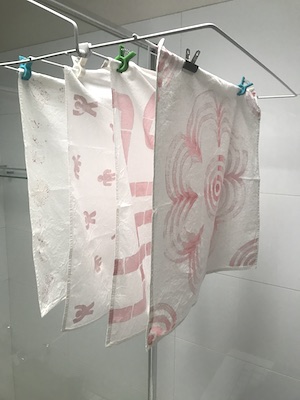
These are all napkins, which came in the kit. A nice size for playing around with, but ultimately I’m not sure what I’ll use them for. In Australia napkins are generally only used, if at all, at formal dinner parties. These are too informal for that. Maybe I can sew them into throw pillow covers, or drawstring bags. Or use them as furoshiki. Whatever they turn into, they were fun to paint and print and had me eager for the next class.
Seven weeks were left of 2022 when I began thinking about my intentions for 2023, which felt early but maybe only because the weather felt like Winter right up and into December. When I asked myself want I wanted to do next year the words “get my sh*t together” flashed into my mind. So I wrote a list of what sh*t needs getting together and noted that most items were tasks I’ve been putting off for a long time. I considered and dismissed various reasons why and was left with one: because they aren’t much fun.
So I asked myself if I could make them fun. Perhaps take a different approach? Maybe break them down into more enjoyable tasks? Possibly reward myself when they’re done and have that be the fun part?
The idea inspired me to decided that my motto for 2023 was “Make it Fun”. However, so far 2023 has had other ideas. Getting my sh*t together took a major back seat behind just getting through each day.
After the first drama passed a gloomier sense of clarity set in. There’s nothing like dealing with elderly parents to make you review what you need to let go, be that possessions, activities or people. Getting my sh*t together was suddenly about more than just a few neglected tasks I hadn’t done, but ones I’ll need to do in future, and ones I should avoid having to do. It also felt like an illusion. Like housework: something never finished and harder to get to when there are dramas in your life.
I thought… perhaps a more realistic motto might be: “Remember to Have Fun”. So it was in that spirit that I decided not to delay doing the Maiwa “Print and Paint with Natural Dyes” workshop I’d signed up to, but get stuck in. Being busy and distracted meant I didn’t always get results I like, but so long as I was learning something and had something to occupy my mind that was fine. It was truly art as therapy.
There are two weeks of the workshop to go. I have one day free. I’m going to create a few posts and set them up to self-publish just in case another drama happens. Thankfully, I did keep records of what I did to remind me of what I did. So here goes…