Midway through fixing the rows of blocks for the blue quilt, I got bored. So I took the batch of purple strips, ironed them, removed those with selvedges, and sorted them into stacks of the same fabric and laid them out in an appealing colour sequence. I had near enough to twenty of most of the fabric designs. So I cut in half a few strips of the ones that were less than twenty, then got to sewing it all into one long strip.
With that done, measured, counted and did some math and worked out that if I cut the strips 120 cm long and sewed them together lengthwise I’d get a quilt top around 180 to 200 cm long. So I started doing that. 2-3 days sewing later and I had this:
Which I’m pretty happy with, and put in the pile of quilting to do when I get the Juki back.
With the Blue Quilt and Rainbow Cat quilt in limbo it seemed a good time to assess the remaining flannelette strips. I didn’t want a quilt with fire engines, monkeys, frogs, princesses and other themes for children, so I removed those. I put aside some black and red skull themed strips to make a lap blanket with because I like them. The remaining strip stash was made up of solid colours, strips of multicolour striped fabric, quite a bit of purple, and leftovers from the Blue Quilt.
I’d had an idea for a quilt that looked like a watercolour paint box, but multicolour fabric wouldn’t work for that and I didn’t have enough variety of single colour fabric in green, yellow and orange fabric. The fact that the fabric I had was limiting my creativity was a good thing: it meant the quantity of strips had reduced significantly. If I wasn’t going to buy more fabric I had to work with what I had. So what could I make?
Idea 1: a purple quilt
Idea 2: another blue quilt (but using an easier technique)
Idea 3: a graduated solid colour quilt – perhaps with alternating white stripes
Idea 4: a quilt from all the leftover striped fabric
Idea 5: a skull-themed lap quilt
So not so plenty to keep me entertained for a while. However, this was supposed to be the Summer of Quilts, not the Summer and Autumn of Quilts. I wanted to be finished and done with flannelette strips by the end of February so I could go back to sewing clothing in March, even if it meant tossing the remainder into the recycling.
If I couldn’t get all the quilts made by then, what should I aim to complete?
The answer was this: as many tops as possible. My aim was to use as many of the strips as possible. I didn’t need the topstitching part done to achieve that. The Rainbow Cat Quilt, Blue Quilt and anything else I made could be quilted another time.
Could I get the above five quilt tops made in less than a month? Perhaps, if I worked fast and smart. No fancy block designs. No paper piecing of blocks that changed shape after the blocks were sewn together. Just strip quilts, like the aqua quilt, or very basic blocks.
The tail end of the Summer of Quilts was going to me a race against the calendar.
Sewing the squares for this was so much fun – the most enjoyable technique I’ve used so far in this Summer of Quilts.
A friend decided to have a sewing day, so I wound up sewing squares every day for a week to get them done in time for it. I figured it would be a quick and easy task to sew the squares together, but it turned out taking the paper off the back is quite time-consuming, so I only got half of the top constructed.
The next day I was tired, and the next week was really busy, and then I was really, really tired. After a week I hadn’t touched the quilt except to remove the rest of the paper. Eventually I did get the top finished. I cut the backing and batting and made the sandwich.
But then the shop that I had ordered the rainbow topstitching thread from rang to say it wasn’t in stock so they’d have to order from the supplier, which meant it wouldn’t arrive for a few weeks. I put the quilt aside and returned to the Blue Quilt.
Well, three weeks later there was no sign of the thread, so I gave up on that and started looking at other ideas. In the interim, I had discovered that the quilt had relaxed and distorted, pulling in at some corners and protruding at others. I resewed the protruding ones to get them to sit flatter, but I don’t have room to let out the seams where the corners pull in. It looked like machine quilting would be very troublesome.
So I decided I would hand quilt it. Which I expect will be slow work, but maybe, hopefully meditative. But at least I don’t have to wait for the Juki to come back from the repairer do it.
I didn’t get back to quilting for a week, and when I did I was all fired up to sew the rows together. However when I looked at them, I realised that in my determination to get the rows sewn, I’d made a big mistake.
My blocks looked wonky.
The middle block is square, but the righthand one is pulling it in and the lefthand one is stretching it out.
Some were 9 3/4 inches wide, but most were 9 1/4. I looked at the markings on my square ruler and realised that I’d been distracted by the big fat dominant red lines that marked the half inches, and put my marking tape at the 9 1/4 mark.
Ten stripes together measured 9 3/4 inches. I’d had to do a bit of stretching and pinching of seams to get the blocks to fit together, and this explained why. I went for a walk and considered what to do. I could remove two stripes and cut the blocks down, or I could sew every other seams of the stripes to narrow the strip width. Either way, I was going to have to unpick every row of blocks and rework them in some way.
I decided on the latter option. But I didn’t do all the blocks at once (at first). To make the task seem less like drudgery, I began a quilt-as-you-go method at the same time. (I had been intending to send the quilt to a quilting service, but when I read the tips and tricks on their website it said “Don’t use selvedges” and I groaned aloud. If I’d rejected all the flannelette strips that had selvedges I wouldn’t have had enough for the quilt!)
This meant making a sandwich and quilting the first row, then sewing on the second row and backing at the same time, then tucking batting between and pinning it all together before quilting the new section. Then sewing on the next row until the whole quilt was done.
For the quilting of the first row I did a simple 45 degree angle grid, not trying to be precise. It involved a lot of turning of the fabric sandwich, which I realised was going to get slower and more annoying as the quilt grew in size. So for the second row I did a simpler vertical zig zag, and was able to avoid turning the sandwich by using the backwards stitch on my machine. Having done two different patterns, I decided to see if I could do something different on each additional row. On the third I did wavy horizontal lines, using a walking foot.
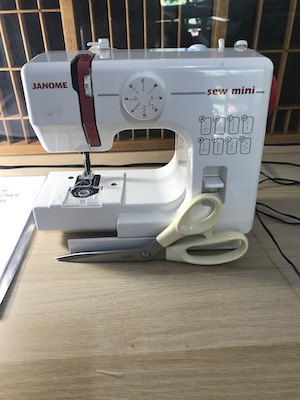
As I was fixing the blocks of the fourth row, my machine started breaking needles at random times. It seemed to happen whenever I changed the bobbin, but then it would happen when I hadn’t changed anything – one seam would work perfectly but when I started the next: BAM! Another needle broken. There seemed no option but to take it in for repair.
I’d given my old regular machine to the op shop, so the only back up I had was this:
Scissors for scale.
Which is very cute, very basic, very noisy, but for fixing the blocks it works just fine.
By the time I’d finished the Rainbow Cat Quilt top I had enough confidence to return to the Blue Quilt. With fresh eyes I could see that my approach to joining the blocks was overly complicated. I just needed to sew them into rows then sew the rows together.
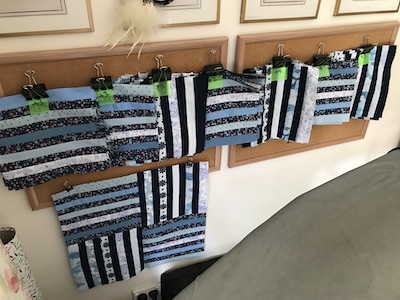
But part of the overwhelm had been not knowing if I had enough strips to make enough blocks. So I decided to work that out. The way I designed it, each row or column of navy or dark floral striped-based blocks has the same sequence of strips. I was going to have a different sequence for each row and column, but decided to keep it simple and have just six varieties. After counting the already completed blocks, I clipped them together in batches of the same stripe sequence and hung them on some pinboards, with a note of how many more needed to be made.
I didn’t have enough strips of some fabrics to do a queen-sized quilt of 10 x 9 blocks, or 9 x 8 blocks. It had to come down to an 8 x 7 block quilt. By then I’d watched videos on adding sashing, so I knew I could do that to make a queen sized quilt.
So every day or two I chose some of the batches and sewed up the remaining blocks needed for each. They seemed to sew up really fast. I had them done by the end of that week, just in time for an impromptu sewing day at my place.
At the start of that day, Paul set up two folding tables next to each other and I laid out the blocks in order. I found that some needed tweaking and I’d completely missed one row of flowery blocks, but with an afternoon of sewing ahead it wouldn’t be long before I was ready to start joining blocks into rows. The guests arrived. We set up. We chatted and made a start. I got the extra blocks made.
And then the power went off.
Fortunately, trimming the blocks kept me busy for the next few hours. When the power came back on, just after my guest left, I started joining blocks and the next day all were sewn into rows.
I didn’t get back to it until the following weekend, when I looked at the rows of blocks and realised they were really wonky. Looking closer, I realised that I’d cut them half an inch narrower than I was supposed to, thanks to the confusing markings on the square ruler I had.
In my summary of craft for 2023 I noted that I seemed to get into a culling frame of mind after getting Covid, but when I think back, I reckon the urge was already simmering in the background. It started after Mum went into care, but not in a ‘you can’t take it when you go’ sort of way. Instead it was in reaction to seeing how bad Dad’s hoarding was getting. I know when he passes away I’m going to have a lot of stuff to get rid of, but I’ll want to keep some things too so I feel the need to ‘make room’ at home to make those decisions easier.
So I tried again to pass on the Passap, and this time was successful thanks to a very helpful person at the Machine Knitters Association. Honestly, I was almost as excited to find it a good home as I was when I bought it, ten years ago. Our ironing board now occupies the space. Not particularly exciting, but I am sewing more often now and it’s been set up in one room or another, always in the way, for most of the last few months. Now it has a permanent home, and that makes one small part of domestic life easier. It even led to Paul ironing the button bands of his shirts!
In non-crafty areas of the house… well, this is the tenth year we’ve been here and our usage of the house has changed quite a bit. When we first moved in we had big parties. Our friends had young kids, and people often stayed over. Now our friends are exhausted from wrangling teens and ageing parents simultaneously, and for the first time nobody stayed over on NYE. So in the days after, I culled a lot of things related to entertaining that are too much trouble, we don’t use now or we are just tired of.
More recently, we watched The Gentle Art of Death Cleaning on tv, then I read the book, which were fun and enlightening. The tv show takes the concept much further than the book, especially in regard to my new favourite term “reverse robbery”. Since I don’t have kids or nieces/nephews, if I die it’s going to fall to friends or even a stranger to sort out my possessions and I’d rather they didn’t have a huge mess to clean up. And since we do plan to downsize eventually, it’d be less of a shock if we don’t have to cut back our possessions all at once.
Well, that’s what I tell myself anyway.
I hesitated to add ‘January’ to this blog post title. It makes it feel like I’m setting myself a challenge to do at least one thing to make life easier each month, which actually makes life harder. My intention is just to remind myself of this year’s motto at the end of each month, and note any new ideas I’ve implemented.
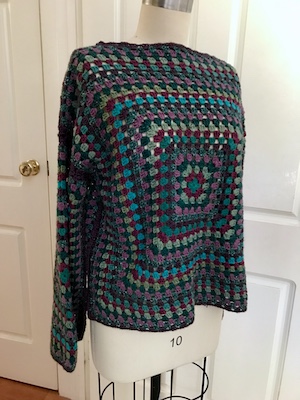
When I cleared out and assessed my yarn stash last year, I put aside some 8ply/dk yarn in greens and purples with some kind of crochet granny square garment in mind. The mix skewed a bit dark and green, so when I found some mauve yarn in an op shop a few days later I knew it was what was needed to brighten the colour scheme.
Patterns I’d considered included several granny squares made into a jacket or a jumper in the usual grid, the same but joined at a 45 degree angle, a jumper with one really big square each for the front and back, and two hexagons that could be folded up to make one half of a body and sleeve in each piece.
While the multiple squares versions had a traditional appeal, by the time I’d crocheted a square using all the yarns it was much bigger than required for the multi-square garments. It looked good, and the thought of the sewing together of squares didn’t appeal – probably due to subconscious memories of the pin loom blanket. If I just continued on enlarging the square I’d soon have a front, so I decided to do the square-for-front-and-back design.
I didn’t use a pattern, figuring I’d just crochet until the square was big enough for a front, then repeat for the back. Being the perfectionist I am, I decided I wanted both sides to match and that wouldn’t be possible if I ran out of one of the yearns, so I began crocheting both at the same time. Then I noted that the sleeves in one of the patterns I liked are also big squares, so I started those and had four squares going at once.
When the sleeve squares reached the right size for my arms, I put them aside and I continued on with the front and back. Then when the front and back were big enough I decided I wanted the sleeves to end on the same colour, so I added some more rounds. Then I joined everything with a join-as-you-go method, which is something I’ve not tried before. It was a nice surprise to find that the sleeves are the perfect length. The only extra crocheting I did was a single round of granny clusters around the neckline.
I really enjoyed making this jumper and I wish it was cold enough in Melbourne to wear it. The bigger the rounds got the longer they took, which I didn’t mind. I only had trouble making myself stop so my hands didn’t get sore. I’m now ready to try turning the UK trip scarf yarn into a garment.
After a week on which I sewed every day, and spend a lovely Saturday afternoon at a friend’s Sewing Day & Pizza Night, I decided that on the Sunday I’d take a break from sewing and relax.
Well, I did take a break from sewing, but I didn’t manage to relax. When I considered what I could do instead of sewing I remembered something I’d been meaning to do for nearly a year now. Last year I made an attempt at starting an indigo vat with ripe bananas and failed dismally, so I ordered fructose and hydrated lime in order to try that recipe. It was time to give it a go.
This time the vat seems to have worked. It’s not particularly strong – I chose the ‘medium blue’ recipe because I only had 32 grams of indigo powder left but only got a light blue. My aim was to only shift colour with over-dying and the vat was dark enough to achieve that.
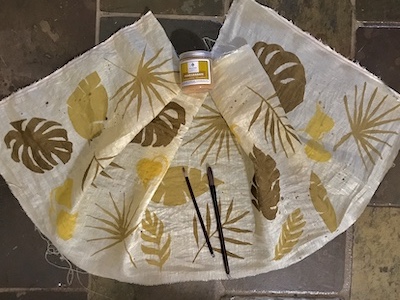
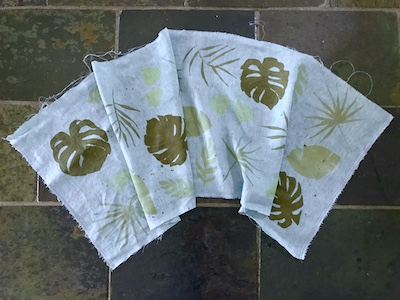
I started with some over dye test strips I made during the Maiwa class, in module 7. They got two dips. The result was interesting in that the indigo moved the red dyes toward purple but the yellow dyes didn’t change to green. I still went ahead and dyed the bigger piece later, but doing only one dip. I’m glad I did because the result is lovely! The background is a light blue and the leaves now range from yellowy green to olive.
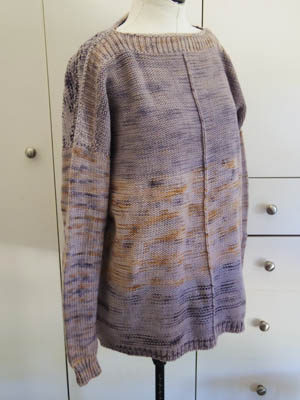
The next was Dusk, a big jumper I’d machine knit by adapting the Weekender pattern. The yarn had been through two dyeing sessions previously: first a failed eucalyptus dye, then over-dyeing with some leftover old wool dyes. It was mauve with orange bits.
I’d made a hat in the same yarn on the Addi circular knitting machine, too, and there were three more skeins of yarn. They all had two dips in the indigo, and are now a coolish grey. I also popped a skein of sock yarn in. It was an unappealing mix of browns, and turned a much nicer blue-brown.
(I have to add: the above post-dye photos aren’t the best. The light here has been terrible for project photography lately, which is usually only a problem in winter.)
The indigo dyeing took up most of the day and most of my energy. So much for a restful Sunday! But I managed a successful indigo vat, improved some pieces of clothing, yarn and fabric, and had a nice break from sewing.
At last I got to the quilt that had inspired me to return to making quilts. As with the previous two, I started by ironing the strips then laying them on my cutting board to see if they were straight and the correct width. Unfortunately, the answer was pretty much ‘no’ to both. I think by the time I cut them, during lockdown back in 2020, I was well tired of making strips. Or maybe the cutting machine was getting blunt. Either way, they were very wonky.
So when I saw a video showing how to sew strips on a 45 degree angle onto squares of paper, I realised it was the perfect method for this quilt. With this technique it doesn’t matter if the strips are of different widths or are a bit crooked. You just sew each strip down and fold it flat, and the wonkiness gets hidden in the seams.
However, I essentially had only two fabrics. One was the stripe, cut in two directions, and the other was the cat faces. What I needed was another fabric so I could vary the order of the fabrics. Preferably purple since there wasn’t any of that colour in the stripe fabric (and you don’t have a full rainbow without purple!). Even better if it had cats on it. And if I was going to buy fabric I may as well make it the backing fabric, too.
So I went shopping. No luck getting purple cats. I could get plain purple at Spotlight, but there wasn’t enough left for backing. I found a nice purply-blue fabric with multicolour ovals on it at a patchwork shop, but there wasn’t enough of that either. Hunting on the internet when I got home, I found another Spotlight store had white fabric with multicoloured dots on it and decided to go get it the next day to use as the backing fabric – and if it wouldn’t work on the front I’d get a little bit of plain purple to use for that.
The next morning I remembered that box of leftover strips from projects I’d woven and sewn, so I decided to have a dig around to see if there were any purple strips in it. And what did I find?
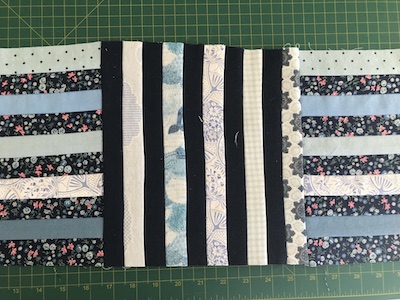
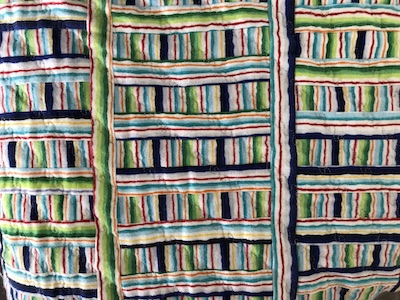
The second and larger batch of wiggly stripe fabric was a mix of red, blue, black and green, and had been cut both vertically and horizontally. I also had a good sized piece of uncut fabric to play with. I took inspiration from a video showing ways to use striped fabric in blocks to find a design that looked good. Though I tried a few plain colours mixed in with the fabric, in the end I decided I liked it all made from the same fabric.
I started as I had with the Cat Quilt, pairing up the already cut strips – one vertical, one horizontal. Then I considered what length to cut them to use most of the fabric. This time I had two lengths that worked, so I embraced that and made columns of alternating widths. The columns were separated with one long strip.
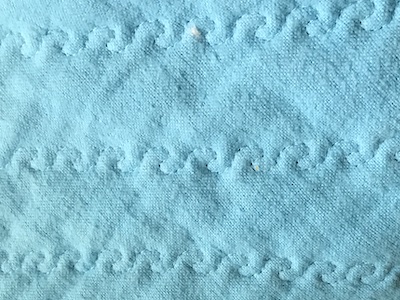
I like how the design I settled on looks like ladders. It was a pity, I thought, that I’d already used serpentine stitch for the top stitching of the last quilt. When I looked at the next stitch in the list, it was also very snake-like:
So that’s what inspired the name of the quilt.
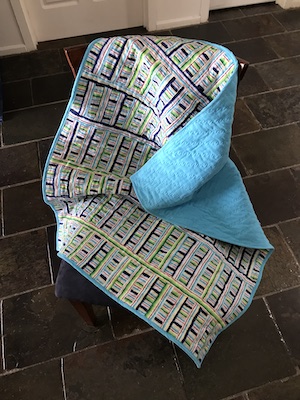
For the backing and binding I used the fabric I’d set aside for the Aqua Quilt leftovers. It turned out to have a small rip in it, but I was able to use it for this quilt instead.
The Snakes & Ladders quilt is a bit small for a couch blanket and too big for a cat quilt, but makes a generous lap rug. By the time I’d finished it, I had already done a test block for the next quilt – the Rainbow Cat Quilt. Now that one is going to be fun!