What I’m Knitting (and Crocheting)

I’m still working on small projects, using up single balls, so it was a bit of a surprise when, a few days ago, I removed a bit more yarn from my stash spreadsheet and realised the total had just dropped under 10 kilos.

That’s a nice milestone to have passed, though it does hinge on whether I consider the Summer Solstice project a wip or not. For now it’s officially in hibernation, waiting on me to regain some interest in larger projects. Once I start working on it again I’ll decide if the yarn is too scratchy or not.

So what did I finish?

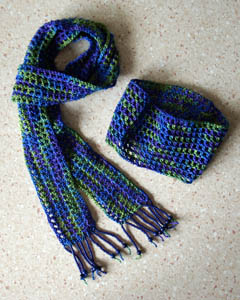
First, a scarf crocheted from sea silk. I wanted to make a cowl from Interweave Knits, but I got tired of waiting for the magazine to show up in newsagents. A long time ago, before I even started blogging by the looks of it, I crocheted a simple skinny scarf out of a single ball of op shop yarn and added a beaded fringe. I really like that scarf. It’s pretty, looks good with evening wear, and works well in spring and autumn.

So I decided it was time to make another one:

I used some large blue seed beads and a bigger blue bead from a repurposed necklace. And with the leftover yarn I made a headband.

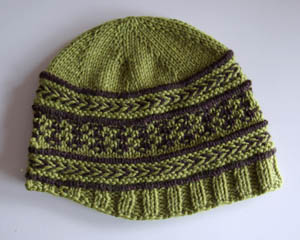
I bought the Lallans pattern from Twist Collective and knit it out of Mission Falls 1824 Wool with Cascade 220 as the contrast yarn:

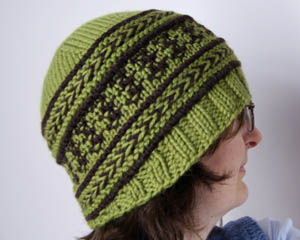
Unfortunately it came out a bit big for me:

I have enough yarn to make another, so I’ll see if this one will fit Mum, who has a larger head than mine. If it doesn’t I’ll make another, reducing the size of the needles, crown section and brim.

This pattern had me utterly charmed:

Such a simple method of getting a cable! I’m not into knitted jewellery but, as I hoped, it’s the perfect size to be a headband:

I want to use the same method to make a scarf. Maybe out of the Debbie Bliss Pure Silk I dyed a month or so ago.

I’m also working on a pair of socks, trying out a new shaping method that doesn’t break up graduated colour yarns. If that works I’ll post directions here. It’s a lot simpler than it sounds!

Sketch Sunday 66

On Thursday, after a big lunch in the city, Paul and I headed to a camera shop he likes. Seeing this park opposite the store I thought ‘Great! Instead of standing in the shop feeling bored, I’ll go do a sketch’. So I settled in and got to work. But within a few minutes Paul was out of the store, and I’d barely got started with the paint. So I finished it in a bit of a rush.

Bet he’d have taken three times longer if I’d gone into the store!

Recreating not Refashioning

After I realised I didn’t have the right inks for printing plates, I turned to another printing project I’ve been meaning to try. A long, long time ago I went to the Cook Islands with a friend, where I bought this t-shirt:

I loved that t-shirt so much. The fabric is now so thin from being washed so many times that it’s practically see-through, and bleaching doesn’t seem to get rid of the discolouration of age any more. Though I haven’t worn it for years, I can’t make myself throw it away.

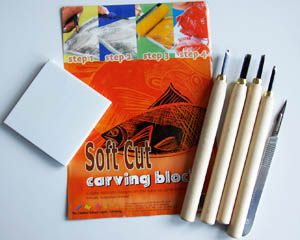
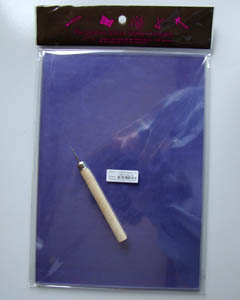
When I saw this product at Zart Art I grabbed a pack. I’ve seen it on US based artist’s blogs, but never found it locally until now.

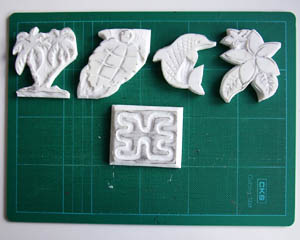
With this stuff I could recreate the t-shirt. So I traced the main pictorial elements and got carving.

It won’t be exactly the same, of course. I made the dolphin a bit less basic, for a start. And I won’t have the type along the bottom. But once I get hold of a t-shirt to print on, I’m going to see if I can make something similar.

Happiness is Learning a New Skill

It’s been a while since I attempted any printing. The pasta maker is still clamped to the edge of the table, but my last printing session raised a lot of questions about materials and methods, and made it clear I needed to seek more information and better tools.

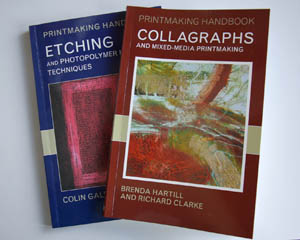
On Saturday Paul needed an ideas journal and I wanted to check out local sources of paper for life drawing, so we headed to Zart Art. I came home with lots of printing supplies, including these two books:

I then sat down and read the Collagraph book from cover to cover. It answered a few questions and introduced me to even more techniques. However, it assumes you have a lot of knowledge about printing already. Much of this is in the Etching book, thankfully. But there were still things I had to work out for myself.

I’d bought an etching tool and some clear acetate sheets, because the plastic I tried to use for plates was very hard to cut and scratch into, and repelled the printing ink.

I also bought more ink.

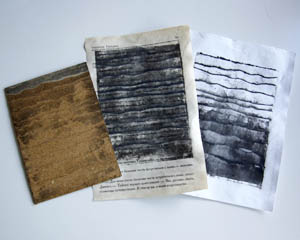
On Sunday I dug out the collagraph I’d already made of cardboard and paper. Following the advice in the books, I varnished the back and edges, soaked some cheap paper – a page from a book and some used office paper because I didn’t want to use expensive 100% rag paper yet – inked the plate, wiped off the excess, blotted the paper and tried a print.

It came out a bit dark and blurry. I figured I hadn’t wiped enough ink off, and maybe the book page was too absorbent despite soaking. So I inked again, wiped more and tried the office paper. This time I could see I was on the right track, but the ink went kind of slushy.

A bit more consulting of books and of jar labels and I realised that the water-based printing inks are really only meant for relief printing (stamps, linocut, etc.). Paper that goes through a press is dampened in order to get an embossed effect and push into the grooves that contain the ink. Damp paper and water-based ink = blurred lines and ink gone slushy. I need oil-based inks.

There was no point trying the acetate sheets, as they’d need oil-based ink, too. Still, the prints that I did had black lines where the grooves in the collagraph plate were, and that was kind of an exciting glimpse at how things will eventually work once I get this process right.

So I have a new shopping list, and it goes a bit like this:

oil-based printing ink
printing paper
blotting paper
new studio with large sink for washing oil-based ink off printing plates

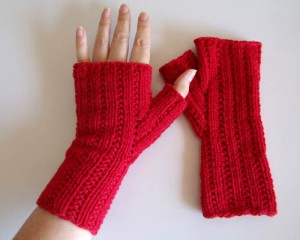
Free Knitting Pattern: Lazy Rib Fingerless Mitts

On Tuesday night I was looking though old entries from when this blog was solely a knitting blog, and I stumbled upon a mention of a pattern for fingerless mitts I was writing from back in ’08. I went looking for it, and eventually found it on my laptop. It was written while at a writing retreat, but I’d came down with a severe flu and didn’t trust my addled brain’s ability to do math, and then never got around to test knitting it.

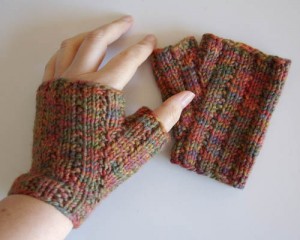
So on Tuesday night I dug out a single ball of yarn I’d bought because the yarn was luscious and interesting and tried my pattern out. The pattern only needed a single correction. I decided I wanted to use up most of the ball, so I made these mitts longer at the wrist, palm and thumb and added some additional numbers to the pattern to make that version.

Lazy Rib Fingerless Mitts
50 g ball/skein 8ply/dk (I used Woolganic Knitters Yarn for the long pair, and some mystery hand dyed 8ply for the shorter pair)
4mm dpns
Stitch holder
Darning needle

CUFF
Cast on 27 st and arrange 9 st on each of three dpns (Please note: I have thinner than average wrists and haven’t yet had time to test the mitts on someone of average size. If you suspect these will be too small simply cast on 33 st instead, and place 12 st on first needle, 9 st on second needle, and 12 st on third needle. The shaping all happens on the second needle, so the pattern will still work.)
Round 1: *k2, p1* rep to end
Round 2: knit
Repeat Rounds 1 & 2 seven (fourteen for longer mitt) times in total, then Round 1 once more

HAND
Continue in rib pattern on first and third needles, but whenever you get to the second needle:
Row 1: k3, m1, k2, m1, k4
Row 2: k2, p2, k2, p2, k2 p1
Row 3: k3, m1, k4, m1, k4
Row 4: k2, p1, k1, p1, k2, p1, k1, p1, k2, p1
Row 5: k3, m1, k6, m1, k4
Row 6: *k2, p1* to end

Row 7: k3, m1, k8, m1, k4
Row 8: k2, p2, *k2, p1* to last 4st, p1, k2, p1
Row 9: k3, m1, k10, m1, k4
Row 10: k2, p1, k1, p1, *k2, p1* to last 5 st, k1, p1, k2, p1
Row 11: k3, m1, k12, m1, k4
Row 12: *k2, p1* to end

Row 7: k3, m1, k14, m1, k4
Row 8: k2, p2, *k2, p1* to last 4st, p1, k2, p1
Row 9: k3, m1, k16, m1, k4
Row 10: k2, p1, k1, p1, *k2, p1* to last 5 st, k1, p1, k2, p1
Row 11: k3, m1, k18, m1, k4
Row 12: *k2, p1* to end

There should be 45 st (9 st on first needle, 27 st on second needle, and 9 st on third needle)

Next row (second needle): k6, move 15 st onto holder, co 3 st, k6 (33 st on needles – 9 (or 12) st on first needle, 15 st on second needle, and 9 (or 12) st on third needle)
Rep Round 1 & 2 three times in total (six for longer mitt), then Round 1 once
Cast off in rib

THUMB
Move st on holder to needles, arranged 6 st on first needle, 6 st on second needle, and 3 st on third needle
Knit to end, pick up 3 st onto third needle at base of thumb
Rep Round 1 & 2 two times in total (four for longer mitt), then Round 1 once
Cast off in rib

Sew in ends

Sketch Sunday 65

The year before last (is it really that long ago?), while on holiday in Canada, we went to an Ethiopian Restaurant and had a fabulous meal. The dish we shared with our travel companions involved a big platter of injera – moist crepe-like flat bread covered in spicy meat and bean sauces that you eat by hand. I decided I had to try making it one day. When I got home I googled some recipes, but a few of the ingredients were going to be hard to find here so the idea slipped to the back of my mind.

Recently some friends of ours have been hosting dinner parties trying out social ways of eating food, like ‘steamboat’. They’ve inspired me to finally try those Ethiopian recipes. A few days ago I bought a spice grinder so I could make Berbere sauce (though the recipe I used is more a spice mix than an actual paste). Yesterday I got out our rarely used slow cooker and made a lamb sauce which included the Berbere spices, and then last night I whipped up the injera and we got nomming.

It went better than I’d expected. The sauce was fabulous. The injera was a bit bland, but I suspect that’s because I used ordinary wheat flour rather than traditional grains – one of the hard ingredients to find. Still, it’s better that than the other way around. The injera is used to mop up the sauce, so the sauce tends to dominate anyway.

Tonight I’m going to try 100% wholemeal flour and see if that makes a difference. In a couple of weeks I’m having one set of friends around to experiment on, and I’ll try two more meat sauces. Yum!

Some Beads, Some Wire, Some Chains

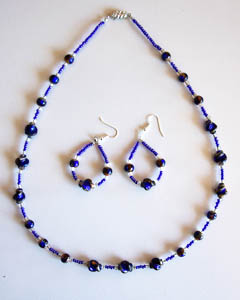
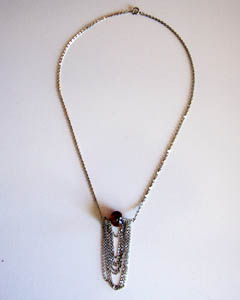
A few weeks back I had a sudden itch to make – and remake – some jewellery. After refashioning a few pieces from old ones, I made a few new things from my little box of beads and supplies:

Early last year I bought some discounted bundles of glass beads from an art store in Canberra. They were a bit ‘too much’ all strung together, so I spaced them out with some seed beads. I’m not in love with the result, but I like it enough to wear it. At least until I think of a better idea.

I saw some elaborate necklaces featured on a blog with lots of chains draped between beads. This is much less fancy, but I like the simplicity of it and have worn it out twice already. It incorporates a glass bead I bought at the craft show last year.

This looks much nicer worn than lying on a flat surface, because the strings of beads hang slightly in front and behind each other. It’s based on a wood and gold necklace I bought cheaply at a dress shop. I had one of those moment when it occurs to you that two things you’ve been keeping separate would look great together. In this case, there’s a lot of black and white fashion about, which I like, so the combination was in my mind when I looked through my beads. The white beads came from a necklace I bought at an op shop, the black ones for another necklace that only ever worked in my head.

It took many, may hours to make it, partly because I used tiger tail on my first attempt and I couldn’t get the lengths of each strand of beads quite right, and then I kept running out of one or other kind of bead. Eventually I strung them separately on plain sewing cotton, then transferred them to beading thread when I was satisfied with the combination of beads and how everything hung together.

Crafting in the Heat

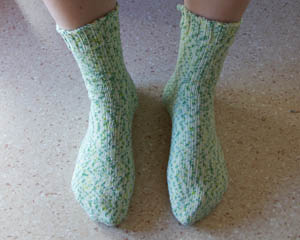
Socks
Pattern: my own toe-up heel-flap sock pattern
Yarn: Crystal Palace Panda Cotton (59% bamboo, 25% cotton, 16% elastic nylon)

What with the heat and the stress of the last week, my crafting has been a bit directionless. Knitting has always been a good fall back craft, since I can retreat downstairs where the aircon is most effective to do it.

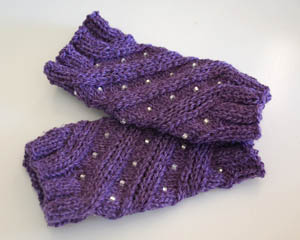
Wrist Warmers
Pattern: based on the Celtic Cable Neck Warmer
Yarn: Eki Riva Casual (baby alpaca)

Not only did we have a wet lounge room on the weekend, but a few days earlier we were woken at 4am by the sound of a crash and glass breaking. Investigation revealed that a picture rail that the shonky builder of our house extension had installed was only held up by one nail and by being wedged between side walls. It finally swivelled on the nail and dropped a framed photographic print down the stairwell. Shattered glass and nerves everywhere.

That night I opened an art exhibition for the contemporary art group I’m a part of. This was nerve-wracking as well, though in a good way. I was utterly worn out by the end of the day.

I had an interesting conversation with the curator of the gallery about the difference between contemporary art and Contemporary Art. I realised that my ideas swing toward the latter, but the practical side of me says ‘yeah, but you can’t make money out of that’. I go around in circles and don’t get anywhere. But I ask myself, do I need to make money out of it? Can’t I chalk it up as a hobby – something I do for fun and creative exploration?

In the meantime I can, at least, keep in practise. My first life drawing class on Friday was great. I felt a bit guilty about doing an art class on a weekday, when I should be working, but I love learning under this teacher and want to seize the opportunity while it’s there. One day she’ll have to retire, though she seems determined to keep teaching as long as possible. I’ll just have to work a bit on weekends to make up for it. Which is what I’ll have to do if I start a fine art degree, anyway.

Sketch Sunday 64

On Saturday morning I found what I thought was cat vomit on the floor in the middle of the lounge room, except it wasn’t. It was water, and the wet patch kept growing and growing. The strangest thing about this was that, while it had rained hard overnight, it was petering out by the time this happened. We could see no entry point, and since the water appeared around the seam where the original house slab had been added to long, long ago, it looks a lot like the ground got so saturated overnight that water began welling up through the seam.

How the heck this can be fixed, we have no idea. Hopefully it’s a freak occurrence due to the crazy weather we’ve had lately. Lots of people were having much worse flooding problems than us. We managed to get a carpet cleaner before they were all booked out. They spent ten minutes sucking up the water remaining after I’d soaked up as much as possible with towels, then left this giant hair dryer for us to run overnight.

Sunday we had big stains and were resigned to replacing the carpet. Yesterday they came back and cleaned the carpet again and I was pleasantly surprised to find that most of the stains went. We can probably hang onto the carpet for a while longer. Parts of it are worn out anyway but the thought of the upheaval it would mean to replace it all has us covering our ears and going ‘lalalalala’.

Mind you, if we get flooding rains again, we may get more seepage. Then we’ll have to rip the carpet up to find out where the water is coming from anyway.

Beaded Beanie

Pattern: Odessa
Yarn: Bendigo Woollen Mills Allegro
Adjustments: I made it much shallower than the pattern specified.

My latest small, stash-busting project. I like knitting with beads, but I haven’t done it very much because I could never find beads of the right size to thread onto yarn. I finally found some at the craft show last year.

The beanie did not come close to using up the yarn, so I knit these to match:

More wristwarmers.