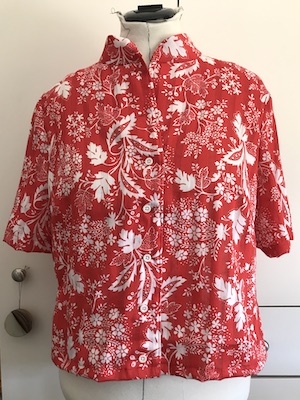
This’ll probably be the last sewing post for the year. First up, a short-sleeved shirt I made from one of Late Lucy’s choir dresses. I’d attempted to make a peasant top and failed, but the pieces of fabric were just big enough to test a vintage shirt pattern, though it did mean there’s a seam down the back. I left out the waist darts, and somehow this made what was a rather traditional floral pattern now look, at first glance, like a Hawaiian shirt. The pattern instructions for the collar are strangely complicated and the button band facing doesn’t sit properly, but that’s why I do a test sew of ‘new’ patterns. I wound up unpicking and resewing the collar the old fashioned way, which made for a much neater finish.
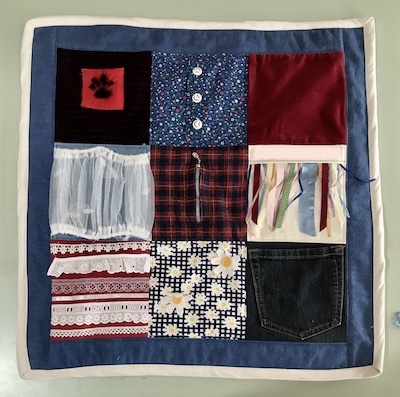
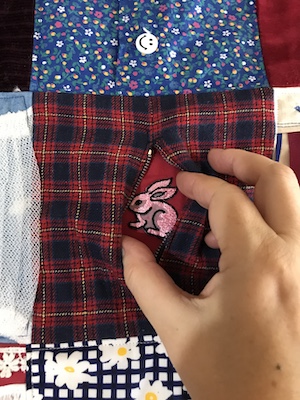
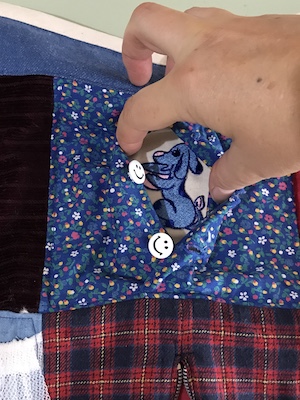
In the middle of the above project I stopped to make a fidget blanket for Mum. It contains fabric from two pieces of clothing she made years ago. I made a couple of additions since I took this photo. The ‘curtains’ are fixed apart and there’s a duck in the middle of the sky background. And there’s a stuffed velvet heart attached by a ribbon to the inside of the denim pocket.
It was fun to make the squares, and was a great excuse to use the lettering embroidery function on the machine (text obscured in the photo) so that was interesting. Assembling and quilting reminded me that I’m not that keen on quilting. I showed my Dad some photos of it, then the next day he called to say that a couple of fidget blankets had turned up at the home. They’re very basic – the squares are just sewn to a fleecy polyester backing. Mum’s will probably get lost among them and I’m trying hard not to worry too much about that.
There’s a fabulous shop called Resource Rescue in Bayswater that sells all kinds of leftover bits and pieces from wood scraps to craft supplies to old shop mannequins. The foam pieces I used to carve grooves for canvasses in the wet panel carrier were from there. A few weeks back the shop announced on its Facebook page that it had taken leftover stock from a closed art and craft warehouse, so a friend and I headed over to check it out.
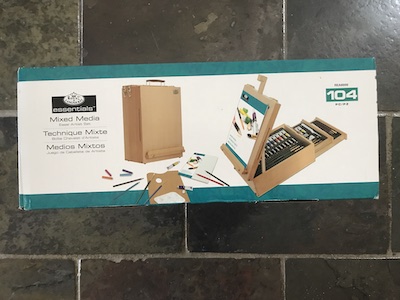
The first thing I saw was an easel full of art supplies. The art supplies were very much at the low end of quality, but the easel – a French style box – was pretty sturdy.
The design had a few flaws, but I figured I could fix those. The drawers were on the wrong side of the easel, for a start. The canvas clamps onto the lid of French easels, but that means that when the lid is open and in position to paint, the main part of the easel is behind the lid, out of reach. To get around this there is usually a drawer or two on the lid hinge side, but on this easel the drawers were on the opposite end side.
At home, after much rumination, I came up with a plan.
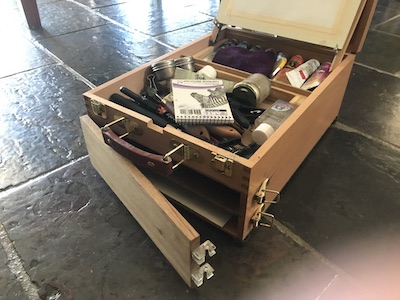
First I set about creating a way for a canvas to be attached to the inside of the lid instead of the outside. A pair of L-shaped metal corner supports on the lid struts provided something for a canvas to rest on, or be clamped onto if there’s a bit of wind. I also made a divider for the top section because every time I picked up the easel the contents would slide down into a muddle.
The drawers took up a lot of space and added weight to the easel so I removed them and screwed on a little door.
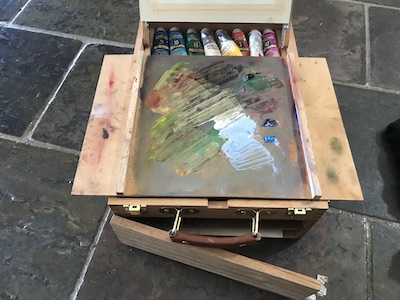
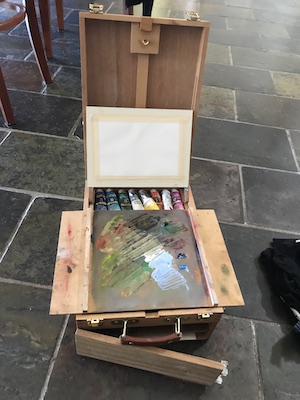
One cavity holds a brush carrier and some other bits and pieces, the other holds a palette I made that fits onto the top of the open easel and has beading that keep the paint from touching the inside of the cavity when stored.
The last amendment was to add a foot plate for a tripod and bigger rubber feet to accomodate the thickness of it.
I mostly use canvas paper taped to a board thesedays as it is light and takes up very little room. It can also be any size or shape so long as it fits on the board. I’ve made a board the same size as the drawer cavity, and a smaller one just because I had a scrap left over.
I’ve used the easel several times now, in life drawing workshops and to a plein air meet. And I took it with me on a recent two week slow drive to Adelaide and back. I’m pretty happy with it.
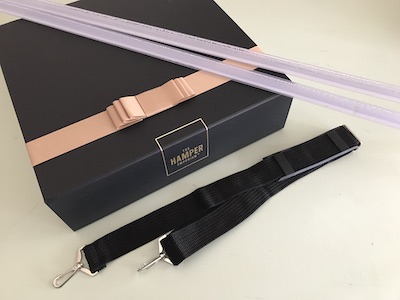
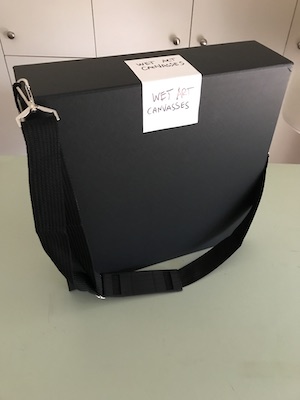
The itch to do plein air painting is back, and that’s led me to tackle a few related projects. The YouTuber artists I watch use box style wet-panel carriers made from wood or corrugated plastic, but I have yet to find a shop selling them in Australia. I figured it wouldn’t be too hard to make one, so I went looking for materials and found hamper box and a shoulder strap.
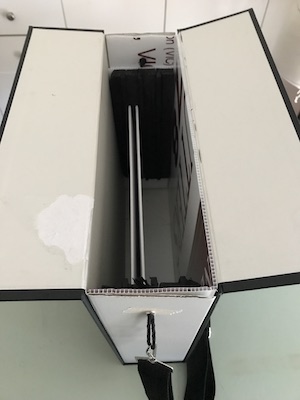
The hamper box closes with magnets, so all I needed to do was add a corrugated plastic inner to strengthen the sides. I bought the plastic edgings in the photo in the hopes it would make good dividers for the panels, but it was too deep for the job. Instead, I used a kind of dense black foam that I could carve grooves into. I drilled holes into the sides to for strong cord loops to hook the shoulder strap on.
Finally, I covered the hamper label with my own.
I’ll only be able to store canvas boards or the thinner style of stretched canvasses in it, and only ones that are 10″ on one side and a max of 14″ on the other, but there’s a good range of options available.
Of course I won’t know if it works well until I try it.
But hey, I was right that most of the materials in it would come in handy one day!
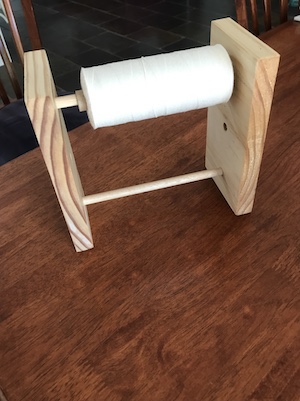
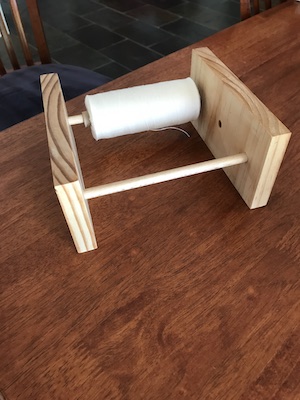
A couple of dowels sticking vertically from a wooden base. That’s what I’ve been using to hold both cones and reels of yarn when winding warps or bobbins. Even though the dowels weren’t straight and sometime fell out, it did the trick. But as I was weaving the pinwheel towels, I noticed how the yarn wound up with quite a twist to it. Reels of yarn ought to sit horizontally when unwound, while yarn from cones needs to come off vertically.
Since I was doing a bit of carpentry anyway, making the warping mill, I got to thinking about making a new yarn stand. The usual lazy kate design came to mind first, then converting one of the boxes the local specialty wine store sell. But the prospect of transporting it to a workshop made me realise it needed to be light, multi-purpose and collapsable.
Immediately I knew all I needed was two pieces each of dowel and timber. For cones it could be used like this:
For reels it can be used like this:
Or this:
And then be broken down like this for travel.
Sometimes the simplest solutions are the most satisfying.
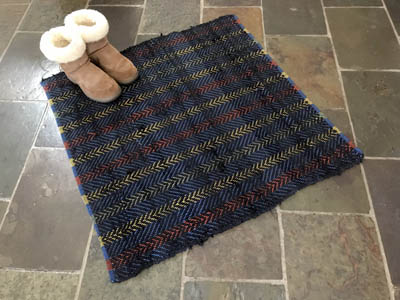
I had enough warp left over from the twill rag rugs to weave a square t-shirt rag rug.
The variation in the depth of the black wasn’t obvious as I wove it, though I did reject one garment worth of rags because it was quite noticeably grey. This a bonus ‘spontaneity’ that comes from weaving rags from used rather than new cloth.
I like the extra squishiness of the knit fabric, and it was nice to not have to worry about ironing and placing the rag so the back side of the fabric doesn’t show. In fact, not having to fuss led to me trying different approaches on the next rug warp, but I’ll cover that in the next rag rug post.
At the beginning of last week I looked at all the part-done projects and tasks hanging about and decided to get stuck into completing them. The list included the rag rugs, some gardening tasks, a few sewing jobs and carpentry projects. I thought I’d get it all done in a day… it took a week. But I did succeed in my aim!
The rag rugs will be in another post, and the gardening and sewing jobs were small and menial, so I’ll stick to the carpentry projects. The first one was another box thing to match the one I put my 4-shaft certificate course notes in, ready for when I do the 8-shaft one. It made sense to make it while I could recall what I did on the first one. However, I do wonder if I’ve now jinxed the course, and it won’t go ahead now!
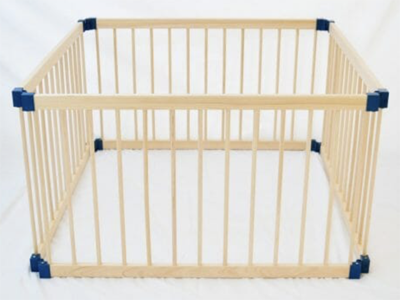
The other project was to turn a giant warping board which was once two sides of a wooden kid’s pen into two normal sized warping boards. I’d picked up the broken play pen from hard rubbish aaaages ago. It once looked like this:
Only two panels survived. I was going to make a clothes drying rack or hang plants off it, but one day I looked at it and thought, “all I’d have to do is cut the dowels a handspan long and I’d have four sides of a warping board”. Of course, Paul did the cutting as he is master of the power saw, and he found some metal brackets to join the corners with and “Ta-Dah!” we had a warping board.
A really huge warping board. Maybe 120 cm square. Unfortunately, I didn’t take a photo of it. A pic of someone holding it could have been quite comical. I held off oiling it and left it out in the garage because there was nowhere to store it inside and I knew I was going to have to consider whether I really needed a giant warping board or should cut it down.
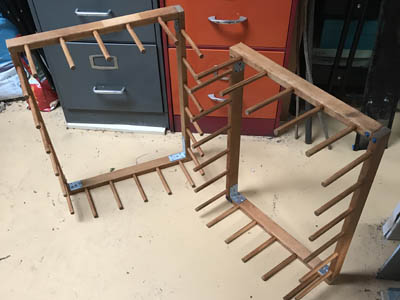
I decided on the latter and, after some measuring up, confirmed there was enough framework to make two normal sized boards. A bit of sanding, sawing, screwing and oiling later the reconstruction was done. However, what I had then was two warping boards with wobbly pegs. The dowels had shrunk since I’d bought the pen panels.
So I set to carefully painting watered down pva around and into the gaps. This wound up taking a couple of hours, broken up over days as the glue dried and shrank and needed to be topped up, but by the end those pegs weren’t moving anywhere.
Do I need two more warping boards? Nope. But the wood has been repurposed and the boards will eventually find homes.
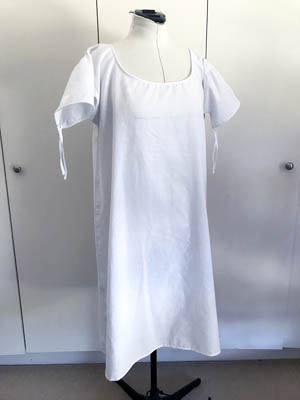
In the middle of making patterns for my next sewing project, a friend invited me to a Regency-era costume picnic the next weekend. That sent me off in a bit of a tangent. I have a dress I made some years ago that I’ve only worn twice. While it’s cotton velvet, so should be warm, I was suddenly obsessed with the idea of having the right underthings. Stays were probably not achievable in the time I had, but I could try making a chemise. The garment, from what I recall, goes under the stays to protect the skin and soak up sweat.
And sweat was likely, if we had a hot day. If we had a cold day I’d appreciate the extra layer. So I searched the web for instructions, and after sending my friend lots of questions about fabric and length, cut up a bed sheet and made this in an afternoon:
Some adjustments were needed to match the neckline to my dress the next day. If I hadn’t been in the middle of a sewing jape, I probably wouldn’t have tackled this or got it done so quickly. Though it’s a simple garment to make, all seams are flat fell seams, so it’s rather slow and finicky.
I rather fancy making a full Regency corset now, but I knew I wouldn’t get one done in time for that weekend so it’s low on the to-do list. Probably I’ll get keen again next time I have a Regency-era costume event to attend.
For a few months now I’ve been cutting, matching, sewing together and ironing flannelette rag strips ready to weave more floor rugs. The flannelette scraps from the enormous bag of them I’d bought from the pj-maker last year has all been sorted and cut. The pieces of flannelette I’ve picked up since are mostly cut into strips too. I have to say, cutting big rectangles of fabric into strips is much faster and more accurate than cutting lots of scraps, and if I wasn’t doing this partly as an exercise in making something useful from what would otherwise go into the trash I’d stick to using old fabric.
I reckon I have enough batches of strips for seven or eight rugs, with possible eighth either being made up from the leftovers, or the first of a new batch using more fabric added to the leftovers. The first two rugs I’m going to weave are 1 x 2-2.3 metre wide aqua and blue rugs on the same warp, which will be a twill sequence of blue stripes interspersed with orange, yellow and green stripes. The colourway is bright and cheerful and reminds me of beach towels.
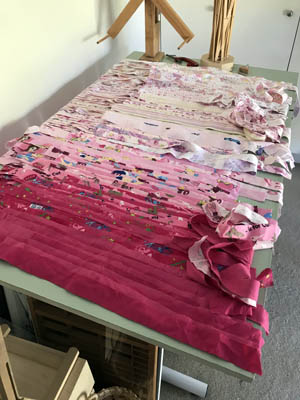
Halfway through measuring the warp I ran out of blue and had to order in more. While waiting for it to arrive I moved on to sewing the strips for the next two rugs: a pink rug and a light blue rug using the same grey warp.
My plan was to weave one pink rug of about 1m x 2.5m, and a smaller light blue rug which would require more fabric. But as I laid the pink strips out I considered the likely owner of the final rug. The most probable recipient would be a child, and it would be a pretty big rug for a child’s bedroom. So I decided to weave two pink rugs instead, at 80cm x 140cm. It turned out I had exactly half the weight of light blue rags to pink ones, so I’ll be making three rugs of the same size and don’t really need to find more fabric for the light blue one. It’s nice when things seem to fall into place like that!
The first batch of pink rags is going to be a graduation.
The second will be all mixed together, as will the light blue. The pattern will be rosepath, based on the project in Tom Knisely’s book. Fortunately, I had the presence of mind to order an extra cone of the grey warp along with the blue. Not only will I need more than I have left on the original cone to do the longer warp, but winding with two ends together will make the measuring much faster.
Once the blue warp arrived I finished winding that warp. It took two attempts to get it on the loom. On the first attempt I realised I had counted 22 threads for every blue stripe not at the edges, but was actually 24. So I had to add threads and weigh them at the back of the loom. Whether the weights were on or not, this made lashing on the warp at the front a pain in the posterior.
But it got it done and started weaving… and realised that the draft I had created didn’t, as I’d thought, let me weave plain weave for the hems. I tried weaving basketweave, but it just didn’t compact down as it ought to and would not make a good hem. So I went back to Fiberworks and came up with a draft that mostly fixed the problem. And since this meant I’d have to rethread the loom anyway, I wound the whole warp onto the front beam, tied on the extra threads so I wouldn’t have to hang and weigh them, and wound it back onto the back beam.
After that the threading went perfectly and I was finally able to get weaving.
However, by then my back was hitting a bad phase and I had to stay away from the loom for a few days, which was hard after all the preparation that’s gone before this. I just want to weave!
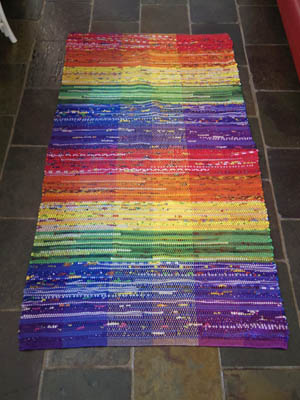
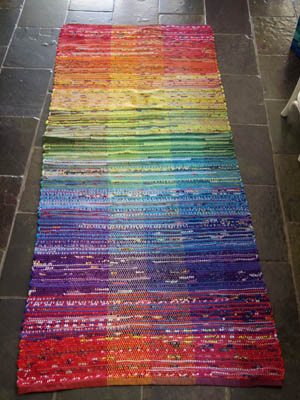
The plan was to weave two 1x2m rugs, both using a spectrum of colours but with different approaches, so the recipient can choose which they want.
For the first rug, I wove neatly delineated stripes that form squares with the warp stripes. I used dark blue fabric for the blue stripe. For the second I wove a single sweep through the spectrum achieved by using two shuttles: creating a solid colour section for 20 rows then a mixed section of alternating stripes with the next colour for the following 20. I used a sky blue fabric for the blue stripe. I also had red on both ends, which made it longer than the planned 2 metres.
I wove hems rather than fringe because there are fringe-eating cats in the household.
The amount of preparation to weave these rugs is kind of crazy. A very rough calculation puts them at about 24 hours per rug. But the result is so good, and the use of a waste product so satisfying, that the time and effort is totally worth it.
There’s going to be a lot of rag strips left, so I foresee more brightly coloured rag rugs in my future. I’ve gone through the rest of the flannelette fabric and there are seven more rugs I want to make, not including the two in other kinds of fabric on the to-do list. Most require a different warp colour, so that’s going to bump up the hours per rug count. Still, the wide sett of a rug warp makes for very fast threading.
Now I’m just waiting for restrictions to be lifted so I can visit the recipient and let them choose which one they’ll keep.
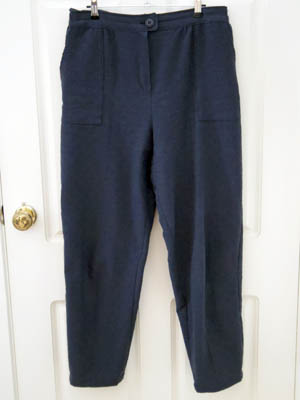
But not what you’re probably imagining! No gingham or embroidery, though that could be awesome. Years ago I requested a black tablecloth for a birthday or Christmas. Mum couldn’t find black so she opted for this dark charcoal which kinda worked in our old place.
We live in a different house with a different colour scheme now so when I culled our table linens recently I decided the charcoal tablecloth should go. But where to? Op shop? I like the fabric, with it’s subtle textured grid pattern, though not so much as a tablecloth. It seemed more suited to clothing. So I popped it in my fabric stash.
I imagined it becomming a shorts jumpsuit at first, and when I found a pattern I snapped it up. But after my recent decision to retire and replace two pairs of summer cotton pants it was kinda obvious what the tablecloth needed to become.
After I made the Bed Sheet Pants I made some adjustments to the pattern. I also decided to put back pockets on this pair. The fabric was slightly stretchy, so I had to take care when sewing to avoid wobbly seams. I got the waistband right this time, too.
You’ll have to trust me that they look good on! It’s not the most flattering way to photographing grey pants, hanging them against a door, and these days I just don’t have the energy to set up a tripod or chase Paul in order to have a pic of me modelling clothes.
The sewing bug hasn’t been exhausted yet, so I am now making a new dress out of one of Late Lucy’s. Or I will be, if the test run of the pattern works out. And that has been interrupted by the start of a weaving workshop that I’m really enjoying. More on that later…