
After removing all the artwork in our old house I was left with a LOT of nail holes to fill. For most it was just a matter of filling the hole then painting with undercoat and then dabbing paint on with the end of a brush. However, where the paint was older it had discoloured, and while in a few rooms I was able to thin down the paint with water and blend the edges of the fresher paint into the old, in some rooms the colour change was still visible.
It was worst in the workroom, where I’d had lots of little paintings hanging and the abundance of light had really changed the paint colour. The room wound up with lots of very obvious patches of new colour. It had to be repainted, but by then my right wrist was sore and swollen so I had to get a painter in.
Dealing with all those nail holes was a lot of work and an unexpected expense. I’m now very reluctant to whack a whole lot of holes in the walls of the new house. Yet we have a lot of art: paintings, photographs, signs, clocks, mirrors and various objects that look good hung on walls. What to do?
I’ve started gathering clever ideas for hanging art without making nail holes. The first three are ones I’ve already used:
A shelf or the top of a bookcase.
The best part of this method is you can overlap the artwork and fit more in:
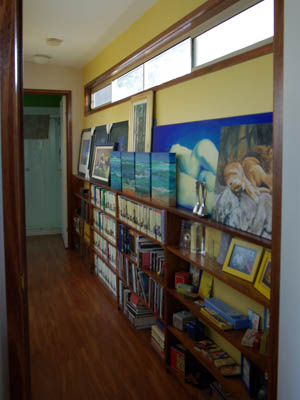
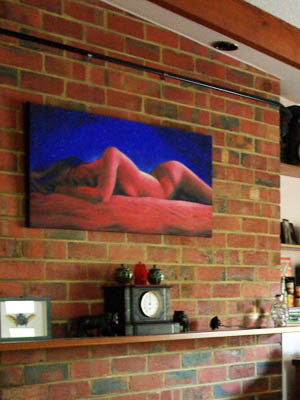
There are a couple of places in our house with a dado rail we could install a shelf on top of, and we have a mantlepiece begging for overlapping art – though I’ll have to work out a way to stop them sliding off as it’s painted with slippery gloss paint.
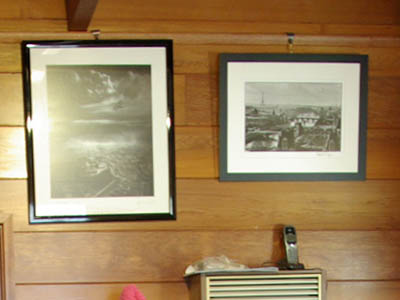
Picture rail.
And old idea but a good one. The advantage is that art can go anywhere along the rail. Might not suit some houses, though, and where we have dado rails already it might be overkill. There’s a wall in the family room one would be fine for.
Picture hanging system.
This involves a purpose-made rail installed up under the architrave from which you hang a wire with a hook. The wire and hooks can be moved so you can position art wherever you like both vertically and horizontally. You can also put two or three paintings on each wire, depending on their size and weight. It’s expensive, but we’ve found the rail can be swapped for a curtain rail and the wire hung from the hooks used on picture rails:
Or a picture rail, with a length of chain and an s-hook:
One solution I haven’t tried yet for art is the removable plastic hook. I’ve used them to hang other things, like oven gloves. They don’t always come off cleanly, but if even half of them do that’s cut the time spent repairing walls considerably. I’m going to try these for our lighter pieces of art. For the gallery wall effect I’ll use nails for heavier pieces then then surround them with smaller, lighter ones on removable hooks.
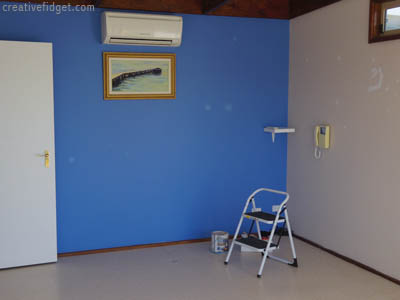
Another solution I’m considering is to place art on something that either stands in front of or leans against the wall. Like this ladder. Or display easels. I saw several nice wooden easels going cheaply at an antique market a few weeks back, and I have one I don’t use for painting any more because the screws are too stiff for my hands.
Full size easels do take up floor space, but there are table easels that can sit on top of cabinets and shelves. And cookbook and plate holders will work for smaller artwork.
At the moment we have all our art leaning against cupboards and boxes in the family room. I don’t want to decide where anything is going until we’ve moved the rest of our furniture from the old house. But once I do, I have plenty of ideas for non-nail hanging and display methods to try, and no doubt another blog post to show how it all works out.
Does it really matter if you create nail holes? What matters is to use a system that you can live with for the many years you will be in the house; if there’s a bit of patching to do when / if you move out, so be it.
The trouble was, we have so much artwork (120+ pieces) that we had to remove a lot to get the house looking good in the sale pics, and that meant filling the holes that were now exposed. Just as the camera adds pounds to a person, it takes roominess from a room. There’s only so much wide angle lens effect that counter that.
I’m not trying to avoid nail holes completely, but to reduce them to what the average house would have – and to add some flexibility as well.
And I am a bit of a nomad, though often not intentionally. The nine years I lived in the old house is a record for me. The previous longest time was five years. I really, really hope we’ll stay here longer, especially as the next move is likely to be a downsize.
I forget – our old house was advertised as suitable for demolition, so all we had to do was make it tolerably clean! Our current house, though – the previous owners had been advised to spruce it up a bit, so they painted – every room a different, horrible, colour. So we repainted as soon as we could, and then covered the walls with bookshelves.
After patching 180+ holes in our son’s bedroom walls when he moved out you would think I’d be apprehensive about putting a nail in the wall, but I guess I got over it . When asked him about the holes because I didn’t remember him having pictures or posters all over the walls, he said that they were mostly cause by practicing the blow gun! Kids…