
During the weaving workshop students from other classes would occasionally ask if they could come in and look at what we were doing. One duo looked at my loom and said “this is a really expensive loom, isn’t it?”. I told her how much it cost and then admitted I would advise against buying it, and explained why.
While I love so much about the Katie Loom, there is one shortcoming that renders it a loom only suitable for sampling or making very small projects. The cloth beam at the front is so close to the front beam, that the accumulating woven fabric around it soon meets the front beam and you have to cut it off to continue. It also begins to restrict how far forward the beater can swing, giving you a decreasing area in which to weave, and a narrowing fell. Depending on the thickness of the yarn you’re using, you could end up only being able to weave a metre of cloth.
It seems like compromises were made in order to keep the loom small and light. I’ve considered how the loom could be better designed many times, and it didn’t seem like much weight and extra depth would be added to it in order to allow a longer warp.
Having discussed ideas with Kay, I decided I was going to ‘fix’ the loom when I got home. I measured the loom and drew up plans, comparing different approaches that would gain more room for the front cloth beam.
Simply replacing the front beam with a dowel is a small change that would make a reasonable difference, and what I’d recommend for other Katie owners. This will make it much harder to put a raddle on the front of the loom but, as Kay had pointed out, a raddle ought to be as close as possible to the beam the warp is being wound upon – which is the back beam no matter whether you warp front to back or back to front. So if you want an improvement to your Katie, a simple change from the flat front beam to a broomstick-size dowel is an easy fix.
However, I wanted to try to make even more space for woven cloth, and that meant moving the cloth beam lower. I’ve considered moving it to new version of the ‘legs’ that swivel down to support the loom, but that would mean cutting the cloth beam shorter which would involve some tricky woodwork. I’ve considered attaching pieces to the underside of the existing arms to hold the cloth beam, but when I realised that was going to be as involved as simply creating new arms entirely I put that side aside.
New arms would add weight and depth to the loom, but I was prepared to live with that for the sake of being able to make a whole scarf on my only eight shaft loom.
First I carefully dismantled the front of the loom. The scariest part was removing the knob and ratchet – they are two pieces but it’s not obvious. The ratchet piece is screwed into the beam, and the outer knob slots tightly into the ratchet. It’s the part most likely to break when taking the loom apart. Don’t try this unless you’re prepared to break it and have to order replacement parts.
I managed to separate it without damaging anything, fortunately. Next I traced an existing arm, then brought out a math-a-mat, french curves and paper and got to work designing arms that would lower the cloth beam without compromising the function of the ratchet and pirns. When I was satisfied with my new design, I copied it onto tracing paper and held it up to the existing arms. To my surprise, they would only add about 2 cm to the depth of the loom.
A trip to Bunnings for some Tasmanian Oak (Ashford Looms are made of Silver Beech and a quick google didn’t show any easily accessible sources in Melbourne), some assistance from Paul with power tools, and a bit of sanding and varnishing later…
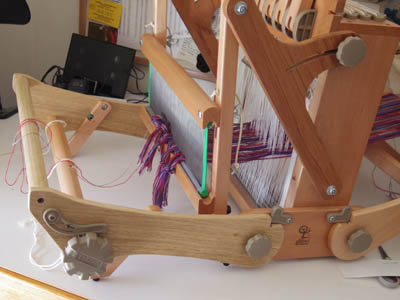
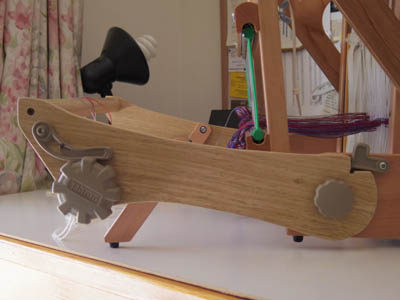
My modified Katie weighs only 44 grams more than the original loom. It’s about 2 cm deeper, and still fits in the bag the loom came in.
I’ve yet to test how long a warp I can weave on it, which really depends on the thickness of the yarn used anyway, but I’ve increased the space for the front cloth beam from 53 mm to 78 mm so that’s 25 mm more cloth thickness I can wind on before I run out of space.
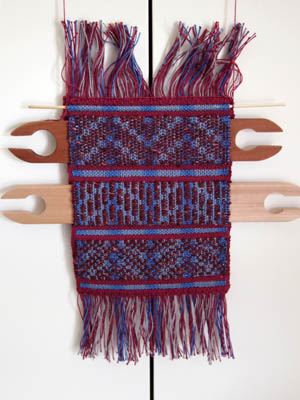
I’ll be trying out a longer warp soon, but the first thing I did was retie the sampler warp and weave the last of it, going through variations of summer and winter I learned in the workshop. I got a small length of fabric with pockets big enough to fit my stick shuttles, so it became a little shuttle storer:
I found that I can’t weave close to the front beam, as the beater doesn’t swing that far. That made me think about replacing the sides the beater hangs off so that it has a couple of positions from which to swing… which would be do-able but I think this is enough loom tweaking for now!
Hi Trudi
Well done. Great instructions on the way you have done this too.
Re getting 25mm extra space, remember that is the radius so you get that for increased circumference too, i.e. woven cloth – that will make quite a big difference
Jillian
Yes, even changing the front beam to a dowel could be all it takes to get a decent length of cloth on there.