Rugged & Blue

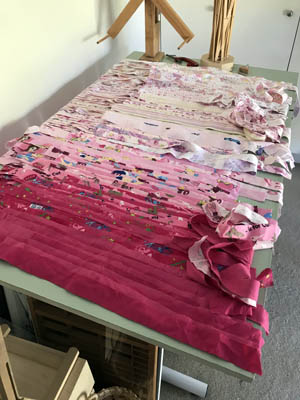
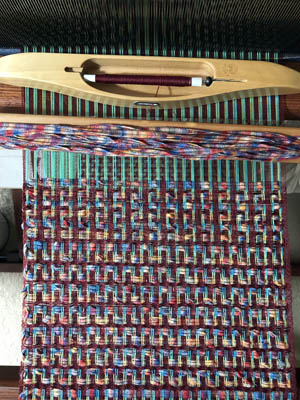
There’s something that tickles me about how the actual weaving of rag rugs is so fast. There is SO much preparation, and then BAM! a couple of hours more and the rug exists. (Mostly. There’s still hemming and washing, of course.)

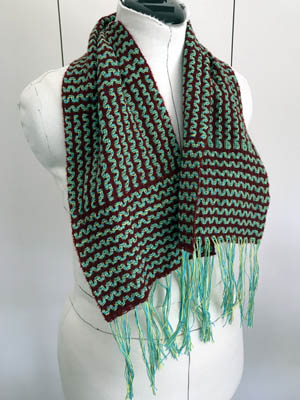
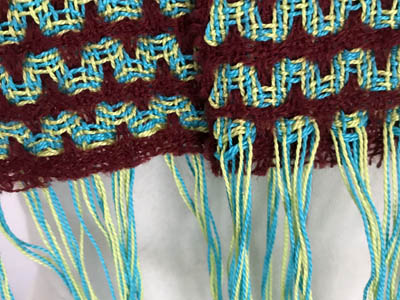
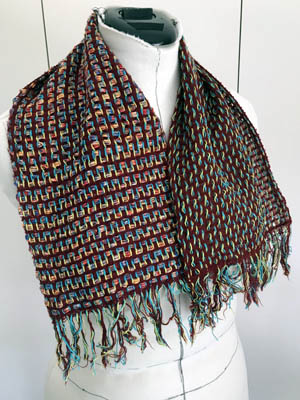
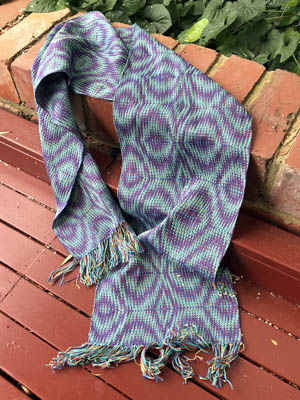
The Aqua Rug turned out shorter than I’d intended. When sewing together the rags I had an older batch of mixed rags already sewn together, a few misc strips, and two newer batches of unsewn strips in the same colourway. Instead of cutting the already sewn strips apart to mix in the new ones, I added only the misc pattern strips, then sewed the two similar colours together. My aim was to use two shuttles to weave alternate rows of old-mixed and new-similar batches.

This made for only slightly more complicated weaving. It also meant I ran out of the old batch before I got to last quarter of the new, and I wound up with a shorter rug than I’d planned. I’m wondering, now, if I should have woven two new-similar rows for every old-mixed one. Too late now. The unused strips went into the box of leftovers.

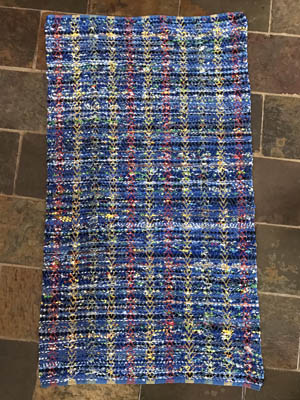
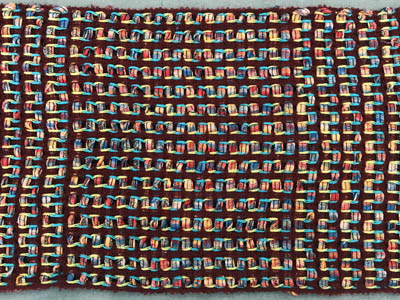
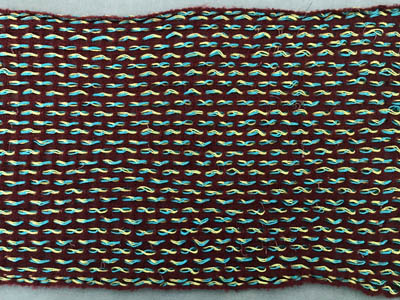
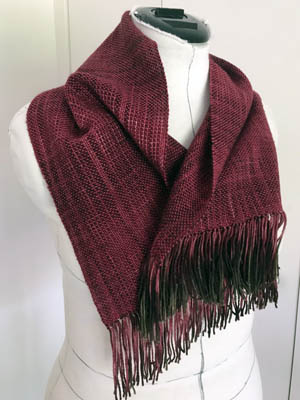
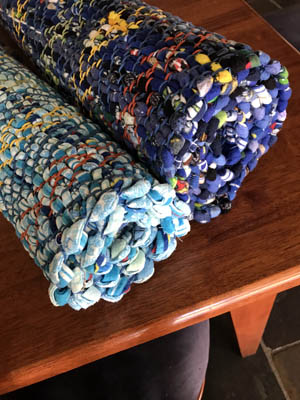
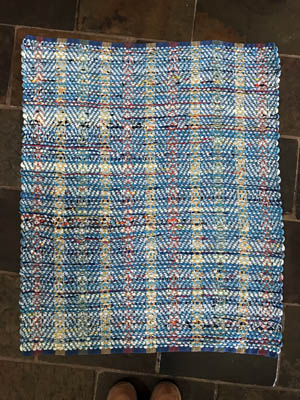
The Blue Rug was one big batch of evenly mixed pattern, so I could just wind it onto a single shuttle and weave to the very end. Despite this, it really felt like it took much longer. Partly because I was weaving in shorter sessions, and because it wasn’t much shorter than it should be!

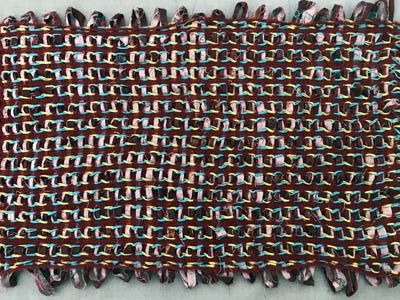
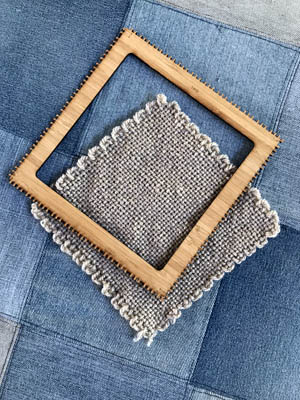
Since the Aqua Rug came out shorter than planned, I had a lot of warp left over. I decided to try weaving with t-shirt fabric strips. This came out much nicer than I expected and not needing to fuss with folding in the edges of the strips made it SO much faster. It was only slowed by having to stop and cut up more old garments. The down side is that no matter how you cut up t-shirts or leggings, you’re going to have corners or seams creating lumps. I don’t mind this, but it does make for a more bumpy rug and some people mightn’t like that.

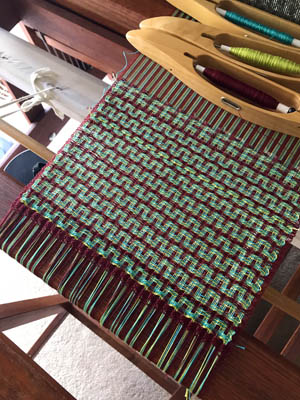
I got to thinking, as I wove, that it might be worth taking the time to sew the flannelette strips. Ironing them with a bias tape maker helps by folding in the edges, but I still have to fiddle a lot to get them to sit right when weaving. So I tried that on the next rug’s strips and found that it’s slower than I hoped and chews through a lot of thread.

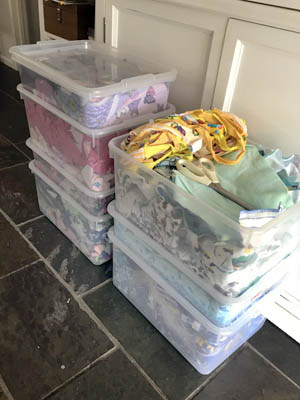
I’m at the point, now, where I don’t think I’d take more flannelette rags even if they were free. Though it was nice having a source material that was not ‘used’, the prep is too time-consuming and dark colours aren’t common (light colours not being so good for hiding dust and stains). If the fabric comes in larger pieces it is much faster to cut, and if the colour is near to or as dark on the back the edges don’t have to be folded in so long as it isn’t too prone to fraying.

There’s still enough flannelette for five or six rugs, however, so I’m not even going to be looking for fabric for some time!

From Play Pen to Weaving Tool

At the beginning of last week I looked at all the part-done projects and tasks hanging about and decided to get stuck into completing them. The list included the rag rugs, some gardening tasks, a few sewing jobs and carpentry projects. I thought I’d get it all done in a day… it took a week. But I did succeed in my aim!

The rag rugs will be in another post, and the gardening and sewing jobs were small and menial, so I’ll stick to the carpentry projects. The first one was another box thing to match the one I put my 4-shaft certificate course notes in, ready for when I do the 8-shaft one. It made sense to make it while I could recall what I did on the first one. However, I do wonder if I’ve now jinxed the course, and it won’t go ahead now!

The other project was to turn a giant warping board which was once two sides of a wooden kid’s pen into two normal sized warping boards. I’d picked up the broken play pen from hard rubbish aaaages ago. It once looked like this:

Only two panels survived. I was going to make a clothes drying rack or hang plants off it, but one day I looked at it and thought, “all I’d have to do is cut the dowels a handspan long and I’d have four sides of a warping board”. Of course, Paul did the cutting as he is master of the power saw, and he found some metal brackets to join the corners with and “Ta-Dah!” we had a warping board.

A really huge warping board. Maybe 120 cm square. Unfortunately, I didn’t take a photo of it. A pic of someone holding it could have been quite comical. I held off oiling it and left it out in the garage because there was nowhere to store it inside and I knew I was going to have to consider whether I really needed a giant warping board or should cut it down.

I decided on the latter and, after some measuring up, confirmed there was enough framework to make two normal sized boards. A bit of sanding, sawing, screwing and oiling later the reconstruction was done. However, what I had then was two warping boards with wobbly pegs. The dowels had shrunk since I’d bought the pen panels.

So I set to carefully painting watered down pva around and into the gaps. This wound up taking a couple of hours, broken up over days as the glue dried and shrank and needed to be topped up, but by the end those pegs weren’t moving anywhere.

Do I need two more warping boards? Nope. But the wood has been repurposed and the boards will eventually find homes.

Twill Be Rugs. Lots of Rugs.

For a few months now I’ve been cutting, matching, sewing together and ironing flannelette rag strips ready to weave more floor rugs. The flannelette scraps from the enormous bag of them I’d bought from the pj-maker last year has all been sorted and cut. The pieces of flannelette I’ve picked up since are mostly cut into strips too. I have to say, cutting big rectangles of fabric into strips is much faster and more accurate than cutting lots of scraps, and if I wasn’t doing this partly as an exercise in making something useful from what would otherwise go into the trash I’d stick to using old fabric.

I reckon I have enough batches of strips for seven or eight rugs, with possible eighth either being made up from the leftovers, or the first of a new batch using more fabric added to the leftovers. The first two rugs I’m going to weave are 1 x 2-2.3 metre wide aqua and blue rugs on the same warp, which will be a twill sequence of blue stripes interspersed with orange, yellow and green stripes. The colourway is bright and cheerful and reminds me of beach towels.

Halfway through measuring the warp I ran out of blue and had to order in more. While waiting for it to arrive I moved on to sewing the strips for the next two rugs: a pink rug and a light blue rug using the same grey warp.

My plan was to weave one pink rug of about 1m x 2.5m, and a smaller light blue rug which would require more fabric. But as I laid the pink strips out I considered the likely owner of the final rug. The most probable recipient would be a child, and it would be a pretty big rug for a child’s bedroom. So I decided to weave two pink rugs instead, at 80cm x 140cm. It turned out I had exactly half the weight of light blue rags to pink ones, so I’ll be making three rugs of the same size and don’t really need to find more fabric for the light blue one. It’s nice when things seem to fall into place like that!

The first batch of pink rags is going to be a graduation.

The second will be all mixed together, as will the light blue. The pattern will be rosepath, based on the project in Tom Knisely’s book. Fortunately, I had the presence of mind to order an extra cone of the grey warp along with the blue. Not only will I need more than I have left on the original cone to do the longer warp, but winding with two ends together will make the measuring much faster.

Once the blue warp arrived I finished winding that warp. It took two attempts to get it on the loom. On the first attempt I realised I had counted 22 threads for every blue stripe not at the edges, but was actually 24. So I had to add threads and weigh them at the back of the loom. Whether the weights were on or not, this made lashing on the warp at the front a pain in the posterior.

But it got it done and started weaving… and realised that the draft I had created didn’t, as I’d thought, let me weave plain weave for the hems. I tried weaving basketweave, but it just didn’t compact down as it ought to and would not make a good hem. So I went back to Fiberworks and came up with a draft that mostly fixed the problem. And since this meant I’d have to rethread the loom anyway, I wound the whole warp onto the front beam, tied on the extra threads so I wouldn’t have to hang and weigh them, and wound it back onto the back beam.

After that the threading went perfectly and I was finally able to get weaving.

However, by then my back was hitting a bad phase and I had to stay away from the loom for a few days, which was hard after all the preparation that’s gone before this. I just want to weave!

More Wiggle Scarves Wobbles

Deflected Doubleweave is slow going, due to moving the shuttles from the front to the back to avoid yarns looping around the outside. I’d aimed to weave a vertical or horizontal section every day but wasn’t managing it, so when I stopped to check the length of Wiggle Scarf the First I was surprised to find it was already 144 cm long. I was so surprised, I unwound the front beam so I could double check in case the tape measure had moved or something. Sure enough, it was already long enough for a scarf.

After weaving an edge band, I left a gap for fringe and started the second scarf. For this one I substituted cotton ribbon yarn for the green and blue 10/2 cotton. Weaving went much more quickly after that, as not only did I not have to wrangle two shuttles, but one pick of the ribbon replaced four picks of the cotton.

It was so addictive I had to make myself walk away from the loom lest I weave for hours and stir up my back problem. When I came back to it, however, I ran out of the ribbon yarn much sooner than I’d hoped. I still had 50cm or so of warp left, and the ribbon yarn section was too short to even make a cowl.

I made my own ribbon yarn by sewing some hand painted silk into a tube then running it through the overlocker in a spiral, which wove well but the colours were more intense and made the original ribbon look washed out. I tried weaving with 10/2 cotton in various colours but it didn’t have the same structural charm. To finish the scarf I really needed a fabric weft that wouldn’t distract from the beauty of the ribbon yarn.

I considered and tried a whole lot of other fabrics but none suited. Eventually I found some quilting cotton in a second hand shop that matched the burgundy colour of the wool warp and cut that into strips. It was paler on the back, so I wove a sections with one side up followed by the next with the other side prominent.

Then I took them off the loom and washed them.

Wiggle Scarf the First came up well.

However, it I wasn’t sure what to do with the ends. The wool ends fulled into dreadlocks, but I’d always intended to cut them off and only have cotton fringe. However, the first and last band of wool weft I’d woven didn’t quite felt as much as I’d hoped and I’m not sure if it’s going to hold. I ought to have made them much wider so I could make a hem.

Finishing the ends was probably covered in the workshop, but I don’t recall much. It was around the time my brain was messed up from the migraines sparked by my back issues. It might also have been during the start of the last lesson, which was a point where my attention was distracted.

Wiggle Scarf the Second was initially delightful. The ribbon section came out just as it had in the sampler, and is lovely.

I figure it must have shrunk at a similar rate to the wool, because the section with the cotton strips clearly didn’t, resulting in loops at either side of the fabric.

It was quite harsh to the touch, too. I considered cutting the section off and tossing it, but decided to see what happened if I removed the fabric strips.

It’s actually quite pleasing – a little bit lacy and has a lovely drape. To make it a cowl I would sew the ends together, but I have the same problem with having too little, not-quite-fused-enough fabric there. One of the weavers I follow on Insta makes cowls from short lengths of handwoven fabric joined with sections of cut up knitwear, so maybe I’ll do something like that.

If I can find the right colour and type of fabric, I might add ends to Wiggle Scarf the First, too.

Pin vs Notch

During the Pin Loom Weaving workshop, I had many different sizes and kinds of looms to demonstrate on, and that included the flat, laser-cut looms from Twill Textile Design. At one point I switched from demonstrating on a nail loom to one of the TTD looms, and I found myself remarking aloud how much easier it was to work without nails getting in the way. I was amused to see one of the students pick up her phone and immediately order one.

That got me thinking that I really ought to buy one of the larger ones, so when I got home I did, and it arrived a few weeks later.

It was double the size of the larger of the two looms I already had and the first square I wove confirmed that this translated to the smaller squares too. That gave me the idea to add bigger squares to the Wandering Squares Blanket. I laid out a few pieces and instantly knew this was going to look fabulous.

This project has been my go-to portable project for a few years now, and I’m in no hurry to finish it. There may be a benefit to it taking a long time too. When I put together examples of different ways of joining squares for the workshop I found that using a zig-zag on a sewing machine was actually very effective. I’m thinking of using that method for this blanket.

After all, I have over 100 of the smaller squares, so it would be a LOT of hand sewing to join them all.

Wiggle Scarf Wobbles

When I started this scarf, it was as if holes had developed in my memory of how to warp a loom. I realised I hadn’t warped a loom since the dishcloths back in early November/late December. Still, it’s not THAT long ago that I should forget so much!

First I was flummoxed that the cotton colours on the draft I’d made in Fiberworks were much paler than what was in my stash. Instead of using the brighter versions of those colours, I chose the darker ones. When I’d wound half the warp I realised the wiggles were going to be barely visible against the burgundy background. It needed contrast.

So for the first time I put a large bout of warp back on the warping board and laboriously unwound it. I changed the draft in Fiberworks to the colours from the sampler, and that gave me the idea of using green/blue/green/blue in both warp and weft instead of one colour in each. It would mix the colours more. I tried it in the program and liked the way it looked, and started winding. I was a quarter of they way along before I remembered that the reason I’d used one colour in the warp and another in the weft was to avoid using three shuttles.

Oh well. Three shuttles it would be.

Only after I had almost finished winding the second half of the warp did I realise that I’d measured a 3 metre warp instead of a 4 metre one. I’d read the number of ends as the length. What I had was too short to make two full length scarves.

Sigh.

I reminded myself of my approach for this year: ‘Be flexible.’

I wasn’t going to unwind everything again, so I figured I’d be making at least one full sized scarf and the rest could be a short scarf or a cowl. Which might be a good thing, actually. The second scarf was originally going to use the lovely silk ribbon yarn I’d tried in the class sampler, but when I went to buy more I found it had been discontinued. A cowl would be short enough that I can use the leftovers from the sampler. Maybe.

After I’ve woven one band each of the pattern – wiggles going across followed by wiggles going up and down, I looked at the back and realised that I had not, as I thought, worked out a way to get the back to look the same as the front. Back in Fiberworks I figured out it wasn’t possible, and I decided to settle on a small variation in the vertical wiggles on the back. Fortunately I was able to fix what I’d woven already by removing four rows of the burgundy.

Once that was done I resumed weaving, finished another horizontal section and a vertical one… then realised that my two sections of vertical wiggles started from different directions – one from the left, the next from the right. That had to become intentional, meaning I have to check what the last one was when I start the next and do the reverse.

I tell you what, this scarf is really making me work hard! I’m almost glad the second one will be shorter, so I’ll be done sooner.

Painted Roses Scarf

This one began as a three heddle rosepath project, but after most of a year in hiatus when I returned to weaving it I was totally over the novelty of wrangling three heddles. So I untied the warp, pushed off the little bit of weaving I’d done, and rethreaded with one heddle as plain weave.

The rosepath wasn’t the only effect I had intended for the scarf. The warp was a painted skein. I laboriously adjusted the warp length as I threaded the loom so that the colours aligned. So this has become the Painted Roses Scarf. The effect is subtle thanks to the weft being a similar red to that in the warp, but the weft also has a bit of glitz in it, adding a hint of shimmer to the final piece.

Matching the colours made for a shortish scarf, but some people prefer that.

Cutting up the flannelette scraps for use in rag rugs is done.

I’d estimated it might take a month. Instead it took about 12 hours, spread over two weeks. A lot more scraps had already been cut than I realised. I also weighed the strips and did the math to work out how long a rug each batch would make, and chose warp colours to match. Next I need to sew the strips together, then fold the edges in using and iron and a bias tape maker. From what I recall, the sewing is fast but the ironing is slow.

I had a mild feeling of de-ja-vu during the last four days of cutting, as I’d done the first big batch of cutting during the first lockdown in Melbourne. Thankfully both cutting and lockdown were much shorter this time.

The Owl & the Moustache

My first project using an Echo draft I designed is done:

I named the draft “The Twirly Moustache” after the design line but I’m going to call the scarf the Owl Scarf, because the resulting pattern looks like owl eyes and beaks to me.

There are a couple of other Echo ideas I’d like to explore, but I’ve decided to move on to the Deflected Doubleweave designs I created after the workshop so, hopefully, as much as possible of that stays in my memory.

In the meantime, I’ve started cutting up more flannelette.

The intention is to get it all turned into strips so they take up less room in the stash. It’ll be quicker and easier to mix, match, weigh and work out sizes, too. Since most of rag rug weaving time is prep, and the weaving is fast, it’s silly to wait until the loom is free before deciding to weave a rug, since that leaves the loom empty for weeks.

It’s around a year since I bought the huge bag of rags and I’ve only woven less than a quarter of it. I don’t really want it to take four to five years for me to use it all up, especially when there are other rugs, made both of rag strips and rug yarn, that I want to weave too. So I’ve set myself up in the kitchen with the electric bias binding cutter and aiming to do an hour of strip-making a day. If all goes well it’ll take under a month to get through it all.

Handwoven, Handmade

Early last year I wove fabric with the intention of making two tops in the same style as this top I made several years back and then embellished in 2016:

The first was woven from some fine blue yarn with white cotton slubs along it, that I got as part of a mill ends batch. I call it my Little Fluffy Clouds top.

The second was woven from some leftover and new Seta Soie Silk. I call it my Seta Soie top.

I’m resisting the urge to add darts on the front and back. For years my style has been fitted on the top and loose on the bottom, but I adopted it back when I didn’t have much of a bust and anything loose made me look flat-fronted. Now I certainly don’t have that problem. I’m more of an hourglass than a pear, and anything too fitted shows more than just the flattering bumps and creases. Loose on the top works with fitted on the bottom, or loose on the bottom so long as there’s a waist, or a suggestion of one.

Shadow Weave Vest

In May last year I finished this shadow weave jacket:

Ugh.

It was a fudged solution to a failed attempt at replicating a knitted jacket in woven cloth. I knew I wouldn’t wear it, and I didn’t, so wound up in the refashion pile.

A few months ago, when I was having the fabric/sewing clear out, I started playing with it again. I unpicked the seams and considered the fabric pieces I had, and after some playing on the dress model I mapped out a plan:

Did I make a calico? Nope!

And then didn’t have the courage to start sewing. But last week I bit the bullet, so to speak, and got stuck into the sewing.

It’ll need a closure of some kind if worn on it’s own. I’m thinking press studs.

The back was a ‘make it work’ moment, as I’d wrapped the top of the sides over the shoulder in the hopes of using less fabric for the back, and have enough left over for sleeves.

I do love how the shadow weave pattern looks here.

That wasn’t to be. I could have made 3/4 length sleeves, but I hate them, and short sleeves would look odd in fabric this thick. So I decided it would have to be a vest/top. The only seams I’m not 100% happy with are the armholes, which gape a little at the back of the right side, but otherwise I’m pretty chuffed with how it came out. And amazed at how secure the overlocked edges are.

I’m quite chuffed with how it turned out. I don’t need another vest, but the only alternative was to throw out some perfectly good handwoven fabric. At least this one is cotton, so I don’t need to wear anything underneath to prevent contact with my skin. Which might mean it’ll get more wear than my knitted vests.