Midway through fixing the rows of blocks for the blue quilt, I got bored. So I took the batch of purple strips, ironed them, removed those with selvedges, and sorted them into stacks of the same fabric and laid them out in an appealing colour sequence. I had near enough to twenty of most of the fabric designs. So I cut in half a few strips of the ones that were less than twenty, then got to sewing it all into one long strip.
With that done, measured, counted and did some math and worked out that if I cut the strips 120 cm long and sewed them together lengthwise I’d get a quilt top around 180 to 200 cm long. So I started doing that. 2-3 days sewing later and I had this:
Which I’m pretty happy with, and put in the pile of quilting to do when I get the Juki back.
Sewing the squares for this was so much fun – the most enjoyable technique I’ve used so far in this Summer of Quilts.
A friend decided to have a sewing day, so I wound up sewing squares every day for a week to get them done in time for it. I figured it would be a quick and easy task to sew the squares together, but it turned out taking the paper off the back is quite time-consuming, so I only got half of the top constructed.
The next day I was tired, and the next week was really busy, and then I was really, really tired. After a week I hadn’t touched the quilt except to remove the rest of the paper. Eventually I did get the top finished. I cut the backing and batting and made the sandwich.
But then the shop that I had ordered the rainbow topstitching thread from rang to say it wasn’t in stock so they’d have to order from the supplier, which meant it wouldn’t arrive for a few weeks. I put the quilt aside and returned to the Blue Quilt.
Well, three weeks later there was no sign of the thread, so I gave up on that and started looking at other ideas. In the interim, I had discovered that the quilt had relaxed and distorted, pulling in at some corners and protruding at others. I resewed the protruding ones to get them to sit flatter, but I don’t have room to let out the seams where the corners pull in. It looked like machine quilting would be very troublesome.
So I decided I would hand quilt it. Which I expect will be slow work, but maybe, hopefully meditative. But at least I don’t have to wait for the Juki to come back from the repairer do it.
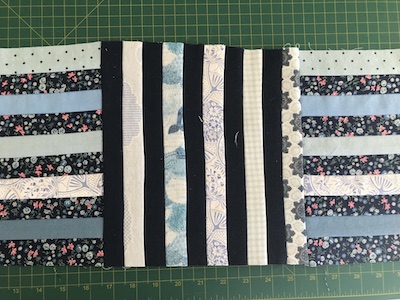
I didn’t get back to quilting for a week, and when I did I was all fired up to sew the rows together. However when I looked at them, I realised that in my determination to get the rows sewn, I’d made a big mistake.
My blocks looked wonky.
The middle block is square, but the righthand one is pulling it in and the lefthand one is stretching it out.
Some were 9 3/4 inches wide, but most were 9 1/4. I looked at the markings on my square ruler and realised that I’d been distracted by the big fat dominant red lines that marked the half inches, and put my marking tape at the 9 1/4 mark.
Ten stripes together measured 9 3/4 inches. I’d had to do a bit of stretching and pinching of seams to get the blocks to fit together, and this explained why. I went for a walk and considered what to do. I could remove two stripes and cut the blocks down, or I could sew every other seams of the stripes to narrow the strip width. Either way, I was going to have to unpick every row of blocks and rework them in some way.
I decided on the latter option. But I didn’t do all the blocks at once (at first). To make the task seem less like drudgery, I began a quilt-as-you-go method at the same time. (I had been intending to send the quilt to a quilting service, but when I read the tips and tricks on their website it said “Don’t use selvedges” and I groaned aloud. If I’d rejected all the flannelette strips that had selvedges I wouldn’t have had enough for the quilt!)
This meant making a sandwich and quilting the first row, then sewing on the second row and backing at the same time, then tucking batting between and pinning it all together before quilting the new section. Then sewing on the next row until the whole quilt was done.
For the quilting of the first row I did a simple 45 degree angle grid, not trying to be precise. It involved a lot of turning of the fabric sandwich, which I realised was going to get slower and more annoying as the quilt grew in size. So for the second row I did a simpler vertical zig zag, and was able to avoid turning the sandwich by using the backwards stitch on my machine. Having done two different patterns, I decided to see if I could do something different on each additional row. On the third I did wavy horizontal lines, using a walking foot.
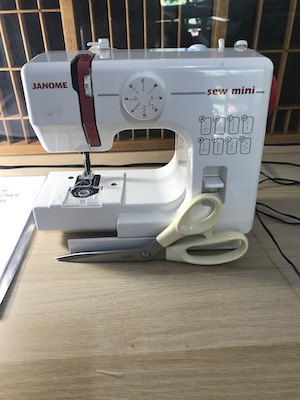
As I was fixing the blocks of the fourth row, my machine started breaking needles at random times. It seemed to happen whenever I changed the bobbin, but then it would happen when I hadn’t changed anything – one seam would work perfectly but when I started the next: BAM! Another needle broken. There seemed no option but to take it in for repair.
I’d given my old regular machine to the op shop, so the only back up I had was this:
Scissors for scale.
Which is very cute, very basic, very noisy, but for fixing the blocks it works just fine.
By the time I’d finished the Rainbow Cat Quilt top I had enough confidence to return to the Blue Quilt. With fresh eyes I could see that my approach to joining the blocks was overly complicated. I just needed to sew them into rows then sew the rows together.
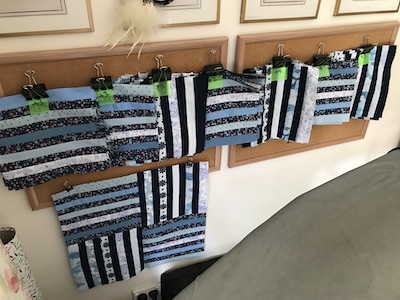
But part of the overwhelm had been not knowing if I had enough strips to make enough blocks. So I decided to work that out. The way I designed it, each row or column of navy or dark floral striped-based blocks has the same sequence of strips. I was going to have a different sequence for each row and column, but decided to keep it simple and have just six varieties. After counting the already completed blocks, I clipped them together in batches of the same stripe sequence and hung them on some pinboards, with a note of how many more needed to be made.
I didn’t have enough strips of some fabrics to do a queen-sized quilt of 10 x 9 blocks, or 9 x 8 blocks. It had to come down to an 8 x 7 block quilt. By then I’d watched videos on adding sashing, so I knew I could do that to make a queen sized quilt.
So every day or two I chose some of the batches and sewed up the remaining blocks needed for each. They seemed to sew up really fast. I had them done by the end of that week, just in time for an impromptu sewing day at my place.
At the start of that day, Paul set up two folding tables next to each other and I laid out the blocks in order. I found that some needed tweaking and I’d completely missed one row of flowery blocks, but with an afternoon of sewing ahead it wouldn’t be long before I was ready to start joining blocks into rows. The guests arrived. We set up. We chatted and made a start. I got the extra blocks made.
And then the power went off.
Fortunately, trimming the blocks kept me busy for the next few hours. When the power came back on, just after my guest left, I started joining blocks and the next day all were sewn into rows.
I didn’t get back to it until the following weekend, when I looked at the rows of blocks and realised they were really wonky. Looking closer, I realised that I’d cut them half an inch narrower than I was supposed to, thanks to the confusing markings on the square ruler I had.
I’ve only quilted a larger quilt once before, and it must have been quite a while ago because I’d forgotten what it was like. Which is like wrestling a big, fuzzy, floppy mattress. I had to put my sewing machine in the middle of the cutting table to have enough room to handle it. I’m certain my stitching would have been far neater if I hadn’t been constantly pulling, pushing and manipulating it.
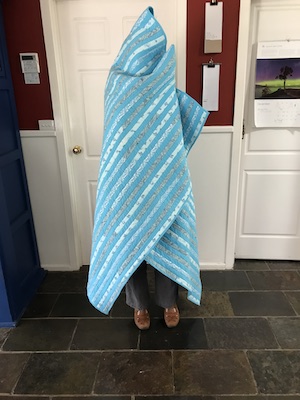
The plan was to use ‘serpentine’ stitch, which sews a wavy line, but when I selected the number for the wavy line shown in my machine’s manual I got a completely different stitch. The manual had no other info – just a chart – so I gave up and did the ‘stitch in the ditch’ method instead. Though this does make it look a bit like a puffer jacket (which I loathe) the bamboo batting makes it feel appealingly cushy rather than full of air.
Even though this is possibly the plainest quilting topstitch patten, it still ate up four and a half reels of thread. I had two in the right colour already, and I’d already bought more, but it turns out the number on the edge of the Gütermann thread reel is the same on all reels, and the actual colour number is the ends of the reels. So I made a fourth trip to Spotty in as many weeks only to find that every colour in that thread was in stock except the one I needed. I asked a staff member and they said the shelf had been restocked the previous day.
Fortunately, there was a thread in the same colour in another brand.
I wanted to bind it with the same fabric as the backing, but flannelette probably doesn’t make the most robust of fabrics. Unfortunately, the quilting cotton was nearly twice as expensive and the only colour that came close to matching was too dark. Then I remembered a friend’s method of finishing: just turn over the edge of the backing to the front. This wouldn’t be any less robust than making bias binding out of the backing, and it’s much faster. So that’s what I did.
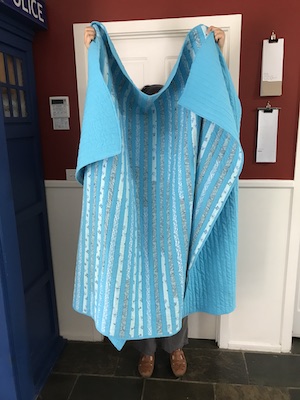
I like it. The colour lifts my mood.
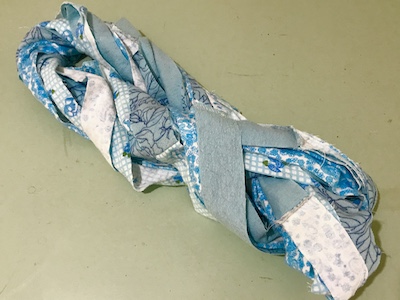
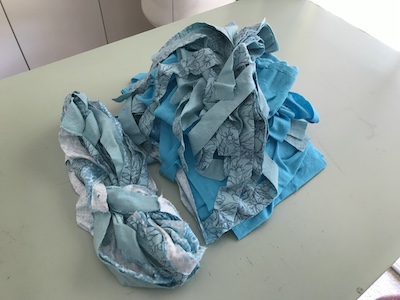
However, when I looked at the leftover fabric a hard truth settled over me: I did not succeed in reducing my stash. I started with three of these bundles:
And now I have probably more mass of fabric left:
I did add Mum’s pyjamas to the initial bundles, but that just means I’ve ended up with as much unused fabric as I started with.
At least one piece isn’t cut into strips – the piece I was going to make bias binding out of. The options for using that are much broader.
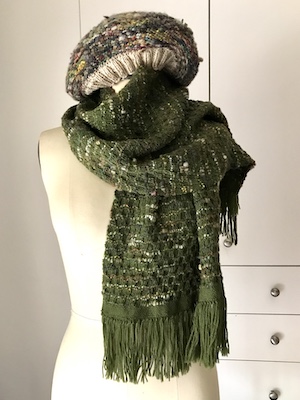
A little white ago a friend asked on FB if anyone wanted a ball of slubby, multicoloured yarn formerly a scarf that had unravelled. I put my hand up for it and offered to weave it into a new scarf. She accepted.
We had a couple of quick consultations, in which I showed her some examples of weaving using slubby yarn, she picked honeycomb weave with a green background as her favourite. I did a lot of math and worked out that I didn’t have enough of the green to make a shawl, but plenty for a wide scarf.
Weaving honeycomb was rather pleasant, and similar to the deflected doubleweave I’ve been weaving in that it pairs smooth wool with a textured yarn, and is fast and engaging to weave.
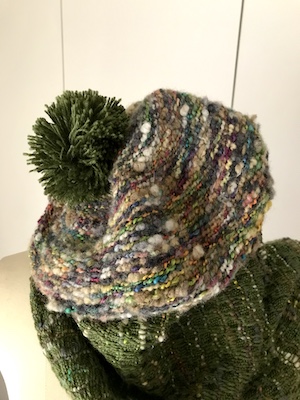
My calculations were way out, though, since I still had plenty of both the slubby and background yarns left when the scarf was done. I considered making another scarf. Then memories of this friend wearing a beret/tam had me digging out a device I made years ago for weaving tams, and I got to work. The body was woven from the old scarf yarn, then fulled a little. The brim was knit separately out of a natural coloured 8ply yarn then sewn on.
The pom pom was made from the thrums, making this a very frugal project. I still have a ball of the slubby yarn left, but I’m going to offer it to my friend to save in case of moth damage.
When I embarked on the band knitting, I looked up beret patterns to see how many stitches were cast on and realised that berets seem to be in fashion again. It has me eyeing the yarn stash.
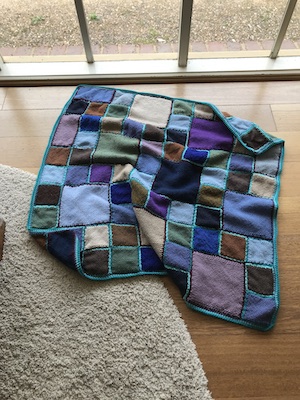
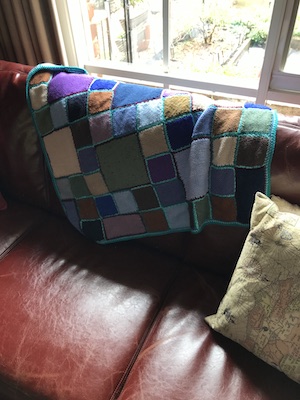
This project has taken me over half a decade. It started as a small weaving thing to do while travelling then, when I had accumulated enough squares to start thinking about what to make out of them, something bigger. Eventually I hit on the idea of a double-thickness blanket of stuffed squares. Since then, however, I decided not to stuff them because the weave isn’t dense enough for the filler not to show through.
After I did the pin loom workshop a few years ago I bought the double size square loom to get a little variety into the blanket and speed up the process, though it didn’t really speed up the process much. It didn’t help that, no matter what size square I wove, if I worked on it too much my back would complain. So progress was made in small bouts of enthusiasm and abandonment.
Early this year I decided it was time to finish it off. Using safety pins, I connected the squares together in an appealing sequence and used a board to carry it all from room to room when I needed the kitchen table for something else. Slowly I wove the remaining squares. Gradually I crocheted around the edges. Doggedly I sewed it all together, then crocheted a border. When I think about the hours I must have spent on it, I’m sure it has to have taken hundreds. I wonder if it was all worth it. If the journey is more important than the destination, then yes, it being an epic trek that I was totally over by the time it was done definitely overshadows the relief of having it done.
Not all wanderers are lost? Yeah, I’d totally lost all will to live by the end of this one. But I survived.
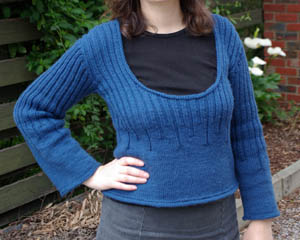
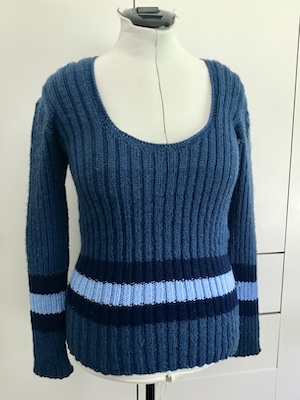
Well, time changes things and not the least body shape. In this case, the length of the jumper just didn’t look or feel right any more. Too short – causing the hemline to sit right at the widest part of my belly. I was tempted to send it off to an op shop, but decided instead to see if my hands could cope with a bit of knitting again. Seems they can, but my neck complains louder so I listened to it and stuck to doing a few rows at a time, knowing I would eventually get it finished.
I didn’t have any more of the yarn, which is discontinued, and the only people on Ravelry who were selling it had colours that wouldn’t suit. Instead, I opted for adding stripes of navy and light blue yarns in my stash. I didn’t have enough of the navy, and Spotlight had sold out of it, but a friend came to the rescue with a spare ball.
The new yarns were slightly thicker, but any change of tension this created would be better hidden with ribbing than plain knitting, so I frogged back to where the ribs started changing to plain knit and started adding ribbed stripes from there.
A few months later I had this:
A ‘new’ jumper. And an itch to knit that I am trying hard to ignore.
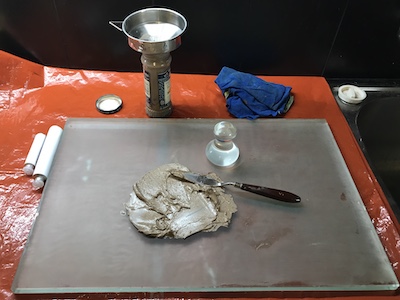
For years now I’ve been ‘recycling’ solvent by letting what I’ve used to clean brushes sit for a while until the pigment settles, then pour off and reuse the clean part at the top. Every few years I’d toss the sludge at the bottom. But it turns out that you can make paint out of it. The colour you get is a muddy mix of every hue you’ve used since saving it, but that doesn’t mean it isn’t useful. Or even beautiful.
I don’t recall exactly where I heard of this, but as soon as I did I knew I had to try it. Some tutorials I’ve seen suggest storing the paint in a jar, but then you have to put cling wrap on the surface to prevent it forming a skin, so I much preferred the option of scooping it onto an empty paint tube.
Once I’d hunted down those, I scooped out the sludge from my settling jar, spread it over my mulling slab and picked out lumps and bits of paint bristle. It was much too sloppy a mix, as it would end up quite liquid once I’d added linseed oil. I contemplated leaving it there for a few days for the solvent to evaporate, but since I was doing this indoors (with an exhaust fan going), I didn’t want to leave fumey, wet paint exposed for long. So I scooped it up into a coffee filter, folded the edges in and left it overnight. The next day I was chuffed to find it had worked. The sludge was now a typical oil paint consistency.
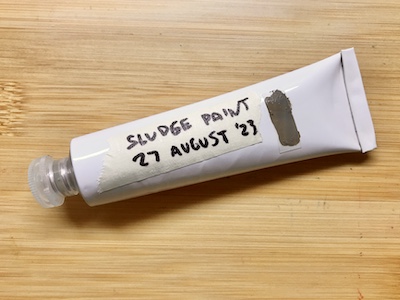
I spread it on the slab again and added a bit too much linseed oil because it came out of the bottle too fast. Next time I’ll use a spoon or dropper. I mulled it for a while, then scooped that into an empty paint tube and folded over the end. There was exactly enough to fill the tube.
The colour is a paleish browny green. I’m planning to use it for sketching in at the start of paintings. It’s not so muddy a colour that I can’t imagine it being useful apart from it being a bit runny.
It also gave me another idea – to premix shades I mix up a lot, like the alizarin-viridian combination that makes a great black, which I use in almost every painting. I have some smaller tubes I can use for that. It’ll save time when setting up to paint plein air.
Looking over all the Daily Art pieces and considering what was worth framing had me thinking about what sort of art might sell. Recently, I refreshed the items I had for sale in the Guild shop and that got me thinking along similar lines.
Of the six items I put in the shop six months ago, two sold: a pink flannelette rag rug and a grey and white shadow weave cotton scarf made from the extra yarn in a kit. The four items that didn’t sell included a black t-shirt fabric rag rug with a multicolour twill warp and three cotton twill scarves. I couldn’t help but note that all the scarves had been stashbuster projects and wonder if my intention in making them was weighted too much toward using up the yarn than making something saleable. Perhaps I would have been better off culling those yarns.
I also noted that those four items weren’t my best pieces in the “to sell or gift” chest. When I considered which items to put in the shop this time, I put the nicest ones back in case I needed them as gifts. That is silly. It’s not like I give handwovens very often. So I’ve decided I will take the best pieces for the shop in six months. I only waste my time and fail to make space for new creations if I sell nothing because I didn’t put the good stuff in!
However, I do stand by my decision to keep the nicest flannelette rag rugs. They took a ridiculously long time to weave and in these tough times I doubt anyone would be willing to pay even a quarter of what they’re worth. Eventually mine will wear out and I’ll have something to replace them with.