The other neglected project, Summer Solstice, didn’t sit unloved all because of the Passap either. There were issues with the pattern to be sorted out, but also issues with the machine.
Compared to the Passap, the Bond Ultimate Sweater Machine is limited, rickety and suddenly I’m very conscious that it’s made of plastic. But it is a brilliant entry-level knitting machine and if I hadn’t learned on it I’d have had a much more frustrating time getting used to the Passap. One of the big selling points for me was how light it was. Unfortunately, I’ve just sacrificed that in order to get past some of the Bond’s problems.
The main one was getting the machine to stay put. If you knit a garment sized piece the weight of it will pull the machine over the edge of the table. You’re supposed to clamp the machine on but I could never find a table with an edge deep enough for the clamps, and when I put the machine onto a sheet of wood to get over that problem I found the clamps still didn’t work. They don’t go in straight because the support rod inside is in the way. If you to slide them under the rod they twist as you tightened them, pulling the front of the machine down.
I abandoned the clamps years ago and have been keeping the machine in place by using the non-slip mat and putting soft weights (the kind you strap around your wrists) on the ends. But if I was knitting something wide I’d have to pick up and put down the weights as I slid the carriage across. You already need two hands to slide the carriage and hold the yarn. The bed of needles is made up of little segments, and the carriage can catch on the joins unless it’s held ‘just so’. With the weights to worry about as well, it was all getting too tiresome.
I decided I’d had enough the other day. The only solution I could see was to attach the machine to a length of wood, then clamp the wood to the table. I explained the problem to Paul and we discussed various fixes. Whatever we did shouldn’t alter the machine any more than necessary, in case I decided to sell it one day.
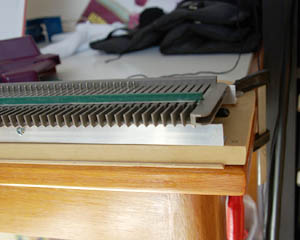
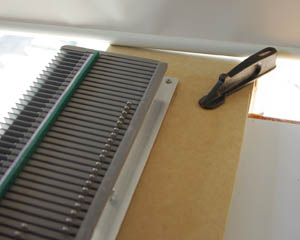
After a trip to Bunnings and some digging through leftover materials at home, we had ‘fixed’ the machine. The only alteration to the machine was an extra four holes drilled in the base so we could bolt on two aluminium ‘L’ shaped strips, which were then screwed onto a scrap of particle board (from the kitchen renovation).
Fortunately, the machine has an extension kit added so it’s almost the same width as the table and I can clamp the mdf at each side. If your machine was shorter than your table you could make the board a little wider at the ends and clamp it from the front. The only down side to ‘fixing’ the machine in this way is it now weighs a LOT more and can’t be disassembled easily. Storing it is going to be interesting, and it certainly isn’t portable any more.
I’ve also replaced the sponge strip under the green rail that holds the needles down. I was surprised to find the old one had deteriorated so much, when I hadn’t used the machine all that much. There happened to be some similar foam in one of my boxes of saved packaging, but I’m already finding chunks of that are coming out. I’ve heard you can replace it with a strip of suitably thick and fuzzy yarn instead, so I’ll try that next.
You can order replacement foam strips from the Bond website, but I can’t see the point when it clearly doesn’t last. I have ordered some extra accessories from the site, but have had some problems there. I ordered them back in January, but was unlucky to have done it just when they were switching from one online ordering system to another, and my order went AWOL. In the meantime, while looking for short term alternatives, I found some really good tips that meant I didn’t need some of the accessories so it was a good thing I got to do a new order. I’ll cover those in another post.


