
A laundry renovation was in our future from the moment we bought this house. The old one contained a wall of cabinets on one side, and just a rusty old sink, water outlets for the machine and a shirt airing rail on the other.
For storage we made do with second hand wire shelving and the cabinet we had to remove from the kitchen because our fridge was 5cm too tall. I asked the kitchen and bathroom company that did our ensuite if they did laundries, and they said no – and suggested we’d use cheaper DIY cabinets than their expensive high-end ones. I asked the plumber if he’d do it, and he said “put in DIY cabinets and then call me for the plumbing”.
In the last couple of years I had played around in Illustrator making plans and elevations so we could discuss the layout. We wanted a decent length of bench space so I can do wet crafts like papermaking and dyeing, and Paul could lay out photo processing chemicals when he used the laundry as a dark room. So this was to be a laundry used for more than washing clothes and storing cat food.
A couple of months ago we decided it was time. We had a layout we liked, and found a brand of flat-pack cabinets from Bunnings that would fit the space. The cabinets were easy enough to construct – similar to IKEA ones. Getting the heavy wall cabinets up onto the wall was a challenge, but we came up with a way that didn’t strain our backs. The plumber came over to sort out the pipes, install the benchtop and glue on the cement sheet for the tiling. I painted the wall, Paul added kickboards and I did the tiling and caulking.
And it was done:
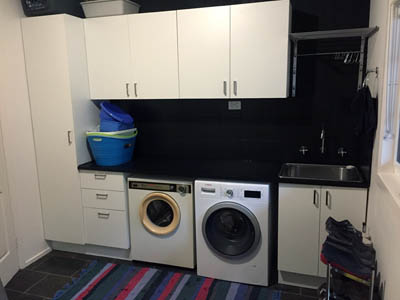
I’m pretty chuffed that we managed to do most of it ourselves. The tiling was the most challenging, but only because space I was tiling was about 5mm off the tile size, and it’s really hard to cut a strip that small from a tile.
I’ve done some dyeing in there since. Paul has tackled most of the tasks he needs to do to use the laundry as a darkroom. He’s removed a set of wall cabinets on the other side, which meant I had to patch the plaster and help him repaint the area. He just needs to find a neat way to cover the window when he needs to and block the light leakage around the doors.
Wow, it looks fantastic and even more so considering that it is DIY. Our laundry is outside because our house is from 1930. It is not so bad as there have been some overflow incidents.
Thanks – I can see advantages to an outside laundry, especially when it comes to carting dye water out to dispose of in the garden… though it’d be a bit cold at this time of year.
Looks great! Weather stripping around the door and a nice heavy shade on the window for light control?
Yeah, weather stripping seems to be the best door solution, but the windows are doing to need a removable panel of some kind.