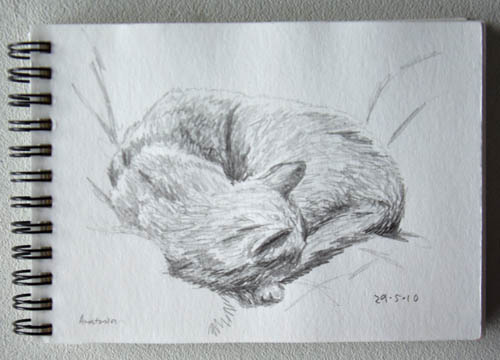
We went to a Eurovision party on Saturday night. The hosts have russian blue cats, which are a wonderfully graceful breed. I took the opportunity to sketch Anastasia sleeping.


We went to a Eurovision party on Saturday night. The hosts have russian blue cats, which are a wonderfully graceful breed. I took the opportunity to sketch Anastasia sleeping.
I’m still roaming around the internet, finding blogs to follow. A few days ago I saw this post, and followed the link to the makers of the ponchard box the artist was using. I really wanted one of those cute little boxes, which are quite reasonably priced, but then postage from the UK would probably cost more than the box, especially if I wanted it to arrive earlier than three months from now (sea mail). It just happened that I had a box about that size already that I’d picked up second hand, and I was sure I could convert it using bits and pieces around the house.
Here’s the box:
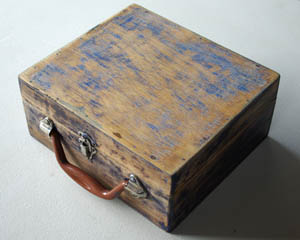
Actually, it was painted a bright blue, well chipped and scraped, which was appealing in a shabby chic kind of way, except that the clasps, latch and handle had been painted, too, and that just made it look shabby. A bit of citrus paint stripper and furniture wax later and it still looks rustic, but better! Here’s the inside:

(I’d have taken ‘before’ shots, except I did most of the work at night when the light was bad, or outside where I didn’t want to stop and get the camera.)
The ponchard box lid opens at one end for access to the canvasses or boards, and grooves hold canvasses apart to protect freshly painted ones. I considered several alternatives to this, since I didn’t want to cut up the box, and wanted to keep to materials around the house and find a solution that was as simple as possible. Eventually I decided it would be better to have a spacing device that attached to the canvas or board instead of the box, to allow for different thicknesses of surface. That way I could fit four boards, three board style canvasses, or one stretched canvas in the lid. Lengths of rubber tubing split down the length was the solution:
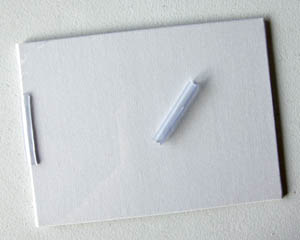
And a bit of foam down the side of the lid to prevent them falling out when I close the box (see pic above the last one).
Instead of a slide-out palette, I just added six eyelet screws to support a particle board shelf. And I don’t intend to use that as a palette. You can get ‘disposable palettes’ at art stores which are just pads of paper cut into a palette shape. That’s always seemed a bit wasteful, but I took the idea and used a magazine cut in half instead, which fits perfectly. The art teacher I used to take lessons with always advocated not using a white palette. (The glare of the white dazzles you and reduces your colour perception.)
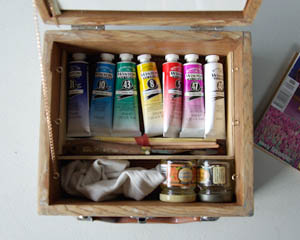
To close everything up, I just slide the palette and particle board shelf in under the eyelets to prevent them touching the exposed canvas or board, unhook the chain holding the lid up (so it doesn’t swing over onto the fresh paint) and close the lid.
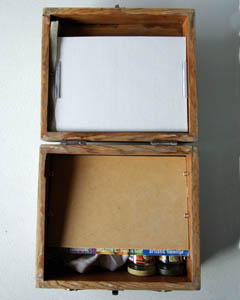
The canvasses shown were bought from Riot. They had some close to the size of the lid. I’m also getting Paul to cut up a piece of gessoed masonite I had lying around from my illustration days into boards the right size. The lid is just over A5 in width and larger in height, so even a sketchbook would fit nicely.
I’m really happy with how this turned out. I’d like to add a shoulder strap, and I have some old belts I can recycle for it, but haven’t yet found any way to attach it that I’m satisfied will do the job securely.
In the meantime… I really have to find time to get outdoors and paint!
Here’s how the second bamboo scarf came out:

The two knots in the ball I’d reserved for the weft happened to be close-ish to either end, so I just put beads on the ends of the scarf. I figured they might be annoying to the wearer if they were on the neck part.
I actually knitted and frogged an entire scarf recently, but didn’t get pics before I frogged it. It was another mobius scarf, this time knitted to the pattern so it formed ridges. I liked it. But I knit it out of Handmaiden Sea Silk, and when washed it kind of stretched and expanded, so the cast off edge was suddenly way too tight and it hung all hammocky and wrong.
When I was putting the frogged yarn back in the stash, I noticed the two balls of possum yarn in black, that I’d made Le Slouch out of. Now, I wore that hat more than any other last winter. It’s mainly moss stitch. Like the Mossy Mobius Scarf…
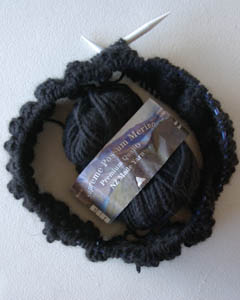
Clearly knitting an entire scarf and frogging it hasn’t put me off the pattern. There is something very satisfying about knitting a scarf in the round.
I’ve started the last pair of Socks For Others Club socks:
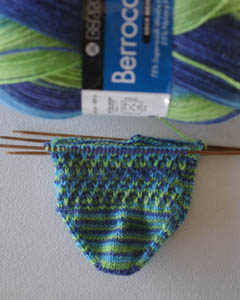
There’s a slip stitch sock pattern out there that I was thinking of trying, but when I started these the cat was on my lap and I couldn’t be bothered tramping upstairs to the computer in the cold workroom. So I’m making this up as I go, using my own basic sock pattern. Slipping every third stitch on every third row, shifting across one stitch each time. Easy peasy. But it does mean the top of the sock is turning out a little shorter than the bottom. Not sure if that’s going to be a problem yet.
Another of my Projects for 2010 is done:
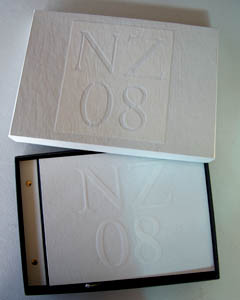
My plan was this: set out the photos from our holiday in New Zealand onto large sheets of photo paper, get them printed, then compile them in a side bound book. That was back in 2008.
The first hitch was choosing the photos and figuring out how to arrange them on the page. So many of our pics wanted to be on pages on their own. Eventually I changed the format to suit that: with several single page pics and then a few pages containing several snapshot style pics at the end.
The bookbinding books I bought or was given gave me ideas for the cover. My favourite was one where you cut out shapes and glue them onto the cover before applying bookcloth, creating a kind of embossed effect. I tried this and it worked really well.
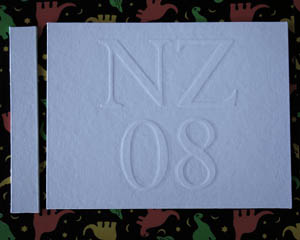
Except that I forgot that I was supposed to cover both the ‘hinge’ bit of the cover and the main piece together, and covered them separately.
I considered some creative ways of connecting the two pieces, but the front piece had also warped as it dried so I decided to start again. This meant going back into the city to buy more book cloth. The guy at the store suggested I get two pieces of thinner card and glue them together at 90 degrees to each other, to prevent the warping. So I did this, then patiently cut out the letters for the cover again and remembering to include the hinge bit as I covered the front in book cloth…

Except that I put the hinge on the wrong side.
At this point I was fed up with the whole thing. I decided I couldn’t face cutting the letters out again, and cut up the card for the back cover in order to make a third, plain front cover. This worked perfectly…
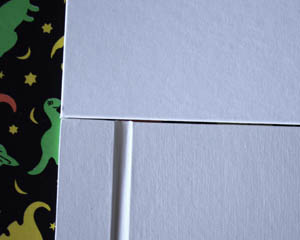
Except that the second batch of book cloth turned out to be a slightly different colour and a courser texture to the first, and it was only obvious when you put them next to each other, which is what happens when you put the original back cover with the new front cover.
At this point I was really fed up with this project. I didn’t want to make another trip to the city to buy more bookcloth – and I couldn’t order more by mail because I had to be sure I got the matching cloth. So I returned to my original two pieces of cover. A bit of bending by hand had reduced the warp in the front cover, so I just needed to join it to the hinge piece. First I tried sticking a piece of tracing paper onto the backs with double-sided tape, but the front kept falling off when I opened the cover. So I turned to that solution of last resort: fabric tape. In black. A wide piece down the back, and a thin strip to fill the gap on the front:
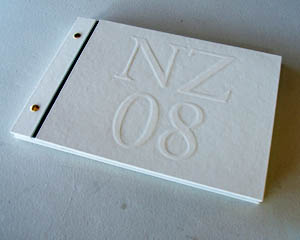
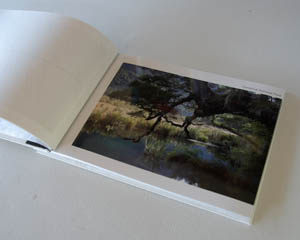
A bit of drilling later, some post screws to hold it all together, and the book was done. But then I remembered something else: I’d always intended to keep it in a box, with the usual brochures and guides you pick up on holidays stored at the bottom. I already had a box. In fact, I had designed the album to fit in the box. But did I have enough book cloth? Er. No.
But then I had a flash of inspiration.

Since the fabric tape had added a bit of black, why not cover the bottom section of the box with it? And (sneakily) the underside of the top?
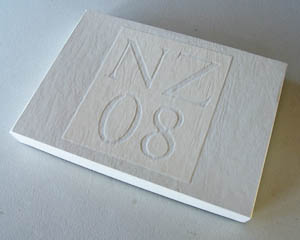
I also used the pieces of card left from cutting out the cover type to create the reversed embossed effect on the box. However, the second batch of book cloth was much more temperamental than the first. It expands when moistened with glue, so I got a rippled effect that didn’t completely diminish with drying.
But despite all this, when Paul saw the album, he said ‘you know, this is really good!’, and he isn’t one to, unprompted, come out with such praise. So, though I can see the flaws, I’m pretty satisfied with how it turned out in the end.
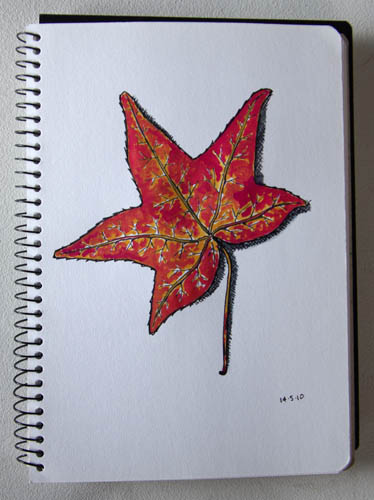
Of the sketchbook art that I’ve seen, the colour work gets me wondering the most. The sketch I did at Hanging Rock took 35 minutes. If I’d used colour it would have taken twice as long. How on earth do artists whip up colour sketches – particularly those of people or animals – while out and about? And how do they stop the paint making the ink bleed? Do they sketch in pencil first, then colour, then ink on top? If so, do they have to do the inking by memory, because surely the subject would have moved in the meantime?
The leaf above was very obliging, not moving while I worked on it, and consenting to a second sitting in which I added colour to the ink sketch. The sketch was an experiment to see if painting gouache on top of ink would cause as much bleeding of the ink as watercolours do. Some bleeding occurred, but then I was mostly painting around the lines rather than over them. Where I painted over the cross-hatched shadow it turned the paint colour grey, but the line work is still fairly solid.
It would still probably be better to paint colour on top of pencil, then add the ink later. But that requires time and planning, which isn’t always available when sketching. Still, I’ll keep gouache in mind for times when I do have that luxury.
Another Socks For Other Sock Club pair done!
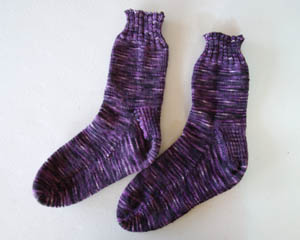
Pattern: my own toe-up heel flap pattern
Yarn: Fannie’s Fingering Weight
I am so impressed with this yarn. It’s lovely to knit, neither too thick or thin, splitty or ropey. The colours didn’t line up and flash or zig zag. If it washes and wears well, it could become my favourite sock yarn of all time.
Only one sock club recipient to go. Then I think it’s time the menfolk in my life got a pair.
It’s been nine months since we arrived home from Canada. I’m noting this because it was about then that I noticed I wasn’t as obsessed with knitting and was looking for new inspiration and creative outlets. It led to me starting this blog – a fresh start and a place to record my explorations of new crafts and interests.
As time has passed the types of blogs I’ve been reading have changed to reflect that exploration. So I thought I’d stop and write about this, because when the list in the sidebar changes, a copy of the old arrangement doesn’t remain on old blog entries. Not that I want to record this in detail. Just to note the general trends.
When I started out, most of the blogs in the sidebar were knitting and weaving blogs that didn’t come up under the ‘friends’ list in Ravelry. (I still read knitting blogs in Ravelry, because it’s a more efficient system.) A lot of those bloggers weren’t posting much since Rav came along, so I removed them from the list. It also turned out that many of the weavers who blog tend to do complicated work that takes a long time, so their posts were either too technical or a long time in coming, or both. I’d decided I didn’t want to do complex weaving yet, so I culled some of those, too.
Then I added the blogs of two friends: Konstant Kaos and Pivotal Xpressions. Exploring the blogs that they listed introduced me to a whole new world of craft. The kind that involved simple, sweet little creations you could whip up in an afternoon. That really appealed. I reckon knitting caught my interest partly because my job involves working hard for a year or so before the satisfaction of finishing, and knitting gets me that satisfaction a lot quicker. Now perhaps the appeal of these quick crafts was I could get a hit of finishing satisfaction even faster.
So a lot of crafty blogs and a couple of magazines got added. But then something strange and annoying kept happening. It seemed every time I found a vibrant, often-updated blog, within a few weeks the blogger decided they’d had enough and stopped blogging.
However, I found I really liked blogs and sites about recycling and reusing stuff. Especially the sort of stuff I’ve had hanging around for years: paper and art materials. And that led me to bookbinding. Okay, I’d already had a go at this, but badly and in a simple form. I started buying books on bookbinding. I did a class. I started adding bookbinders’ blogs to my sidebar. Some of these bookbinders produce art, or art books…
At the same time as all this, I’ve slowly been gravitating back to art. I’ve been struggling with this for a few years now. Usually I get inspired to do a certain kind of art, and it occupies me for a couple of years until something else catches my interest. But for a couple of reasons I stopped painting a few years back, and since then nothing has caught my interest. All I know is I don’t want to do the sort of art I used to do.
Then I found the An Illustrated Life podcast and book, and decided that sketching would be a way to incorporate a little art into my life. This is now complimented by the bookbinding – I can make my own sketchbooks! So recently I went looking for artist blogs, particularly those who keep sketchbooks, and found plenty to inspire me. (I’m just waiting for half of them to decide they’ve had enough and stop blogging.)
So that’s where my blog explorations have taken me over the last nine months. I now read blogs about knitting, weaving, tapestry weaving, painting, dyeing, jewellery making, paper craft, sewing, home decorating, design, recycling, bookbinding, photography and sketching. It certainly makes for interesting and inspiring reading!
There has been sewing. Of paper.
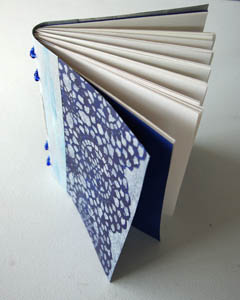
First the Podcast Journal. I sewed it three times before I was happy with the arrangement of the beads. That’s fine. This was meant to be a book I could experiment on. The materials were cheap or leftovers. In fact, only part that was recently bought was the blue paper at the front and back of the signatures. Even the beads are repurposed from a necklace bought at an op shop.
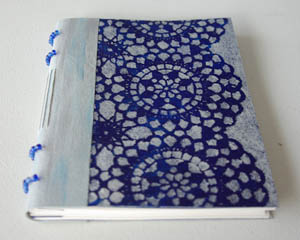
The binding is longstitch. I’m liking this method a lot. There’s a lot of creative potential.
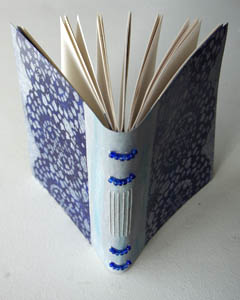
The canvas painted with acrylic that I used for the spine works quite well, though I suspect the paint may crack as it ages. It makes the canvas a little stiff, as was shown in the podcast, but because I let it dry folded in a curve close to what I expected it would have when finished, it sits neatly closed and doesn’t need securing with ribbon or elastic.
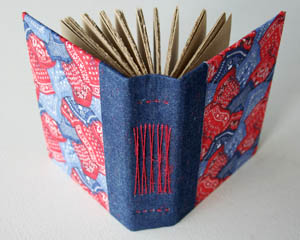
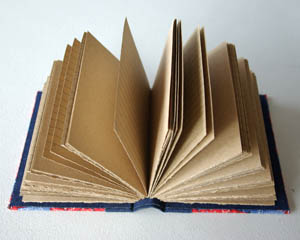
The Denim Notebook also uses longstitch. This time I tried crossing the outer stitches, which involved working with two signatures at a time. It was easier than it sounds. I only needed to stitch the book once.
The paper is lined on one side, which means there are blank and lined pages throughout the book.
I used coloured hemp from a bookbinding supply shop for the thread, and I didn’t like it. The hemp slowly shredded as I pulled it through the paper and cover and, just over halfway, it had got so thin I was able to snap it with a light tug. I tied on more to finish the book but, as you can see, it got furrier and furrier as I worked along the spine. Though the book doesn’t look or feel as if it might fall apart, I won’t be using hemp again.
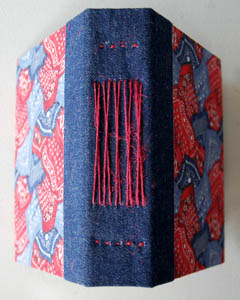
I’m happy with how both of these books came out. I’ve learned quite a bit from both of them. It’s interesting how they are quite different tactile experiences. The Podcast Journal is smooth and cool, and the size of it give it the personality of a rather spiffy exercise book. The Denim Notebook is soft and warm, due to the cloth cover and the torn recycled paper, and has the character of a casual, personal diary.
I think my handbound books are starting to evolve identities of their own!
… of getting some gardening chores done:
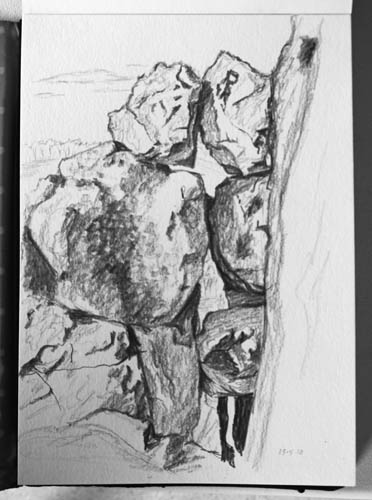
Yesterday I finally got out and sketched ‘en plein air’. I used the art set created and given to me as a birthday present last year by Margaret of Konstant Kaos. We went to Hanging Rock where we had a picnic (of course), walked up to the summit taking photos, then I settled down with Paul to sketch while the rest of our group headed for the playground with their kids.
It was a beautiful day, and I left with a feeling of contentment and satisfaction that I think I would have had even if I’d been unhappy with the sketch. Just getting out and giving it a go was achievement enough.